Learn to make large flowers out of paper. Large flowers made of corrugated paper: impressive decor for interiors and photo zones
Do you want to give a gift to your loved ones or decorate your home with unusual crafts? Most the best option– flowers made by . Today we will tell you how to make your own paper flowers. Remember that a gift made with your own hands will be doubly pleasant.
We can make huge ones out of paper, and they will never deteriorate, unlike living plants. Today, banquet halls, tables at holidays and just any premises are decorated with such flowers, and this despite the fact that they are very easy to make.
We make beautiful roses from paper
Both adults and children can do crafts - there are no restrictions. So, we’ll tell you how to make a paper rose for a gift.

You will need some items and materials, namely:
- high density paper,
- pencil,
- scissors,
- glue.
Draw a spiral line on thick paper. Cut out the spiral. For this, both regular scissors and those with a spiral are used. We try to wrap the ends of the cut spiral in the opposite direction. And if the paper tears a little, it’s okay.

This way the flower will be more similar to the real one. We twist the spiral into a rose. Do not constantly twist the spiral with the same tension force. Finally you need to loosen it. Once the spiral is completed in twisting, the end needs to be glued.


A stem is glued to the base or you can make a lot of paper roses and place them in a frame, it will work!
DIY paper flower bouquet for a gift
In order to make a bouquet, you must have:
- nippers and scissors,
- paper,
- wire,
- vase.
A stem is made from wire. Apply PVA to the wire. Prepare for buds colored paper. A sheet of paper is folded twelve times and then the petals are cut out. Once the petals are ready, you can collect them into a flower.

A piece of paper is wound around the stem. Then the remaining petals will be glued to it. As soon as the petals are in place, we wrap the stem with green tape.

DIY branch of a blossoming apple tree
The flowering branch will look beautiful. To do this, take soft paper and a dry twig. You definitely need glue and scissors. The soft paper is folded into squares until several folds are formed. From what we got, we cut out the petals.

To make the product look like a real branch blossoming apple tree, on the contrary, you need to cut it unevenly. Two flowers are glued together.

At the same time, we try to make sure that the petals are visible and separated. We glue the flowers with our own hands onto a dry apple tree branch. It turns out beautiful.

Simple and original flowers with your own hands
Some people prefer to make toys in the form of flowers. To do this, use colored paper, tape and scissors. As an addition, we take wire.

Cut out six circles from colored construction paper. Each circle should have a diameter of approximately seven centimeters. But you can also set the desired size yourself. The circles do not have to be even.

We prepare a ring with a diameter of 10 centimeters from wire. The circles are folded in half and a cut is made in the middle. The circle that remains is attached to a wire circle. It is secured with tape. This will be the base of the flower. Now you just need to put the so-called petals on the base through the cuts. In order for the wire to stand holding the flower, you need to bend it in the shape of a circle.
The resulting craft can be used not only as decoration, but also as a toy for children. At the same time, the toy will bring many benefits, for example, when learning colors.

Flowers can be made not only small, but also large. We will need colored paper, a marker, scissors, and a glue gun. A petal is drawn on a large colored sheet of paper. One flower requires a minimum of six petals. Once the petals are cut, give them the desired shape. A small cut is made at the bottom of the petals. Once this is done, the petals are connected and glued together. To make it easier, you need to glue three petals together, and then combine the two halves. A circle of any color is inserted into the center of the flower. More detailed master class making large flowers read .
You can easily make wonderful carnations from napkins.

You will need:
- a lot of napkins,
- wire,
- scissors,
- felt-tip pen,
- as well as a lid from a tin can.

DIY carnations from napkins, step by step photo
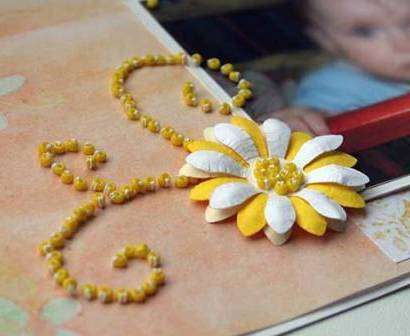
Paper goes well with beads. Together the two materials create a flower. You will need all the same materials as when making a regular paper flower, as well as beads, scissors and thread with a needle.

Flowers are cut out on a sheet of thick paper. You can make the flower petals convex. When the petals are collected, beads are sewn onto them.

There are a large number of options making flowers from paper. Each of them has the right to exist. You can always fantasize. It is not necessary to follow strict instructions, especially in terms of colors and sizes.
Volumetric paper flowers are used to decorate interiors, furniture, ready-made accessories, gift packaging, and cards. Making them is not difficult: the process does not require special skills, it is exciting and enjoyable. Combine business with pleasure: try making flowers in different ways.
Making flowers from paper is a simple process. The material is accessible and inexpensive, it is easy and convenient to work with, so even beginners who have not previously done needlework can master the process. Studying detailed master classes will provide an opportunity to find successful options and receive exclusive jewelry. By the way, popular in 2017-2018.
For production you may need:
- Material. This can be plain white printing paper, colored or corrugated, Whatman paper, tracing paper, old newspapers or magazines. It is convenient to make small elements from soft materials, and large ones from dense ones, which should retain their shape.
- Scissors are used to cut out parts. Choose quality ones that will cut cardboard.
- Glue: universal, silicone, PVA. The choice depends on the type of paper: the denser and thicker it is, the more securely it should be fixed. For convenience, protection from dirt and good bonding, you can use a glue gun.
- Schemes, templates. If the master class with instructions left you with questions, a visual demonstration will answer them. Using the template, you can make ideal blanks, and detailed diagram will help you figure out how and in what sequence to act.
- Materials for frames. If flowers are made from paper with stems and leaves, you will need wire to serve as reinforcement and fixation of the composition.
- Good mood and calmness. Start making if you are calm and determined to succeed. By being nervous, angry and worried, you will not achieve a good result and will not get pleasant emotions from the process.
Volumetric flowers made of corrugated paper
 The flowers look attractive corrugated paper. To make them, stock up on materials and tools. Need to:
- wire;
- scissors;
- corrugated paper (green, red, white, yellow);
- glue;
- ribbon.
 Process :
- Cut a strip of wire to prepare the stem.
- Cut a strip 1.5-2 cm thick from green corrugated paper.
- Coat the wire with glue, wrap it with a green strip along the entire length (fix the edges with glue).
- Cut out a strip of red (or other) paper: do not touch the bottom part, but cut out semicircles or ellipses on the top. Wrap the edge of the stem with this blank, having previously coated it with glue.
- Cut out the remaining petals and glue them to the bud one at a time. Fluff the flower.
- Cut out the green leaves and fix them on the stem.
- The first flower is ready, make the rest, making them multi-colored.
- Gather flowers into a bouquet and tie it with a ribbon.
Advice! You can make large flowers in the same way, increasing the size of all the parts several times. This will be an original interior decor or photo zone for a holiday.
 There is another way: by combining many flowers, you will get a beautiful garland. You will need multi-colored corrugated paper, fishing line or strong thread, scissors, a needle, glue or a stapler.
Description of actions:
- Cut out rectangles from paper: the same size or differing by 1-2 cm.
- Place the blanks in stacks of five. To obtain solid colors, combine elements of the same tone, and to make bright jewelry, combine different shades.
- Fold each stack like an accordion. Fix the centers with a stapler or tie them with thread. Round the edges with scissors to make the flowers look delicate and cute.
- Straighten and fluff the edges of the paper elements.
- String the resulting buds onto a fishing line or thread, piercing them with a needle in the central parts.
Volumetric flowers on the wall
 Large voluminous flowers will become a non-standard wall decor in any room: living room, nursery, bedroom, hallway. Prepare:
- cardboard for the base;
- scissors;
- colored double-sided paper (can be replaced with stickers - small pieces of paper glued together into a block for notes);
- glue.
 Master Class:
- Cut out a round base blank from cardboard. Diameter – 13-14 centimeters.
- Prepare paper squares. It is more convenient to use ready-made stickers, since you do not need to prepare the parts. If there are none, cut out squares of approximately 7.4x7.5 cm from double-sided colored paper. Quantity for a circle with a diameter of 13-14 centimeters: 24 pieces for the first layer, 22 for the second, 17 for the third, 14 for the 4th and 15 for the core.
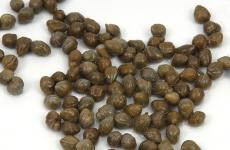
- Form small balls from all the squares (much like for seeds). A sharp cone should form at the bottom, and a circle with one triangular petal at the top. Connect the edges with glue.
- Take the base, coat the edges with glue and fix the balls with the back sides (the parts with protruding triangular petals).
- Glue the second, third and fourth rows in the same way.
- When making the core, glue the central bags to the neighboring ones so that the center turns out voluminous and neat.
- A beautiful three-dimensional flower is ready. You can attach it to the wall with double-sided tape or using a nail and a thread loop glued to the base.
Postcard with voluminous flowers inside
To please loved one or a friend with a postcard with a bouquet of paper flowers inside, try making such a gift with your own hands. Make beautiful three-dimensional chrysanthemums. You will need:
- colored paper in lilac, pink, yellow, white, green (lime) colors;
- a sheet of cardboard for the base;
- thread;
- scissors;
- glue.
Master Class:
- For one flower you will need five paper circles: two of the largest size, two medium and one small. Fold the first circle in half three times, cut out two oblong petals from the edge (deepen the cutout slightly towards the center).
- Unfold the circle and fold the petals in half to give the composition volume.
- Place two medium ones on the large circle, then the small one. Connect the parts with thread or glue. The center can be decorated with a thread tassel or left as is.
- Make several chrysanthemum buds.
- Prepare the card base by folding a piece of cardboard in half.
- Glue the resulting flowers, for example, one in the center on the fold of the cardboard and several on both sides.
- Cut out strips - flower stems. Fix them under the buds.
- Cut out the leaves, fold them in half and secure them near the stems.
- The DIY card is ready, and the flowers seen inside will definitely delight the recipient!


There is another option for those who love roses. You need to prepare:
- double-sided colored paper (red, pink or white);
- felt-tip pen or pencil;
- scissors;
- cardboard;
- glue.
 Manufacturing instructions:
- Draw a spiral on paper and cut out the blank along the line.
- Twist or bend the edges of the long turn of the spiral - this is the center of the future flower.
- Wind the remaining turns of the spiral around the central part, periodically fixing them with glue to secure the composition.
- The edges of the petals can be bent a little, then the flowers will look more realistic and voluminous.
- Make a few more flowers.
- Fold a piece of cardboard in half to form the base of the card.
- Glue the buds inside the card.
If the recipient prefers delicate calla lilies, make this paper card for them. You need:
- double-sided colored paper (corrugated paper is suitable);
- modeling dough or polymer clay;
- universal glue (glue gun);
- scissors.
 Description:
- Make a stamen - mold it from dough or clay. But you can crumple the paper and roll it into a tube.
- Cut out a heart from paper.
- Place the stamen between the rounded parts of the heart and secure.
- Wrap the stamen into the petal, leaving most of the part out. Glue the connected sides of the heart together, carefully turning the edges out.
- Make several buds, glue the flowers into a card and give them as a gift.
Templates and volumetric color schemes
You can make flowers from paper using templates or diagrams. After studying the diagram, you will understand the sequence of steps and make the product identical to that described by the author. For beginners, it is better to use simple and understandable options.
The template will simplify the process as much as possible. You just need to open and download the image, transfer it to a Word document or other file and print the image on paper. But it will not be possible to make large flowers using templates, since the size of the design is limited by the sheet format. 


Volume flowers video
Handmade flowers will become original decoration interior or an exclusive gift for any occasion. Consider all the methods proposed in the article, choose the one you like, study the instructions and start making.
With the holidays approaching, many people are thinking about how to make a flower out of paper, because such a gift is truly unusual and will be remembered for a long time. These buds look incredibly touching, sweet, gentle, demonstrating the feelings of the giver. After all, to make it you had to make an effort, be patient, and invest a piece of your soul.
A paper flower is an ideal gift for your loved one’s birthday, February 14, March 8. Such bouquets look original as wedding bouquets - these buds certainly will not wither, retaining their beauty for a long time. long years. The good news is that even an inexperienced person can do such a thing, for example, a child under the guidance of a mother, grandmother, or kindergarten teacher.
Even the smallest, preschool children, for example, can make simple flowers with their own hands. kindergarten or at home.
One of the most simple options- a three-dimensional flower made from glued strips, it is made like this:
Take: colored paper of your favorite colors (white, yellow, pink, red, orange), pencil, ruler, scissors, glue;

- cut strips 4 cm wide, 21 long, eight pieces in total

- bend them in half, cut off the corners by about 2-3 mm
- tie a thread around the middle, carefully cut off the tails of the thread

- Apply glue to the area near the middle, bend the edge of the top sheet to it, and precisely bend all the “petals”

- secure the edge with clothespins until dry
- After a few minutes, remove the clamps and straighten the flower.
Templates and patterns of volumetric paper flowers
Easy to make buds using ready-made templates or diagrams. All that remains is to trace the contours on paper, cut them out, fold them in a certain way, secure them with glue - and the craft is ready.


How to make a large flower from corrugated paper with your own hands to decorate a wedding hall
You can really make luxurious flowers yourself, with your own skillful hands; such crafts made from corrugated paper are especially beautiful (in childhood, we simply called it a reaper because of its “crumpled” surface). For example, huge buds will be a very original, romantic decoration for a wedding photo area or the entire hall.
You need to prepare:
a roll of corrugated paper of two selected colors, one darker, the other paler, a glue gun, a tape measure, scissors, a circle cut out of cardboard;
They are made in this way:

- take light color, cut a strip 1 meter long, fold it in half, cut it 25 cm wide (in half a roll)

- fold the strip in half three times, cut the sides, not cutting 5 cm to the edge

- cut in half, also leaving 5 cm
- we make sharp petals by cutting off the corners, we get a garland of flags

- Using a large accordion, we roll up the garland, twist the roll, as if we were wrung out laundry first in one direction, then the other

- unfold, stretch each sheet in the middle

- Using a glue gun, glue the garland along the edge of the circle in the shape of a sun

- We process the second strip exactly like this, gluing it along the edge of the “reaper”, trying to secure it in a checkerboard pattern compared to the first layer

- take the second color, make strips - two 19 cm wide, one 12 cm wide, also 1 meter long
- We fold one 19-centimeter strip as before, but do not cut it to the edge (not 5, but 4 cm), glue the garland inside the flower
- just like that we glue the second row, the third - from a strip of a darker color, then again a light one

- the fifth row is already stamens, for it we take a strip 12 cm wide, also fold it in half three times, but now we cut it not into two, but into three leaves, without cutting to the edge of 4 cm
- the last 12-centimeter strip is folded in the same way, but about 2 cm is not cut, after compression, carefully unfold the garland and use hot glue to roll it up into a tube - this is the middle
- if it remains empty place, then cut out more strips 12 cm wide

- Lastly, we strengthen the middle with glue, pressing it against the cardboard
- All that remains is to straighten the leaves - and the luxurious flower is ready.
An easy way to make a flower without glue
If you don’t have glue, it doesn’t matter, you can make these simple buds by cutting out petals from multi-colored paper and stringing them onto a cocktail tube. To prevent the layers from scattering later, all that remains is to slightly cut the edge of the tube, bending the resulting strips in different directions, simulating stamens.

Flower with candy for children
What child doesn't like sweets? What if you decorate it like a flower? Agree, not a single child will remain indifferent! And making a simple bud with a candy core is quite simple. Let's take a sunflower as an example.
Let's prepare:
- corrugated paper, scissors, ruler, glue gun, piece of wire;
- cut the header into strips 1.5 cm wide, divide it into 8 parts

- Sharp petals are cut out of these pieces, each one is twisted with scissors, the tip is additionally curled upward
- this is how about two dozen petals are performed
- leaves of slightly smaller size are cut out of green material in the same way

- You need to cut out a small circle from cardboard for the base (the size of a candy, a little larger)
- should be painted over or covered with brown paper
- A wire is attached to the cardboard with a glue gun, twisted into a ring at one edge for better fixation.

- glue the petals to the base in a circle at the very edge, then the second row, closer to the center and adhering to the checkerboard order
- Glue green leaves on the bottom
- decorate the wire with green tape

- glue the candy to the center of the sunflower.
Making a paper flower from napkins quickly and easily
A beautiful, lush bud can be easily made from a simple napkin - cheap, and most importantly - the base is almost always at home, you can experiment whenever your heart desires.
Take: 3 napkins, lay them out to a rectangle, fold them together, then fold them like an accordion in increments of about a centimeter;

- fold the strip in half and secure with thread
- cut the ends with the letter “M”

- flatten to create a circle
- then carefully separate the layers of the napkin

- this is how we get a lush peony.
Video on how to make a flower from A4 paper that blooms in water
Flowers can be not just static, they can... bloom. Surprisingly, this applies not only to living plants, but also to their paper counterparts. The secret is simple - when wet, the material returns to its shape and becomes even, but this experience looks really cool - not only a child, but even an impressionable girl on a date will be surprised. Try it!
Paper flower using origami technique for beginners
Origami technique – ancient art, requiring concentration, patience, endurance. But almost anyone can master the simplest crafts. Probably all of us in childhood made such cups from sheets of a school notebook, various animals, boats, boxes. But origami offers more complex shapes, including flowers. Personally, as a child, I loved to make a tulip like this, sprinkle it with water, and then put it in a vase or give it to relatives.

The execution scheme is as follows:
- Fold a sheet of A4 or another (but not too small) diagonally, cut off the excess, so we get a square
- bend the square along the second diagonal, turn it over, fold it in half lengthwise, tuck the sides inward along the folds, we get a double triangle
- fold the corners towards the middle, turn them over, repeat on the other side
- we take the upper corners, connect them, turn the craft over so as to work with the sides previously hidden inside
- We bring the corners to the middle with a slight overlap, tuck one into the other, repeat with reverse side crafts
- carefully straighten the figure, inhale air into the hole at the bottom so that the tulip “straightens out”
- All that remains is to beautifully straighten the petals and shape the stem from a skewer or wire.
How to make a paper bouquet for March 8 or a birthday
Creating a bouquet for a holiday, for example, name day or March 8, is quite simple, having mastered the techniques described above. For the composition, you can use paper flowers with candies or just self-created buds. All that remains is to fold them beautifully, wrap them with ribbon, wrap them with a special net, wrapping film, decorate them with beads, bows, ribbons - here everything is limited solely by personal imagination.

The easiest option for children is to take a sheet of green paper, fold it like an accordion, attach it at the bottom with glue or thread, and attach cut-out flowers of pink, white, red, yellow along the top edge. You will get such an impromptu bouquet.
More high level– a bouquet of roses with a candy core, for which you need:
Take: glue gun, crumpled paper, scissors, round-shaped candies, bamboo skewers or wire;

- string candies onto “stems” made of wire or bamboo

- from the harvester, cut circles with a diameter of 5.5 cm (14 pieces) and 4.5 cm (12 pieces) for each bud
- stretching the center to form petals
- Attach petals around the candy with glue in a circle, first small, then large

- cut out small leaves from green material and glue them to the bottom of the flower

- decorate the stem with green tape or paper again

- collect the required number of roses in a bouquet and tie with a satin ribbon.
Such crafts will definitely last longer than the usual 2-3 days, pleasing the eyes of everyone. Besides, you will agree that it will be more original than the usual bouquet from a flower shop. Choose what you like, experiment, try it, good luck! Check out our blog for more tips!
A number of people are skeptical about artificial flowers, based on the fact that real flowers are more beautiful and fragrant. However, a variety of techniques and types of paper allow even amateurs to create unique masterpieces. Miniature paper flowers are suitable for decorating a postcard, gift box or table setting, while large ones are suitable for marking accents at festive events. Flowers on stems are used to create bouquets for loved ones and relatives. To give the gift an official touch, decorate it in baskets and create candy bouquets. Below are simple instructions on making paper flowers for different situations.
The “twisting” technique involves wrapping a strip of paper around a wooden stick. Despite the simplicity of the process, there are a large number of colors created using this technique that are not similar to each other. They are distinguished by their brightness and originality.
1. Carnation for February 23 or May 9
An easy craft that older preschoolers can handle.
To make it you will need red and green corrugated paper and a stick for the stem. Let's consider the sequence of actions:
The process takes no more than 30 minutes, and if you re-make the flower, it will take even less time.
2. Asters by March 8
A bouquet of paper flowers will be a pleasant gift for a mother, grandmother, or friend. The craft is designed for children over 6 years old. Prepare thick two-color paper, a ruler, a pencil, scissors, narrow tape or glue, a stick for a stem and green tape. Instructions for creating a bouquet of asters:
- cut a strip 6 cm wide along the long side of the A4 sheet. Mark a line on it, 1.5 cm from the edge;


- cut out the cloves from opposite side from the outlined edge;

- cut a narrow fringe in the direction from the edge with the teeth to the line;

- take a stick and begin to wind a strip around it;

- The edge of the bud is fixed with glue. For reliability, wrap transparent tape on top;

- bend the petals to the sides;

- take a wooden stick and wrap it with green tape;

- plant a flower on a stem;

Fix the core with plasticine. 
More patient amateurs first make the center of the flower. To do this, twist a narrow strip of flowers that contrast with the petals. Fix it and screw a strip of fringe onto it. This flower has a more elegant, finished look. 
As a result of experiments with the width of the fringe, with the tips of the petals (the edge is made not with teeth, but with a rounded edge or otherwise), chrysanthemums, daisies, and peonies are obtained.  If you twist the ends of the petals in blanks made of thick paper (for example, an aster) with a wooden stick, the resemblance to real flowers will increase.
Original paper flowers using the rolling technique are made from strips of fringe, which differ in the length of the petals. For example, they make the middle. To do this, a strip 1 cm wide is tightly wound onto a toothpick. The next strip with fringe, but 2 cm wide, is wound onto it. Then, 2.5 and 3 cm wide. A flower is obtained in which the length of the petals gradually increases from the center to the edges.
3. Paper rose
A spectacular rose is rolled out of paper in a matter of minutes. To do this, you will need a colored square sheet of paper (preferably not glossy to make it easier to work with). Draw a spiral on it (no need to worry about the evenness of the intervals) and cut it out. Start rolling the rose from the edge (not from the middle). A bud is formed and fixed.


How to make paper puff flowers
Spectacular “puff layers” are obtained by superimposing flower silhouettes on top of each other. Each layer differs in size from the previous one; it is given a relief (more on this below), which allows you to add volume to the finished product. To create layered flowers, prepare stencils:
- selected on the Internet;
- create themselves. On an A4 sheet of paper, circles of different diameters are drawn and cut out. Each circle is folded in four, then in half. Draw the tops of two petals (a heart) on the outer edge. Cut out the edge and deepen the center of the workpiece. Unfold. The layer is ready.
1. Volumetric puff flower.
In order to make a three-dimensional decoration you will need: blanks of colored paper, scissors, a tool for creating relief, thread, needle, glue. Instructions:

The edges of the petals are tinted with a contrasting felt-tip pen. 
Different silhouettes of petals and their unusual relief allow you to create dahlias, poppies, asters, roses and anemones.  Irises and pansies are made using this technique (templates can be downloaded from the Internet).
2. Corrugated paper layer
Flowers made from paper (crepe, corrugated) look natural, since the paper already has a certain relief. In addition, the delicate structure of the material allows you to create exquisite compositions for interiors and decoration of special events. Let's consider quick way creating a flower:
- Select crepe paper of the desired color. To make it more natural, take two colors close in tone;
- fold the sheet in half the required number of times to get a square piece;
- fold it three times, draw the edge of the petal;
- cut out and unfold the workpiece.
Sew the layers in the middle with a thick thread and fluff the flower. 
The method is suitable for making daffodils and carnations. You just need to trim the edges of the blanks accordingly and choose the right color shades.
How to get flowers using the folding method
Let's look at two techniques that help you make flowers from paper by folding it.
1. Tulips
The proposed option is carried out using the origami technique, and is suitable for younger schoolchildren.
You will need double-sided colored paper, a tube, and plasticine. Instructions:
- make a square from an A4 sheet;

- cut off the extra rectangle;

- the square is folded so as to obtain two diagonals;

- press the side elements inward;

- turn two front corners up;

- turn the workpiece over and repeat the previous action;

- bend the outer corners to the middle, repeat on the other side;

- the bottom corner is folded and carefully ironed;

- pull out (blow out) the base of the tulip;

- turn away the petals;

- tuck the lower edges of the petals into each other;

- take the tube, cut it from one edge to a depth of 2 cm, and turn the cuts away.

Attach the bud to the tube. The tulip is ready. 
2. Roses
You will need thick paper, since during the folding process the paper strip will twist around itself. This technique does not have to be carried out strictly according to the proposed scheme. It is important to understand the idea of paper folding. 
How to make pompom flowers
You can make a large flower from corrugated paper in the following way:

For the middle, use a contrasting ball of corrugated paper.
Anemones, peonies, and carnations are made in a similar way, changing the edges with scissors.


How to make flowers with round petals
Using small hard balls and wide short strips of paper (corrugated) they make graceful, airy flowers. To do this, place a ball in the middle of the strip, lift the sides of the strip, and twist it tightly (like a candy wrapper). Take out the ball, maintaining the integrity of the petal. A flower is assembled from several ready-made petals, the center is decorated, and a stem is added. 
Simple instructions from the review will help you create unique works for both children and adults. They will inspire you to combine different techniques. They will allow you to use not only paper, but also ribbons, beads, seed beads, buttons and other useful things to make flowers. In the process of improving the model, it is worth increasing complexity. Supplement with the production of complex stamens, stems and leaves. Paper flowers are an inexhaustible theme for creativity and imagination. They will serve as decoration for postcards, hairpins, gift boxes, and will enliven the interior, bringing notes of spring and happiness to the house.
Svetlana Simonova
Purpose: manufacturing colors to decorate the group.
A very simple and quick decoration idea. Just roll up colored paper into sharp-angled tubes and secure them on a round base in layers. It is important to note that this decoration looks good at long distances, but is not very impressive to the viewer up close. Therefore, choose a suitable place for it, and it will become a bright spot in your interior!
Such flowers can be used to decorate walls for a holiday, and can also be used as "beanies" for a masquerade - to do this, attach an elastic band to the base on both sides. If you take smaller pieces, you can make a very beautiful hair decoration.
Progress:
1. Let's prepare the materials necessary for work
Cardboard (the basis)
- note paper.
Scissors
Cut out a circle with a diameter of 13 cm from cardboard - we will stick it on it flower. Let's take it paper squares. The number of squares depends on the diameter of the circle. For a circle D=13 cm you will need 24 squares for the first layer, 22 squares for the second, 17 squares for the third layer and 12 for the fourth. 15 squares for the middle flower.


Using glue to make squares "little bags". Apply glue to one side of the square. Take the square by the corners and fold it into "bag".

Thus, we turn all the squares into "little bags" and get petals flower.

When "little bags"- when the petals are dry, glue them with their backs onto the base, in a circle, leaving a little space in the center for the second and third rows.


The flower is ready.
Publications on the topic:
Applique made from twisted corrugated paper is a form of creativity accessible to any age that promotes the development of children’s fine motor skills.
Rain flower made of corrugated paper (master class) Dear colleagues and friends, good day. Today I present to your attention.
Lotus flower made of paper using origami technique (master class) Dear friends, good day. Today I suggest you make it completely.
I would like to present to you a master class on making a flower from colored paper, which you can do with your preparatory children.
PAPER FLOWER To decorate the central wall of the music room, I try to use inexpensive materials at hand. I use it often.
Dear colleagues, I offer you a master class on a flower made from corrugated paper. I made these flowers for our girls. At a matinee dedicated to...
Goal: to develop the ability to create gifts with your own hands. Objectives: develop the ability to fold paper; develop fine motor skills of the hands; bring up.