DIY large paper rose step by step. Paper roses: several simple options
The rose is, without a doubt, one of the most beautiful flowers in the world, which is why it is very popular.
A paper rose is no less attractive than a real one, and the fact that you do it yourself beautiful flower , makes the rose even more meaningful to the person you give it to.
Learn making a paper rose is not difficult. There are many ways to do this, and you will learn about several from us.
How to make a rose with your own hands. The easiest way.
You will spend very little time on the rose in this example, but will get a lot of pleasure. Such flowers can be used as decor in an apartment or as a symbolic handmade gift.
You will need:
Thick paper
Scissors
Beautiful vase
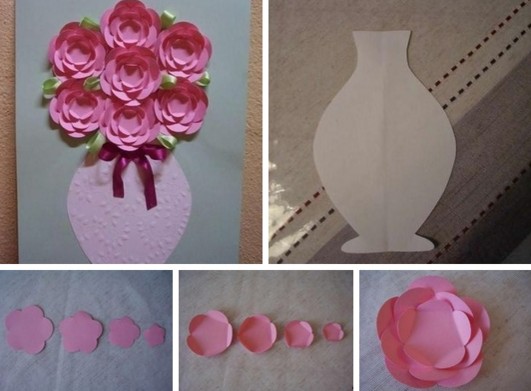
1. From thick paper you need to cut a square measuring 10x10 cm.
*The color of the paper depends on the color of the rose you will be making.
2. Draw a spiral on the square (see picture).
3. Cut out the drawn spiral.


4. Start rolling the paper spiral starting from the outer end.
5. Screw the bud tightly to the end and glue the inner end to strengthen the structure.


The rose is ready, and you need to start making leaves for it.
6. Cut out a leaf and glue it to the rose.


To make the rose look more chic, place it in a beautiful vase.
How to make a paper rose. Method II
You will need:
Thick paper
Scissors
Glue (adhesive tape)
1. Fold a sheet of A4 paper in half, and then in half again.


2. Now you need to cut the sheet into 4 strips. To do this, unfold it and cut along the folds.
3. Use duct tape to hold the cut strips end-to-end together, creating one long strip.


4. The strip that you have obtained needs to be twisted so that you get a rod-trunk (see picture).
5. You now need to fold the remaining part of the paper in half, while slowly turning it around the center (see picture). Continue wrapping and gathering layers until you have a rose.


*If you wish, you can paint the rose with your favorite color if you made it from white paper.
How to make a rose. Method III

You will need:
Crepe paper (red and green)
Stick, skewer or wire
Pencil
Scissors
Floral tape or glue
1. Make a heart shaped template. The size of the template depends on the size of the flower. In this example, the height of the heart is 15 cm.

2. Cut out 5-6 hearts according to the template.


3. Making a stem. Prepare 3 wires or a stick and wrap it with floral tape.
* Floral tape can be replaced with glue.

4. Making petals. Gently stretch the paper wide. Wrap the top edge of the heart around the round handle.


Wrap the first petal around the stem and secure it with ribbon.

Do the same with the remaining petals.

5. Making leaves. Prepare 3 wires and wrap them in crepe paper. Next you need to glue the leaves to them, which must be prepared in advance.

6. Making a rose cup. Cut a strip of green crepe paper.

Attach the strip to the base of the cup using adhesive tape (you can replace it with glue).

Attach the leaves to the stem. Make one common stem and decorate it with green crepe paper.


Paper rose. Method IV

You will need:
Printable template
Printer
Scissors
Stick, toothpick, skewer or wire
Pencil
1. To make such a paper rose you need to download a flower template
Scheme on how to make a rose

2. After which you printed out the template, cut out the petals and leaves.
* Take a close look at the template, where all the petals and leaves are numbered.

3. Use scissors to bend the ends of the petals on both sides.
4. Three green leaves also need to be bent in half lengthwise.

5. Prepare a toothpick, thin wire, stick or skewer and twist petal number 1 around it. Use glue to secure everything.

6. Now around twisted petal number 1 you need to wrap petals number 2 and 3 and also secure with glue.

7. You need to glue petals 4, 5, 6, 7 together to make something similar to cones (see photo).

8. Collect and glue all the parts of the flower together!

You can find roses in other colors by clicking on the links below.
DIY paper roses. Method V
Like the previous roses, this one can be made in any color. The example shows the color red.
1. Prepare colored cardboard. Draw a spiral on it. Try to make the line that you draw from the center to the periphery not even, but a little wavy.
2. Using scissors, make a cut along the entire drawn line. You should get something similar to the peel of a peeled apple.
3. Now you need to wrap your spiral around your pencil. Try to wrap tightly until you reach the middle. After this, you need to remove the pencil and let the flower straighten out.
* Using your fingers, you can try to slightly bend the paper petals in the central part.
4. Apply a lot of glue in the center and let it flow into the central part of the spiral. In order for the glue to set well, you need to press the entire structure to the bottom.
DIY corrugated rose
You will need:
Corrugated paper (pink and green)
Scissors
Wire (straightened paperclip or skewer)
1. Prepare pink or red corrugated paper and fold it several times, first lengthwise and then widthwise.
2. Using scissors, cut out what looks like double petals, shaped like hearts. In this way, you can make 8 petals at once with one cutout.
* In the video, the petals are simply cut out of paper, but you can first draw them on it and then cut them out.
3. Each group of petals should be slightly crushed to give more naturalness. You can stretch it by pressing your fingers into the middle part.
4. Now you need to cut a strip 3 cm wide from a roll of corrugated paper (choose the length yourself, based on the video tutorial). Apply glue along the strip.
5. You need to put a short length of wire at one end of the tape (you can replace it with a straightened paperclip or skewer) and wrap the entire strip around it. This way you will get the core of the rose. It is to this that you will further glue the petals.
6. All that remains is to apply glue to the petals and attach them to the central part.
7. At the final stage, you need to make leaves from green paper. To do this, fold the green crepe paper in half and half again, and cut the shape of the petals as shown in the video.
* In the video, a foam rubber strip is pressed against the wire, and then green paper is wrapped around the wire along with the foam rubber.
Origami rose Kawasaki (video)
This method of making a paper rose was invented by Kawasaki, after whom it is named.
How to make a rose from a napkin (video)
Origami rose from a napkin (video)
Any paper is suitable for making flowers, from writing paper, the petals of giant buds are made from it, to toilet paper, coffee filters. When making stylized decor, colored cardboard is good.
To achieve similarity with real flowers, white writing paper is tinted:
- liquid instant coffee, the result is a delicate creamy shade;
- hibiscus, this natural dye;
- watercolor paints;
- beet broth;
- berry juice.

If you first crumple the paper and then tint it, you will get thin veins, like on real buds. When wetted paper dries naturally, its texture changes and irregularities and roughness appear. Petals from such prepared sheets come to life. This paper deformation technique is more often used to create huge decorative flowers.

Simple and beautiful
In situations where you urgently need floral decor, they will help you out simple ways making paper roses. To work you will need scissors, glue, thick or soft paper. Additionally, ready-made buds are decorated with:
- droplets of silicate glue, they imitate dew;
- glitter - the flower is sprayed with hairspray and powdered with glitter;
- artificial snow, such flowers are added to Christmas bouquets and New Year's compositions.

Roses with dense petals
Using this technology, flowers of any size are made: from small ones, 2-3 cm in diameter, to huge ones. The sheet is cut in a spiral, then I glue the bud, starting from the outer edge of the workpiece. The center of the spiral ends the bud.

The edges of the spiral tape are:
- smooth, then you get a flat, stylized bud;
- wavy, the flower turns out loose, imitates a natural rose.

Another way is to assemble individual petals; the density of the flower depends on the number of paper blanks:
- draw butterfly templates so that between the opposite petals there is a platform for assembly (bottom), they are made different formats;
- the center of the bud is cut in a spiral;
- pieces are strung onto the wire, starting with the largest;
- when the butterfly petals are collected, a loop is made at the end of the wire;
- the center of the bud is glued, starting from the outer edge of the spiral;
- A drop of glue is applied to the wire loop and the dried center of the rose is attached.

If desired, the flower is tinted a little with watercolors: the edges of the petals and the outer part of the bud are tinted. The decor is ready.

Lush bud
For it they use corrugated colored paper. If you don’t have it, napkins of the desired color or toilet paper without an embossed pattern will do. The soft material is easily corrugated and holds its shape well. To obtain folds, the paper is sprayed with water, twisted around a pencil, and squeezed from different sides. When the napkin or toilet paper dries a little, straighten it out and it is ready for use. Any shades from light green to marsh are suitable for leaves.

Lush roses come in different colors:
- burgundy;
- red;
- pink;
- yellow;
- creamy

First, the blanks are cut out according to the template:
for the center of the bud - wide, they are compressed from above, stretched in the middle:
for the outer edge - separate narrow petals. They begin to form the bud from the middle; if desired, place a small semicircular candy in a foil package in the center. Then the outer petals are added. They are fixed with glue using a heat gun. Another option is to make petals with a long tip. These roses are mounted on a wire frame. The ends are twisted, a sepal is formed near the tail, then the stem is wrapped in paper with wire.

Rose for the table in a couple of minutes
Great decor festive table There will be roses made from napkins of different colors. They are placed on or next to plates. They will add a touch of celebration and immediately create good mood. The technique for making such flowers is simple - no glue or stapler is needed. Pliable wipes are easy to accept the required form. Roses are made in one color and with a green stem.

The first method, a flower from one napkin:
- straighten the paper on the table, fold 1/5 of it, iron the fold well;
- The napkin is folded inwards and held between the middle and index fingers;
- the formation of a bud begins: the paper is wound around the fingers clockwise;
- the end of the bud, it is just below the folded edge, is compressed by turning the paper counterclockwise;
- after the bud is formed, twist the stem to the middle;
- the remaining “skirt” is straightened, the corner is freed;
- it is pinched so that a sharp leaf is formed, it is raised to the center of the stem;
- then they finish forming the stem using the twisting method;
- The final touch is to straighten the leaf and bud: the center is slightly curled inward, the edge is bent outward.

These roses are made within a couple of minutes; it is better to use napkins in soft pink colors.

When there are soft standard napkins in red and dark green, make roses with a stem of a different color. The technique is as follows: only half of the napkin is used for the bud, the second is torn off or cut with scissors. When the bud is ready, a green napkin is twisted onto the trunk from a corner; the technique for forming a leaf is the same as for a single-color rose.

The stem will be longer than in the first case. It is appropriate to place such a napkin rose in a tall glass made of thin glass. The table will look unusual.

Any flowers are great
For creating paper flower it won't take much time. If you use your imagination, you can complement the interior with this decor:
- update a faded lampshade table lamp;
- paste over the photo frame;
- turn a shoebox into a chest for trinkets or small toys;
- decorate a mirror in a girl’s room or ladies’ boudoir.

The good thing about paper decor is that it can be easily replaced with a new one if desired. It never goes out of style. Rose is an eternal companion of a good mood.
Good day!
Spring time is coming and you want warmth and more love. The February holiday is behind us, which means that your defenders have received from you. Now it’s the women’s turn, and usually each of us is waiting for something unexpected on the eve of March 8th. Beloved men will primarily present luxurious bouquets. And our children will help them with this, do it in labor lessons or in kindergarten beautiful roses and...
Today we will look at just such crafts that will be made of paper. If you want to please your mom or grandmother not only on International Women’s Day, but for example on a Birthday or Mother’s Day, then visit me in another post, where you will see many other delicate flowers. And you definitely won’t resist and create such a magnificent gift.
After all, a rose is a royal flower, and it is very popular with everyone, especially on days of significant events. You definitely can't argue with that.
Many people will probably think that it is difficult to make such gifts on their own, but you are wrong. It turns out making paper roses is quick and easy. And step-by-step instructions and descriptions with pictures will help you with this.
So, what are you waiting for, get to work.
How to make roses from corrugated paper quickly and easily? Step-by-step instruction
I think that the first work should be shown with a template, cut it out of cardboard or thick paper, and then attach it to the corrugated material. At the same time, roll the corrugation like this, as shown in the picture, to make a strip. Then roll it up like an accordion, outline the shape of a petal and cut it out.
To make a stencil like the one shown below, you need to hold a piece of white office paper to your monitor and draw the image.

This is such a funny picture. It's like petals on a branch. Take any stick or you can take a pen rod (wire) and start twisting clockwise until you get a rose.
The more petals, the more magnificent the flower.

As soon as you finish working with the bud, proceed to cutting out the leaves. Glue them on the wire, and also decorate the twig with corrugated paper of only green color.


The next option will be like this, even easier than the previous one, draw a semi-oval, only slightly flattened, or you can say a round petal. Fold the corrugated paper like an accordion and trace over the stencil. Cut and twist in a spiral.

Roses using the origami technique without glue and scissors (step-by-step diagrams for beginners)
Enough original way To make a rose, use a regular pencil and a stationery knife. Draw a spiral on a piece of paper and run a knife along its contours. And then, starting from the middle, twist it onto a stick into a flower.
As you can see, any beginner can cope with this work; it is easy and not complicated.


Below I want to show more ready-made templates, you can build this beauty using them. So as not to sit and draw on your own.


Now look at the next beauty, the rose is assembled from ordinary paper, or rather from a strip, by bending and twisting:


You can do approximately the same thing with crepe paper (corrugated), such beautiful roses are great to decorate a ball and the result can be a topiary.


You can also twist a rose using the origami technique, it also turns out very beautiful.


Templates for making large voluminous roses
Just four templates are enough, these are a petal, a heart and leaves for decoration:

The work steps are described in the illustrations, so I hope everything will be clear. If you have any questions, ask.
Paper rose from a napkin
Oddly enough, even an openwork napkin that we are used to using in the kitchen can be quite useful for such creative work. It is its ribbed openwork edge with a pattern that will help create such a pretty rose. Just a couple of strokes, cut as shown and twist into a bud.

The next option is made from a napkin, tear it into squares. You need to cut each piece into 4 parts.


Another option is a twisted flower, literally. You need to cut the napkin into two halves and twist each half onto a pencil, and then pull it off, in general, see this master class:


Master class on creating a bouquet of roses from sweets and paper
You can now find a whole bunch of such crafts on the Internet. I even have a whole one on my blog, but at the moment I want you to get acquainted with these flower bouquets, with candies hidden inside the buds. Use a video from the YouTube channel.
The easiest ways to make crafts in the form of paper roses
Well, now I propose to plunge into the world of fascinating souvenirs, while the process of making roses will be shown in pictures. And you can easily cope with such work. Choose any instruction you like and act according to it.

Roses can be made not only voluminous so that you can pick them up and give them as a gift, but it is also quite appropriate to make them and stick them on.
The most probably unexpected way is to take an ordinary newspaper and use it to make a craft in the form of a large rose.

Or use colored double-sided paper.


Here is another master class, if you are planning to decorate a gift box, for example, then it will help you with this. The rose looks cute and attractive.


Here are more leaf templates for cutting out. 

The following ideas will be made from thick cardboard, or you can take a toilet roll and make such an unusual souvenir gift from it.


Or make your own flower from banknotes.

Well, or else, each rose petal can be signed with pleasant words, or

This is where I end the post and hope that you will learn how to fold roses, because as you may have noticed, all you need is paper and the desire to create. Good luck.
See you soon, see you in the group. Goodbye.
Best regards, Ekaterina
Add some color and refresh the interior of your home beautiful composition assembled from flowers made of corrugated and plain paper.
In this section we will teach you how to make flowers with your own hands.
How to make a rose out of paper (7 rose options)
Simple DIY rolled paper rose
We suggest you master new way rolling up a flower - using the twisting method.
It's light and very quick way. In less than 10 minutes the flower is ready.
You will need:
- paper
- scissors
On a sheet of red paper that is not very thick, but not thin either, you need to draw a spiral outline.

Moving in a spiral, cut the paper.

Start twisting the flower from the outer edge of the spiral. This is convenient to do with a pen or pencil.

In the very center of the spiral, apply glue (you can use the most ordinary PVA) and, pressing tightly, glue the twisted element.
And now your rose is ready without any extra effort!

Rose according to patterns
It can serve as a chic decoration for your interior, can be used on a gift box or as part of a three-dimensional painting. It's not that difficult to make if you follow our instructions.

It will be necessary:
- colored paper (red, yellow...)
- scissors
To begin with, we should cut out our blanks from colored paper. You should get 10 blanks.

We will begin to fold our rose from the middle. We wind three single petals onto a pencil.

Then we put them together, placing one on top of the other and gluing them together.

We take our following preparations. You need to give the petals volume and twist them. For this we use scissors. We do this carefully so as not to tear the petal. We do this with all the preparations.

Next, glue them together as shown in the photo, placing the edge of one petal on the protruding “tail”. You can also use double-sided tape for gluing.

We do the same with all the remaining blanks.

All we have to do is collect our rose. To do this, grease each next workpiece from the inside with glue and place it on top of each other.

And press all the petals tightly.

And here it is, our most magnificent rose is ready.

Small corrugated paper roses
A bouquet of these miniature roses will fit perfectly into your interior or can become a boutonniere on your festive dress or jacket. A wide variety of corrugated ones, not just roses.

Materials:
- corrugated paper 2 colors (red and green)
- wire
Cut out 3-4 flowers from bright corrugated paper. IN in this case we took 4 flowers (the rose will be more magnificent).

Take a wire about 10 cm long and pierce one flower.

At the end of this wire we form the middle of our flower.

Then we pierce the remaining flowers and glue them together, forming a rose.

At the end, we wrap the wire with a strip of green corrugated paper and glue a leaf.

Vintage rose
Unusual interesting rose. It won't take long. But, nevertheless, it will serve as an excellent decoration.

Necessary materials:
- thick patterned paper
- corrugated paper
- scissors
- double sided tape
From patterned paper, cut out flowers (preferably with six petals). It can be in different shapes, it will be even more interesting.
Between the petals we make a cut to the middle of the flower, as shown in the photo. Then we put the petals one on top of the other and glue them together using double-sided tape.

Then we will move on to the central part of our composition - the rose.
Cut out a strip of corrugated paper approximately 25x5 cm, the longer your strip is, the larger the rose will be.
We fold our tape at the beginning, as in the photo.

Then we roll it tightly and glue the end so that it does not unwind.

Glue the finished rose inside our flowers

Our original rose is ready!

Yellow rose
An unusually beautiful and easy to make rose.

For this we will need:
- paper
- scissors
Let's start with that. that on a sheet of paper we will draw petals of a rather abstract shape: 5 middle and 3 outer petals.

Cut out the petals. For lush and beautiful roses eight petals need to be cut out. There will be two types. Three one and five two.

To begin with, take our cut out petals in the shape of hearts. And in the middle we make an incision as shown in the photo.

Then we place the resulting parts one on top of the other and glue them together. We do this with all five petals.

We twist the remaining three petals of a different shape with a tube together one by one, gluing the ends.


Then we glue our middle to the heart-shaped petals as seen in the photo below
We glue the rest of our petals (under the bottom), forming a rose.


The rose appears to be on a flat base. Beautiful and durable.

Lush roses from napkins
Vases for interior decoration with flowers
Flower baskets have been used to decorate compositions since ancient times. They can be tabletop, standing on legs or hanging. They are made from birch bark, willow branches, decorative wire and polyvinyl chloride. Flower baskets have backs, arms, and table baskets have handles. Decorative flower baskets can be made in the form of a cornucopia, a large vase, a fan, a horseshoe or a lyre.
Previously, flower tables, or so-called jardanieres, were widely used to decorate residential and public spaces. They were usually made from wood, flexible branches, wire and metal. A low galvanized box was placed inside in which flowers were placed. It was believed that jardanieres were especially convenient for growing exotic flowers in spring and summer.
Since ancient times, masters of arrangement have used products of old folk crafts - various weavings - in their creativity. This method is used to make not only baskets, but also wall decorations, “plates”, which, combined with decorative leaves, flowers and shiny fruits, look original and elegant.
Pots with indoor plants, vessels with cut flowers, dry winter bouquets. Beautiful weaving for flowers is made by master flower growers and amateur gardeners in Rudny Altai, Northern Kazakhstan and the Almaty region, in particular in Issyk, Chemolgan and many other places.
In the flower shops of our country one can find original flower weaving by Moscow, Baltic and Transcaucasian masters with floral arrangements, which are complete works of art, striking in the originality of their forms. The materials for weaving are usually thin branches of willow, stems of reeds, rush grass, birch bark, cattails, and the roots of various shrubs and trees. Harvesting willow twigs in early spring and later, during the period of active sap flow or at the end of autumn. For weaving, as a rule, one- and two-year-old branches are taken woody plants. Green twigs are stored in a cool, shady place until warm weather arrives.
For the original design of flower baskets, you need appropriate equipment and auxiliary material. These include:
Holders and tattoos. They are widely used for flower arranging. The traditional metal tattoo has different shape and size, most often its base is made of copper, lead or steel. Metal needles from 5 to 7 centimeters or more in length are used for pricking cut single flowers and branches. A homemade tattoo can be made from a mixture of cement and sand (base), and ordinary nails can be used instead of needles.
Wire. It is used for attaching shoots and flowers in bouquets and baskets. It should be soft and white; its average thickness should be in the range of 0.25 - 1.5 millimeters.
Twine and threads. Necessary for making flower garlands and wreaths. For large floral designs, twine 2 to 4 millimeters thick is required. Strong yellowish-green threads are suitable for tying bouquets.
Ribbons (braid). Sometimes they are used to disguise wire when making bouquets and small flower garlands. Their color can be red, white, purple, yellow and green.
Knives. Necessary for cutting flowers and leafy shoots. They should always be well sharpened on a fine-grit sanding block and then pointed on the belt. Typically, garden knives are used, which are known as budding or grafting knives.
Scissors. Required for preparing materials (wire, twine, paper) and at the time of designing the composition.
Secateurs. Designed for cutting decorative branches, greenhouse and various garden flowers and plants. They remove small dry branches.
Plasticine. Used for attaching dried flowers and branches in winter bouquets. It is camouflaged with moss and leaves.
Wrapping. Needed for packaging cut flowers, bouquets and other flower arrangements. In shops and florist farms, the sale of ready-made bouquets in cellophane and wrapping paper is widespread, and the bouquets are tied with cellophane ribbon or braid.
Greetings. Let's continue the topic. We recently made crafts, and today I want to create the queen of flowers - a rose. It looks very good in any interior and on any application.
It is often made to decorate gifts or holiday decor. For example, large voluminous roses can decorate a wedding, birthday or International Women's Day, and also become the main decor for a photo zone.
I have selected the most understandable master classes, following which step by step, you will definitely succeed. There are easy options that can be made with children, and there are more complex ones that need to be created carefully. But absolutely everything is doable, so let's get started.
I think that starting from school, most children have done origami at least once. Even in its simplest form, for example, they did or.
Making a flower is a little more difficult, but it is quite possible for both a schoolchild and an adult. Today I will share with you 4 step by step diagrams, which show step by step what needs to be done to make a rose.
So, the first diagram is in front of you. For it you need to take a square sheet, you can cut an A4 landscape page. I advise you not to use small sheets if you are just learning this technique.

The second diagram is incredibly detailed. She describes each step that needs to be done in order for you to get this flower.
Origami does not involve the use of glue and scissors. But in this case, we will need to do more beautiful leaves, so let's give them a little shape at the last stage.


The following diagram shows how to make a rose from modular origami. This option is interesting, but also more labor-intensive than the previous two. Also, each step is described in detail, which will be convenient for those who are just beginning to hone their skills in this technique.


I suggest you watch the video in which the master makes an unusual beauty that also curls up into a cube. This idea interested me, so I’m sharing it with you.
You can use not only colored sheets, but also newspapers.
Volumetric rose made of corrugated paper with a candy inside with a template
It is now popular to make wonderful sweets with a surprise from corrugated paper. The whole craft is wrapped around a candy. And most often such compositions are created for gifts. These roses look like real ones and are not very difficult to make.
I will give three instructions on how to make such beauties. They differ in the shape of the petals. With this I want to show that the chosen shape and size will vary greatly appearance flower.

In addition to corrugated, you can use crepe; it is also great for the techniques described. For one rose you need to cut three different petal shapes. The widest goes to the outer layers. And the narrowest ones create the middle and wrap the candy.

1. The necessary details are in front of you.

2. Each petal needs to be stretched in the middle and the edges should be curled with your fingers. They have already become like real ones.

3. We begin to wrap the candy.
To ensure that all layers adhere better, use hot glue to secure the bottom of the parts.

4. Layer by layer we apply the parts and fix the end of the bud with thread to keep the candy inside well. But this needs to be done by wrapping the bottom of the flower with wire or a kebab skewer. They will act as a stem for us.

This is what the result looks like from above.

6. Open the petals.

The next master class is very similar in the sequence of stages, but has a different shape of petals. Three sizes are also used here, but they all have the same shape.

I suggest trying to make flowers from unusually shaped parts.

There are two types of them used. One of which is a perky heart.

For one rose you need at least five petals, the more there are, the more fluffy and open it will be.

If you do it without candy, then immediately attach the first petal to the wire with hot glue.

We stretch all the parts a little in width, they become concave and we curl the edges to make them more similar to the real ones.

We begin to collect the bud. First we take narrow and then wide prepared parts.

For those who do not have professional materials for such products, I advise you to use the same crepe or corrugated paper to wrap the stem.

If you use several shades, you get bright and beautiful compositions.

To make the flower more realistic, select sheets of several shades of the same color, from dark to light, so you can create a natural gradient that all plants have.
How to make a paper flower with children?
The easiest way to make a craft with kids is to use napkins. They already have the required dimensions and are easy to roll and glue.
I offer an idea on how to quickly make a rose without glue.

Decorative napkins also provide several variations in how to fold the craft. The flowers turn out delicate and delicate.

Another simple option is to use a template. You draw a wavy spiral, cut along the outline and roll it, straightening each layer.

The same technique is shown below, but its difference is that the edges of the workpiece become frayed. They fold inward and thereby create a fluffy center.

Using the same spiral technique you can make slightly different flowers.

To do this, a template is drawn separately and cut along the lines. Do you see that the petals are more clearly defined here and there is a smooth edge?

Cut it along the contour.

And fold it from the end, correcting the outer petals.

You can finish the product with your fingers. The child will definitely be able to twist the part.

It is advisable to fill the bottom with hot glue so that the spiral does not unfold. This rose has the most beautiful and realistic petals than the results of previous versions using the spiral technique.

And one of the most simple options, this is to cut out the most ordinary spiral. Usually they start with this option, because it does not require any special skill at all.

I think that you liked the ideas and you will be able to create a beautiful decor.

For example, you can decorate a panel like this with flowers made using the techniques described above.
How to easily make a flower in five minutes with your own hands?
Incredibly beautiful buds can be made in just five minutes. And for this we will need corrugated paper again. We need a long strip five centimeters wide. The longer it is, the more blooming the flower you will get.

So, we bend the edge, turning it out a little, as in the photo.

We do this along the entire length of the strip.

And we begin to twist it.

Don't forget to fix the edges.
Another fun and quick idea is created from tissue paper. It is thin and translucent. But it allows you to make voluminous crafts.

1. We need a rectangle, centimeters long and 7 centimeters wide.

2. Fold it in half so that the edges match.

3.And wrap the resulting workpiece around your finger with the fold upward.

4. Secure the bottom with a stapler and straighten the layers.

5. We will need a lot of these buds.

What can they not think of? creative people! For example, make beauty out of egg trays. It’s both environmentally friendly and looks amazing. All instructions are shown in the diagram.

Another quick rose idea. True, it is more labor-intensive than the previous ones, but it will not take more than fifteen minutes for an adult.

If you don't have such shaped staplers, cut out the parts by hand. But such assistants are sold in most office supply stores. And the kids will definitely appreciate such a purchase.

We will need parts of the same size, but with different quantities petals. Therefore, we take three parts and make cuts in each. For the first we only cut one line, for the second we cut out a petal, for the third we remove two.

Roll up each piece and cut off the bottom.

Glue each piece together and see if your result is similar to the image.

We form the center from the cut petal, attaching it to the wire. Then we insert this part into the trefoil, then into the middle blank.

The outermost will be the largest. We remember that all layers need to be secured so that the craft does not fall apart.
This option works well from thick sheets or cardboard. It will be especially beautiful if you take a sheet with texture or reliefs. By the way, all these options can be repeated from felt. If suddenly you have such a desire.
Master class on a large paper rose for beginners with diagrams
Popular now. They are made in different sizes, from standard to full size. These crafts are used to decorate photo studios, photo zones, decorate the interior, and simply give to each other.
This big beauty is made from crepe paper. Remember, above we looked at several options for petals that can be cut from corrugation? So, here we need heart-shaped parts.
The process is the same when creating ordinary flowers. We stretch each petal in width and bend the ends. A bud is assembled, around which layers of petals are glued.

For the stem, you can take a wire whose width corresponds to the volume of the bud. Of course, the thin one will not withstand it.

Here's a beauty for large spaces.

The craftswoman shows you the whole stage step by step. And it is almost the same as the previous one. But the details are many times greater.
All layers must be glued together, otherwise the petals simply won’t hold on under their own weight and will fall apart. You may need a whole pack of glue sticks because the parts are large.
Any woman can make such crafts. And then put your creation to decorate the hall or living room.
For large volumes, one roll may not be enough for you, so buy at least two of them.
Beautiful flower using quilling technique
Quilling has several directions. For example, there is laying out flat modules on the surface of the drawing. The results are bright and delicate compositions, but I will not describe this method today; it requires complete immersion in the technique. Today we will deal with a voluminous rose.

This option can be repeated with satin ribbons. You've probably already seen similar fabric flowers on brooches or other clothes. The sequence of actions is the same, but we use different material.
If you find it difficult to repeat the steps according to the scheme, then I suggest you watch the video in which the master shows how to fold the strip.
All the options I've given are beautiful and will help you out if you need to quickly decorate a gift or create decor for a holiday. And it’s also worth teaching children such wonderful creativity.