Heating a house - what heating systems and wiring diagrams are there. Heating in a private house: theory, options and solutions, choice of system, calculation, installation Standards and requirements for water autonomous heating
An effective heating system will make life comfortable in any home. Well, if the heating works very poorly, then the level of comfort will not be saved by any design delights. Therefore, now we will talk about diagrams and rules for installing elements of a system that heats a home.
What you need for assembly - 3 main parts
Any heating system consists of three basic components:
- heat source - this role can be played by a boiler, stove, fireplace;
- heat transfer line - usually this is the pipeline through which the coolant circulates;
- heating element - in traditional systems this is a classic radiator that converts the energy of the coolant into thermal radiation.
Boiler room layout in the house
Of course, there are schemes that exclude the first and second elements of this chain. For example, the well-known stove heating, when the source is also a heating element, and the heat transfer line is absent in principle. Or convection heating, when the radiator is excluded from the chain, since the source heats the air itself in the house to the desired temperature. However, the oven scheme was considered obsolete at the beginning of the twentieth century, and the convection option is very difficult to implement with your own hands without special knowledge and specific skills. Therefore, most household systems are built on the basis of a hot water boiler and a water circuit (piping).
As a result, to build the system we will need one boiler, several radiators (usually their number is equal to the number of windows) and fittings for the pipeline with associated fittings. Moreover, in order to assemble the heating of a private house, you will have to connect all these components within one system with your own hands. But before that, it would be nice to understand the parameters of each element - from the boiler to pipes and radiators, in order to know what to buy for your home.
Which boiler to choose and how to calculate its power
Water heating draws energy from a special boiler, the combustion chamber of which is surrounded by a jacket filled with liquid coolant. At the same time, any product can burn in the firebox - from gas to peat. Therefore, before assembling the system, it is very important to choose not only the power, but also the type of heat source. And you will have to choose between three options:
- Gas boiler - it processes main or bottled fuel into heat.
- Solid fuel heater - it is powered by coal, firewood or fuel pellets (pellets, briquettes).
- Electrical source - it converts electricity into heat.
The best option of all of the above is a gas heat generator running on main fuel. It is cheap to operate and operates continuously, since fuel is supplied automatically and in arbitrarily large volumes. Moreover, such equipment has virtually no disadvantages, except for the high fire hazard that is inherent in all boilers.
A good option for a heat generator that heats a private house without a gas pipeline is a solid fuel boiler. Especially models designed for long-term burning. Fuel for such boilers can be found anywhere, and the special design allows you to reduce the loading frequency from twice a day to once filling the firebox every 2-3 days. However, even such boilers are not exempt from periodic cleaning, so this is the main disadvantage of such a heater.

The worst choice of all possible is an electric boiler. The disadvantages of such a proposal are obvious - the transformation of electricity into coolant energy is too expensive. In addition, an electric boiler requires frequent replacement of the heater and the installation of a reinforced electrical wiring line, as well as grounding. The only advantage of this option is the complete absence of combustion products. An electric boiler does not require a chimney. Therefore, most households choose either gas or solid fuel options. However, in addition to the type of fuel, the homeowner also needs to pay attention to the parameters of the heat generator itself, or more precisely, to its power, which should compensate for the heat losses of the home in the winter.
Choosing a boiler based on power begins with calculating the square footage of the heated premises. Moreover, for each square meter there must be at least 100 watts of thermal power. That is, for a room of 70 square meters you need a boiler of 7000 watts or 7 kW. In addition, it would be a good idea to include a 15% reserve in the boiler power, which will be useful during severe cold weather. As a result, for a house of 70 m2 you need a boiler of 8.05 kW (7 kW 15%).
More accurate calculations of heater power rely not on the squares of the area, but on the volume of the house. In this case, it is generally accepted that the energy costs for heating one cubic meter are equal to 41 watts. And a house with an area of 70 m2 with a 3-meter ceiling height should be heated by a heat-generating device with a capacity of 8610 watts (70 × 3 × 41). And taking into account the 15% power reserve for extreme cold, the maximum heat-generating capacity of such a boiler should be equal to 9901 watts or, taking into account rounding, 10 kW.
Batteries and pipes - copper, propylene or metal-plastic?
To install a heating system throughout the house, we need pipes and radiators. The latter can be chosen even based on aesthetic preferences. In a private house there is no high pressure in the system, therefore, there are no restrictions on the strength characteristics of radiators. However, the requirements for the heat-generating capacity of batteries still remain. Therefore, when selecting radiators, it will be correct to focus not only on appearance, but also on heat transfer. After all, the power of the heating element must correspond to the area or volume of the room. For example, in a room of 15 square meters there should be a battery (or several radiators) with a power of 1.5 kW.
With pipes the situation becomes more complicated. Here you need to take into account not only the aesthetic component, but also the ability to install the network on your own with minimal knowledge and effort on the part of a home-grown mechanic. Therefore, we can consider only three options as candidates for the role of ideal fittings for wiring:
- Copper pipes - they are used in the arrangement of both domestic and industrial heating systems, but are very expensive. In addition, such fittings are connected using soldering, and not everyone is familiar with this operation.
- Polypropylene pipes - they are cheap, but their installation requires a special welding machine. However, even a child can master such a device.
- Metal-plastic pipes - such a system can be assembled using a wrench. In addition, metal-plastic is no more expensive than polypropylene pipes and allows you to save on corner fittings.

As a result, it is better to assemble home-made heating based on metal-plastic fittings, since it does not require the performer to be able to handle a welding machine or soldering iron. In turn, collet fittings of a metal-plastic pipeline can be installed even by hand, helping yourself with wrenches only on the last 3-4 turns. Regarding the dimensions of the fittings, or rather the bore diameter, experienced specialists in the arrangement of heating systems have the following opinion: for a system with a pump, you can choose a ½-inch pipe - this bore diameter is sufficient for a home system in excess.
Well, if pressure equipment will not be used (water will flow through the pipes by gravity, driven by gravitational and thermal convection), then a 1¼ or 1½ inch pipe will be sufficient for such a system. There is no need to buy reinforcement of a larger diameter under such circumstances. And which wiring to choose - pressure or non-pressure, we will talk about this below in the text, at the same time discussing the optimal diagrams for connecting batteries to the boiler.
Optimal wiring diagram for self-installation
Home heating is based on two schemes: one-pipe and two-pipe. In addition, household wiring can also be built on a collector basis, but it is difficult for novice craftsmen to assemble such a circuit, so further in the text we will not consider this option, focusing only on one- and two-pipe options.
Single-pipe wiring assumes the following coolant circulation plan: the hot flow leaves the boiler jacket and flows through the pipe into the first battery, from which it enters the second, and so on, until the outermost radiator. There is virtually no return in such a system - it is replaced by a short section connecting the outermost battery and the boiler. Moreover, when designing a single-pipe forced circuit, pressure equipment (circulation pump) is placed on this section.
This system is very easy to assemble. To do this, you need to install the boiler, hang the batteries and run one wiring thread between each preinstalled elements of the heating circuit. However, you will have to pay for the ease of installation by the lack of mechanisms for controlling the heat transfer of radiators. In this case, you can regulate the temperature in the room only by changing the intensity of fuel combustion in the boiler. And nothing else.
Of course, given the high cost of fuel, this nuance will suit only a few homeowners, so they try not to use single-circuit wiring in rooms with an area of 50 square meters or more. However, such a layout is simply ideal for small buildings, as well as for the natural coolant circulation pattern, when the pressure is generated due to temperature and gravitational forces.

The two-pipe system is designed a little differently. In this case, the following coolant flow pattern applies: water leaves the boiler jacket and enters the pressure circuit, from which it drains into the first, second, third batteries, and so on. The return in this system is implemented in the form of a separate circuit, laid parallel to the pressure branch, and the coolant that has passed through the battery is drained into the return line, returning to the boiler. That is, in a double-circuit scheme, radiators are connected to the pressure and return pipes using special branches cut into two main lines.
To make such a circuit, you need to use more pipes and fittings, but all the costs will pay off in the near future. The dual-circuit option assumes the ability to adjust the heat transfer of each battery. To do this, it is enough to install a shut-off and control valve into the branch from the pressure line connected to the radiator, after which it becomes possible to control the volume of coolant pumped through the battery without interfering with the general circulation. Thanks to this, you can protect yourself not only from overheating the air in a particular room, but also from senseless overconsumption of fuel and personal funds allocated for its purchase.
This version of the wiring diagram has only one drawback: it is very difficult to assemble on its basis effective system on natural coolant circulation. But based on a pump, it works much better than its single-circuit counterpart. Therefore, further in the text we will consider step-by-step instructions for assembling a single-circuit system using natural circulation and a double-circuit network using forced coolant movement.
Assembling a heating system with natural circulation
The construction of a natural circulation system begins with choosing a location. The heat source should be in a corner room, located at the lowest point of the wiring. After all, the batteries will go along the internal perimeter, along the load-bearing walls, and even the last radiator should be located slightly above the boiler. Once the location for the boiler has been chosen, you can begin installing it. To do this, the wall in the placement area is covered with tiles, and either a galvanized sheet or a flat slate panel is placed on the floor. The next stage is the installation of the chimney, after which you can install the boiler itself, connecting it to the exhaust pipe and fuel line (if there is one)
Further installation is carried out in the direction of movement of the coolant and is implemented according to the following scheme. First, batteries are hung under the windows. Moreover, the upper pipe of the last radiator should be located above the pressure outlet from the boiler. The amount of elevation is calculated based on the proportion: one linear meter of wiring is equal to two centimeters of elevation. The penultimate radiator is hung 2 cm higher than the last one, and so on, up to the first battery in the direction of the coolant.
When the required number of batteries is already hanging on the walls of the house, you can proceed to assembling the wiring. To do this, you need to connect a 30-centimeter section of horizontal pipeline to the pressure pipe (or fitting) of the boiler. Next, a vertical pipe raised to the ceiling level is attached to this section. In this pipe, a tee is screwed onto a vertical line, providing a transition to a horizontal slope and arrangement of the insertion point for the expansion tank.

To install the tank, use a vertical tee fitting, and screw a second horizontal section of the pressure pipe to the free outlet, which is pulled at an angle (2 cm by 1 m) to the first radiator. There the horizontal turns into a second vertical section, descending to the radiator pipe, to which the pipe is joined using a collet fitting with a threaded elbow.
Next, you need to connect the upper pipe of the first radiator with the corresponding connector of the second radiator. To do this, use a pipe of the appropriate length and two fittings. After this, the lower radiator pipes are connected in the same way. And so on, until the penultimate and last battery is connected. Finally, you need to install the Mayevsky faucet into the upper free fitting of the last battery and connect the return pipe to the lower free connector of this radiator, which is inserted into the lower pipe of the boiler.
To fill the system with water in the return pipe, you can install a tee insert with a ball valve on the side outlet. We connect the outlet from the water supply to the free end of this valve. After which the system can be filled with water and the boiler turned on.
Heating with forced circulation in 8 steps
It will also be justified in the case of single-circuit wiring. However, maximum efficiency of a system with forced circulation will be ensured only by two-pipe wiring, arranged according to the following rules:
- 1. The boiler can be installed on the floor or hung on the wall in any room without monitoring the level of the heating device.
- 2. Next, two pipes are lowered from the boiler pressure and return pipes to the floor level, using either couplings or corner fittings.
- 3. Two horizontal lines are installed at the ends of these pipes - pressure and return. They run along the load-bearing walls of the house, from the boiler to the location of the outermost battery.
- 4. At the next stage, you need to hang the batteries, not paying attention to the level of the pipes relative to the adjacent radiator. The entrance and exit from the battery can be located at the same level or at different levels; this fact will not affect the heating efficiency.
- 5. Next, we cut a tee into the pressure and return branches, placing them under the inlet and outlet of each battery. After this, we connect the tee of the pressure pipe to the inlet of the battery, and the fitting on the return line to the outlet. Moreover, this operation will have to be done with all batteries. Using a similar scheme, we install outlets in the system for connecting heated floors.
- 6. At the next stage, we install the expansion tank. To do this, we cut a tee into the section of the pressure pipe between the boiler and the first battery, the outlet of which is connected by a vertical pipe to the entrance to the expansion tank.
- 7. Next, you can begin installing the circulation pump. To do this, we install a valve and two tees in the return line between the first battery and the boiler, assembling a bypass for the pump. Next, we remove two L-shaped sections from the tees, between the ends of which we mount the pump.
- 8. Finally, we arrange a drain for pouring water into the system. To do this, you need to cut another tee between the pump and the boiler, connecting a hose from the water supply to its outlet.

Acting according to this plan, you can assemble a two-pipe wiring in a house of any size. After all, the design of such a system does not depend on the number of batteries - the installation principle will be identical for both two and 20 radiators.
How to increase system efficiency - battery or bypass?
To increase the efficiency of heating systems in everyday life, either heat accumulators or bypasses are used. The first ones are installed in large boiler rooms, the second ones - in small rooms where, in addition to the boiler, there is other equipment. A heat accumulator is a container filled with water, inside which the pressure and return lines of the heating system are laid. As a rule, such a container is placed immediately behind the boiler. Safety valves, expansion tanks and circulation pumps can be embedded into the section of the pressure and return pipeline located between the heater and the battery.
In this case, the pressure line heats the water in the tank, and the return line heats up from the liquid poured into the battery. Therefore, when the boiler burner is turned off, the system can operate for some time only from a heat accumulator, which is very beneficial when used in a circuit that generates excess energy at the start of combustion of a portion of wood or coal supplied with the firebox. The capacity of the heat accumulator is determined by the proportion 1 kW of boiler power = 50 liters of tank volume. That is, for a 10 kW heater you need a battery with a capacity of 500 liters (0.5 m3).
A bypass is a bypass pipe that is welded between the pressure and return branches. Its diameter should not exceed the radius of the main highway. Moreover, it is better to install a shut-off valve into the bypass body in advance, blocking the circulation of the coolant.
When the valve is open, part of the hot flow does not go into the pressure circuit, but directly into the return circuit. Thanks to this, it is possible to reduce the heating temperature of the battery by 10 percent, reducing the volume of coolant pumped through the radiator by 30%. As a result, using a bypass, you can regulate the operation of the radiator in both double-circuit and single-circuit wiring. In the latter case, this is especially true, since the bypass embedded in the first two batteries provides stronger heating of the last radiator in the line and makes it possible to control the temperature in the rooms, although not with such efficiency as in the case of a two-pipe wiring.
One of the stages of building a private house is the design and creation of a heating system. This is a difficult stage, since you need to not only design the heating, but also save on materials. An important factor is that the created heating must be efficient and economical. We create heating for a private house with our own hands - you can find wiring diagrams (the most basic) in our review.
There are many schemes for laying heating pipes in private households. Some of them are combined, which allows you to increase the efficiency of the system and achieve more uniform heating throughout the house. In our review we will consider only the most basic schemes:
- single-pipe horizontal circuit;
- single-pipe vertical diagram;
- "Leningradka" scheme;
- two-pipe system with bottom wiring;
- two-pipe system with top wiring;
- beam system with collectors;
- schemes with forced and natural circulation.
Let's look at the features of the presented schemes, and also discuss their advantages, disadvantages and installation features.
Single pipe systems
In single-pipe heating systems, the coolant passes sequentially through all radiators.
When creating heating for a private house with your own hands, the easiest way is to equip a single-pipe heating system. It has many advantages, such as cost-effective use of materials. Here we can save a lot on pipes and achieve heat delivery to every room. A single-pipe heating system provides for sequential delivery of coolant to each battery. That is the coolant leaves the boiler, enters one battery, then another, then a third, and so on.
What happens in the last battery? Having reached the end of the heating system, the coolant turns around and is sent back to the boiler through a single pipe. What are the main advantages of such a scheme?
- Easy to install - you need to sequentially pass the coolant through the batteries and return it back.
- Minimum consumption of materials is the simplest and cheapest scheme.
- Low location of heating pipes - they can be mounted at floor level or completely lowered under the floors (this can increase the hydraulic resistance and require the use of a circulation pump).
There are also some disadvantages that you have to put up with:
- limited length of the horizontal section - no more than 30 meters;
- The farther from the boiler, the colder the radiators.
However, there are some technical tricks that can mitigate these shortcomings. For example, the length of horizontal sections can be dealt with by installing a circulation pump. It will also help make the last radiators warmer. Bypass jumpers on each radiator will also help compensate for the temperature drop. Let's now discuss certain types of single-pipe systems.
Single-pipe horizontal

The simplest version of a single-pipe horizontal heating system with a bottom connection.
When creating a heating system for a private house with your own hands, a single-pipe wiring diagram may turn out to be the most profitable and cheapest. It is equally suitable for both one-story and two-story houses. In the case of a one-story house, it looks very simple - radiators are connected in series - to ensure consistent flow of coolant. After the last radiator, the coolant is sent through a solid return pipe to the boiler.
Advantages and disadvantages of the scheme
First, we will look at the main advantages of the scheme:
- ease of implementation;
- excellent option for small houses;
- saving of materials.

A single-pipe horizontal heating circuit is an excellent option for small spaces with a minimum number of rooms.
The scheme is really very simple and understandable, so even a beginner can handle its implementation. It provides for a serial connection of all installed radiators. This ideal heating layout for a small private house. For example, if this is a one-room or two-room house, then “fencing” a more complex two-pipe system does not make much sense.
Looking at the photo of such a circuit, we can note that the return pipe here is solid, it does not pass through the radiators. Therefore, this scheme is more economical in terms of material consumption. If you don’t have extra money, this type of wiring will be the most optimal for you - it will save money and allow you to provide heat to your home.
As for the shortcomings, there are few of them. The main disadvantage is that the last radiator in the house will be colder than the very first one. This is due to the sequential passage of the coolant through the batteries, where it releases the accumulated heat into the atmosphere. Another disadvantage of a single-pipe horizontal circuit is that if one battery fails, the entire system will have to be turned off at once.
Despite certain disadvantages, this heating scheme continues to be used in many small private houses.
Features of installation of a single-pipe horizontal system
When creating water heating for a private house with your own hands, the scheme with single-pipe horizontal wiring will be the easiest to implement. During the installation process, it is necessary to mount the heating radiators, and then connect them with pipe sections. After connecting the very last radiator, it is necessary to turn the system in the opposite direction - it is advisable that the outlet pipe runs along the opposite wall.
The larger your home, the more windows it has and the more radiators it has. Accordingly, heat losses also increase, as a result of which the last rooms become noticeably cooler. You can compensate for the temperature drop by increasing the number of sections on the latest radiators. But it is best to install a system with bypasses or with forced circulation of the coolant - we will talk about this a little later.
A similar heating scheme can be used to heat two-story houses. To do this, two chains of radiators are created (on the first and second floors), which are connected in parallel to each other. There is only one return pipe in this battery connection diagram; it starts from the last radiator on the first floor. The return pipe coming down from the second floor is also connected there.
Single-pipe vertical
How else can you heat two-story households with a single-pipe system? There really is an alternative - this is a single-pipe vertical heating system, which is used by many people who are looking for a suitable steam heating scheme in a private home. There are no difficulties in such a scheme, you just need to bring the supply pipe with the coolant to the second floor and connect the batteries located there, and then make branches down to the first floor.
Advantages and disadvantages of a single-pipe vertical scheme
As usual, let's start with the positive features:

In single-pipe vertical heating systems, the coolant flows from the radiator on the top floor to the lower floors.
- greater savings on materials;
- relatively equal air temperature on the first and second floors;
- ease of implementation.
The list of disadvantages is the same as the previous scheme. It included heat losses on the last radiators. And since our coolant is supplied through the upper floor, then the first floor may be cooler than the second.
The savings on materials are more than substantial. We only have one pipe going upstairs, from which the coolant is distributed to all the radiators on the second floor (not sequentially). From each upper radiator, pipes go down to the radiators on the ground floor, after which they end up in one common return pipe. Thus, this scheme involves minimal use of materials.
Features of installation of a single-pipe vertical system

When installing a vertical single-pipe system, you will receive as many chains as there are radiators on each floor.
In the previous gas heating scheme in a private house, the pipes sequentially bypassed the radiators on the first and second floors. That is, we have two parallel chains were obtained, each of which included several radiators. In the current scheme we also have chains, but they are vertical. For example, if there are four radiators on each floor, then we get four chains connected in parallel.
This scheme assumes one solid supply pipe passing along the top floor. Branches are made from it to each radiator. After passing through the upper radiators, the coolant flows to the lower radiators, and only after that into the return pipe passing along the first floor.
If in the first case the greatest heat losses were observed in the distant radiators of the first and second floors, then in this scheme it will be cooler on the first floor, since part of the heat will be consumed on the second floor.
A single-pipe vertical heating scheme for a private house with a gas boiler can be implemented without forced circulation of the coolant. The thing is that the temperature of the coolant supplied to the radiators on the second floor is the same. A drop in temperature is observed only on the first floor. But if we supplement the radiators with bypass jumpers, then the temperature change will be minimal - it can be neglected.
Thus, this circuit, supplemented by bypass jumpers, will become the most economical and inexpensive among any other circuits. Instead of a gas boiler, any other boiler can be used. The electric heating circuit of a private house is no different from gas heating (except in the type of boiler).
Scheme "Leningradka"

The Leningradka heating system is an improved single-pipe system.
Both considered schemes have one common drawback - a drop in temperature in the last radiators. In the case of a horizontal circuit, we have cold radiators in horizontal chains, and in the case of a vertical circuit, in vertical chains. That is, in the latter case it is the entire first floor.
The Leningradka heating circuit in a private house allows you to compensate for the cooling of the coolant when passing through the next radiator. How is it implemented? This circuit provides bypass jumpers located under the batteries. What do they give? The jumpers allow you to direct part of the coolant bypassing the radiators, so the coolant at the outlet is as warm as at the inlet (minor deviations can be neglected).
Advantages and disadvantages of the Leningradka scheme

Leningradka promotes more uniform heating of rooms.
Each scheme has its own advantages and disadvantages. What are the advantages of the Leningradka scheme?
- More even heat distribution throughout the house.
- Relatively simple upgrade.
- Possibility of adjusting the temperature in individual rooms (as in two-pipe systems).
Single-pipe heating is not perfect, so the Leningradka scheme allows you to compensate for some of its shortcomings. But she has negative features:
- limited line length – if there are many radiators in a horizontal chain, then there will still be losses;
- the need to use large diameter pipes for more uniform heat distribution.
The last drawback can be eliminated by installing a circulation pump in the system.
Features of installation of "Leningradka"

Connection options for Leningradka in a single-pipe vertical circuit.
When creating heating systems for private houses with their own hands, many people actively use the Leningradka scheme. How is it laid? To create a circuit, you need to place radiators and lay a pipe under them, from which branches are made to the inlets and outlets of the radiators. That is, a jumper is formed under each radiator. In addition, we can install three taps on each radiator - the first two taps are installed at the inputs and outputs, and the third is installed on the jumper itself. What does this give?
- Taps can be used to regulate the temperature in individual rooms.
- Ability to exclude any radiator without shutting down the entire system(for example, if one radiator is leaking and needs to be replaced).
Thus, the “Leningradka” scheme is the optimal scheme for small one-story and two-story houses - you can save on materials and achieve uniform heat distribution throughout the rooms.
Two-pipe system with bottom wiring
Next, we will consider two-pipe systems, characterized by the fact that they ensure uniform heat distribution even throughout the largest households with many rooms. It is the two-pipe system that is used for heating multi-storey buildings, in which there are a lot of apartments and non-residential premises - here such a scheme works great. We will consider schemes for private houses.

A two-pipe heating system consists of supply and return pipes. Radiators are installed between them - the radiator inlet is connected to the supply pipe, and the outlet is connected to the return pipe. What does this give?
- Uniform heat distribution throughout the rooms.
- Possibility of adjusting the temperature in the rooms by completely or partially closing individual radiators.
- Possibility of heating multi-storey private houses.
There are two main types of two-pipe systems - with bottom and top wiring. First, we will look at a two-pipe system with bottom wiring.
Bottom wiring is used in many private homes, as it makes heating less visible. The supply and return pipes pass here next to each other, under the radiators or even in the floors. Air is removed through special Mayevsky taps. Heating schemes in a private house made of polypropylene most often provide for just such wiring.
Advantages and disadvantages of a two-pipe system with bottom wiring

When installing heating with bottom wiring, we can hide the pipes in the floor.
Let's see what positive features two-pipe systems with bottom wiring have.
- Possibility of masking pipes.
- The ability to use radiators with bottom connections makes installation somewhat easier.
- Heat losses are minimized.
The opportunity to at least partially make heating less visible attracts many people. In the case of bottom wiring we get two parallel pipes running flush with the floor. If desired, they can be placed under the floors, having provided for this possibility at the stage of designing the heating system and developing a project for the construction of a private house.
As for the disadvantages, they are the need for regular manual removal of air and the need to use a circulation pump.
Features of installing a two-pipe system with bottom wiring

Plastic fasteners for heating pipes of different diameters.
In order to install a heating system according to this scheme, it is necessary to lay supply and return pipes throughout the house. For these purposes, there is a special plastic fastener on sale. If radiators with a side connection are used, we make a branch from the supply pipe to the upper side hole, and take the coolant through the lower side hole, directing it to the return pipe. We install air vents next to each radiator. The boiler in this scheme is installed at the lowest point.
This circuit is most often made closed, using a sealed expansion tank. The pressure in the system is created using a circulation pump. If you need to heat a two-story private house, we lay pipes on the upper and lower floors, and then create parallel connection both floors to the heating boiler.

In a two-pipe heating system with overhead wiring, the expansion tank is placed at the highest point.
This two-pipe scheme is very similar to the previous one, only here it is provided for the installation of an expansion tank at the very top of the system, for example, in an insulated attic or under the ceiling. From there, the coolant goes down to the radiators, gives them part of its heat, and then is sent through the return pipe to the heating boiler.
Why is such a scheme needed? It is optimal in multi-storey buildings With big amount radiators. Thanks to this, more uniform heating is achieved, and there is no need to install a large number of air vents - the air will be removed through the expansion tank or through a separate bleeder that is part of the safety group.
Advantages and disadvantages of a two-pipe system with top wiring
There are a lot of positive features:
- it is possible to heat multi-storey buildings;
- saving on air vents;
- you can create a system with natural coolant circulation.
There are also some disadvantages:

Using vertical wiring will lead to additional difficulties when installing hidden heating.
- pipes are visible everywhere - this scheme is not suitable for interiors with expensive finishes, where elements of heating systems are usually hidden;
- in tall buildings it is necessary to resort to forced circulation of the coolant.
Despite the disadvantages, the scheme remains quite popular and widespread.
Features of installation of two-pipe systems with top wiring
This scheme eliminates the need to locate the heating boiler at the lowest point. Immediately after the boiler, the supply pipe is diverted upward, and an expansion tank is installed at the highest point. Coolant is supplied to the radiators from above, so a lateral or diagonal radiator connection scheme is used here. After this, the cooled coolant is sent to the return pipe.

Radiant heating system using a collector.
This is one of the most modern schemes implying the laying of an individual line to each heating device. To do this, collectors are installed in the system - one collector is the supply, and the other is the return. Separate straight pipes diverge from the collectors to the batteries. This scheme allows for flexible adjustment of heating system parameters. It also makes it possible to connect heated floors to the system.
The radial wiring diagram is actively used in modern homes. The supply and return pipes here can be laid in any way - most often they go in the floors, after which they are suitable for one or another heating device. To regulate the temperature and turn on/off heating appliances, small distribution cabinets are installed in the house.
According to heating engineers, this scheme is ideal, since each heating device operates from its own mains and is almost independent of other heating devices.
Advantages and disadvantages of beam systems
There are many positive qualities:
- the ability to completely hide all pipes in the walls and floors;
- convenient system setup;
- possibility of creating remote separate adjustment;
- minimum number of connections - they are grouped in distribution cabinets;
- it is convenient to repair individual elements without interrupting the operation of the entire system;
- almost perfect heat distribution.

When installing a radiant heating system, all pipes are hidden in the floor, and the collectors are hidden in a special cabinet.
There are also a couple of disadvantages:
- high cost of the system - this includes the costs of equipment and installation costs;
- difficulty in implementing the scheme in an already built house - usually this scheme is laid down at the stage of creating a home ownership project.
If you still have to put up with the first drawback, then there is no escape from the second.
Features of installation of radiant heating systems
At the project creation stage, niches are provided for laying heating pipes, installation points are indicated distribution cabinets. At a certain stage of construction, pipes are laid, cabinets with collectors are installed, heating devices and boilers are installed, a test run of the system is carried out and it is checked for leaks. It is best to entrust all this work to professionals, since this scheme is the most complex.
Despite its complexity, a radiant heating system with collectors is one of the most convenient and efficient. It is used not only in private homes, but also in other buildings, for example, in offices.
With forced and natural circulation
All the schemes presented above can be created on the basis of heating boilers of any type. For example, a stove heating scheme for a private house is built on the basis of a wood or coal stove, and pipe routing can be carried out according to almost any of the schemes described above. True, it would not hurt to add forced circulation to many of them. What is it for?

The main difference between a system with forced circulation of coolant and a system with natural circulation is the circulation pump.
As we remember, single-pipe heating systems are characterized by a decrease in coolant temperature as it moves away from the boiler - part of the heat remains in the radiators. These losses are partially compensated by the Leningradka scheme, but in some cases this is not enough. In order to rectify the situation, in heating system a circulation pump is installed to ensure forced circulation of the coolant.
Forced circulation is also necessary in many other schemes, including two-pipe ones. The thing is that the small diameter of modern polypropylene pipes, numerous connections and turns create hydraulic resistance. In addition, the use of forced ventilation allows for faster heating of households.
Advantages and disadvantages of forced and natural circulation
Each system has its own advantages and disadvantages:

When heating a room with a large number of radiators, a circulation pump is simply necessary.
- natural circulation is easier and cheaper– there are no costs for circulation pumps;
- forced circulation makes it possible to improve heating performance in large buildings - in some cases you can get by with natural circulation, but then the system warm-up time increases;
The main advantage of a private house is that there is complete independence from various utilities. At the same time, they should be, but much more efficient than what utilities offer today. Probably the most important thing is that in your home the heating season can begin when you wish and end when it is convenient for you. But how it will take place is also important. And below we will look at how to arrange the heating of a private house with your own hands, we will offer videos and diagrams that will help you master all stages of this important process.
| Types of heating boilers: gas, electric, coal, combined. | |
 |
Types of heating systems and their installation: air heating, water heating, steam heating, electric heating. |
 |
Warm floors in a private house. |
 |
Combined heating. |
You can’t just buy a heating system in a store and install it in your home. Of course, all its components are sold on the market or in a store, but you definitely won’t be able to get by with just one set. To create a heating system for a private home with your own hands, first of all, you must know:
- How will the house be heated?
- What energy carrier should be used in the system?

Heating system design is one of the most important stages in the communications of a private home. After this, it is necessary to perform a lot of calculations to determine the required number of heating radiators and pipes. All this must meet each other in different parameters.
First of all, you must decide which boiler can heat the house.
What types of heating boilers are there?
I would like it to be warm in a private home, and that it can be achieved with minimal human intervention. For this reason, the heating boiler should be purchased based on what type of fuel would be better suited for its smooth operation.
Boilers can be:
- electrical;

- gas;

- coal;

- combined.
Attention! All modern boiler models are more or less economical, operate without any noise, and have small sizes, and are also easy to maintain. However, all boilers, even coal boilers, require electricity to start.
A gas boiler
If there is gas in the house, this is the most inexpensive and easiest way to heat your home. Modern models of gas boilers operate silently, are designed for a specific power, can be double-circuit, which means they are capable of both heating and providing housing. hot water.
Electric boilerWith the help of electricity, you can heat a large space in an environmentally friendly and efficient manner. Moreover, the power range of boilers that should be used in private homes can vary from 4 to 300 kW.

The main advantages of such boilers:
- they can heat up to 300 m2 of housing, and they are located on two or even three floors;
- they do not require special ventilation and a chimney;
- they do not pollute or emit anything;
- differ in compact sizes.
Some disadvantages:
- Requires powerful electrical wiring in a three-phase network and stable voltage.
- Heating costs can be quite expensive.
Like all powerful modern boilers, electric boilers not only heat living space, but are also used to heat water.
Coal boiler
Solid fuel boilers are quite efficient. Their operation is based on the operating principle of Kolpakov furnaces. It is as follows: an already heated boiler requires fuel to maintain a stable coolant temperature (once a day). These devices are characterized by high efficiency, close to 100%.

Modern coal boilers are made floor-standing. They are quite compact in size. Their body does not heat up during operation.
Main advantages:
- you can burn not just coal, but also wood, including waste that burns (sawdust, paper, peat);
- high power;
- small sizes;
- inexpensive type of fuel.

Main disadvantages:
- modern solid fuel boiler models can be effective, but their main drawback is dirt during their operation (you need to find a place to store coal and dispose of burnt ash);
- They take quite a long time to warm up (to achieve high power, at least 30 minutes must pass after the fuel ignites);
- a well-designed chimney is important;
- You cannot fill in more coal than the combustion chamber can accommodate, otherwise the fuel may “stack up” (become a monolithic structure that cannot be turned, reached, or broken).
Combination boilers
It’s not that these boilers are inefficient, it’s just that their efficiency is no more than 90%. There can only be one combination here - gas and solid fuel.

Such heating units are used when the house is built and you plan to supply gas, but next winter. For this reason, owners prefer to purchase a coal-fuel boiler and heat it with solid fuel the first winter.
The transition from one fuel to another occurs by changing burners. This is quite easy and can be done quite quickly.
Each boiler is part of the heating system, although it will not be very important. Its choice, namely the characteristics, should be based on what kind of energy carrier will circulate in the system.
What are the types of heating systems?
Today, six main types of heating systems can be used in a private home:
- air heating (in this case, the energy carrier is hot air);
- water heating (water circulates through the pipes, which has been heated to the required temperature);

- electric (the home is heated using electric heating elements);

- steam (steam circulates through pipes);
- combined heating (there can be a variety of options);
- warm floor.
Each of them has its advantages, but there are also some disadvantages.
Water heating in a private house
The most accessible, simple, not requiring special conditions operation - water heating. Its operating principle is as follows: it is necessary to correctly calculate the number of batteries and decide on the choice of a powerful boiler. You need to pour water into the finished system and there is no need to drain it at the end of the season.
It should be noted that water for the heating system in a private house can only be filtered (while in central networks it is additionally softened), so it is important to choose batteries more carefully.
This system is the easiest to maintain. Water circulation in it can occur in two ways:
- by gravity;
- using a pump.
Be that as it may, a do-it-yourself water heating system in a private house can be exclusively of a closed type.
Features of forced water circulation
A centrifugal or circulator pump is installed in a water heating system. Its main task is to supply water to and from the boiler (when heating) once at a certain interval.

Modern heating systems have automated this process. For this reason, human intervention to start the pump and control the temperature is absolutely unnecessary. The forced energy system makes it possible to efficiently heat a private house with several floors.
Natural water circulation
This method of moving water through the system is used extremely rarely today. It is built on the elementary laws of physics, where cold and warm waters move due to different weights. Water can flow by gravity in a system where all pipes are at a slight slope. Natural circulation of water is justified in one-story houses.

Any of the above boilers can operate in a water heating system.

Installation of a water heating system in a private house
It is necessary to make accurate calculations of the number of batteries and pipes. All this is done taking into account the area of the room that needs to be heated. All boilers, except electric ones, will require a chimney.
The heating system of a private house can be:
- with two pipes (feed and processing);

- with one pipe (supply of heated water by the boiler).

To begin with, the radiators are placed in the right place according to the level. You can watch our video on how to install and select them.
The next stage is pipe installation. Now metal pipes Using them is quite troublesome and unprofitable, but you can easily install polypropylene ones with your own hands.

Thick-walled polypropylene pipes are used for heating. They are laid throughout all rooms (so that they can move freely from one to another, you need to make holes in the walls slightly larger than the diameter of the pipes). They are connected in in the right places using special welding.
Installation of a two-pipe system
A pipe runs from the boiler to the expansion tank. The boiler should be installed on the first floor of the house, and the boiler on the second or simply above the boiler level.
After the boiler, the hot water is directed to the boiler. Two pipes come out of it: up with cooled water, down with heated water. In each room, pipes are connected to batteries.
Installation of a one-pipe system
To install a heating system in this way, fewer pipes will be needed. The system can only be with top wiring. It is perfect for small private houses with attics. The batteries are connected in series. Therefore, each next one will be a little colder.
The system must have:
- extended tank;
- boiler;
- water purification filters;
- batteries;
- perhaps a pump.
Attention! Setting the temperature in a home with such a system is very problematic. One disconnected battery can bring the entire system to a standstill.
As soon as you decide on the type of system, circulation diagram and pipe routing, you need to draw on paper a diagram of the water heating of the house indicating the location of the boiler, batteries, shut-off valves, fittings, and other additional equipment (hydraulic storage or expansion tank, circulation pump, safety unit, filter etc.).
You also need to measure and draw on the diagram the distance between them, the diagram and the diameter of the wiring. Moreover, such schemes should be developed for each room of the house and one separately. general scheme for the whole house. Compiling them will not cause you any difficulties, and during installation everything will be simple and clear: what is installed and where, connection methods.
DIY installation of water heating in a private house: video, diagrams
Installation of such heating includes the following steps:
- Installation of one or more heating boilers.
- Battery installation.

- Pipe routing.

- Installation of necessary additional equipment.

- Connecting all elements into a single system using soldering (welding), wiring and fittings.

Boiler installation
The installation of a heating boiler is always chosen based on the maximum simplification of pipe distribution around the house and their minimum consumption. Moreover, when installing an electric or gas boiler, you need to take into account the location of the future or existing electrical or gas pipeline entry.
When choosing a place to install a stove with a water circuit or a solid fuel boiler, the determining factor is the possibility of installing a chimney in a certain place in the house.
The installation height of the boilers is of fundamental importance for water heating with natural circulation. In this case, the lower the “processing” input into the boiler, the better. The best option for a solid fuel boiler would be to place it on ground floor at home or in the basement. With stove water heating, it is also necessary that the firebox with the heat exchanger located in it (coil, register) be located as low as possible.Installation of heating radiators
Typically, radiators are located at the entrance to the room or under the windows. Their installation is carried out depending on their size and type of mounting. The greater the weight of the heating radiator, the more reliable the fastening should be.
The batteries are installed horizontally with slight indentations from the floor (60 mm) and from the window sill - 100 mm. It would be good if you install taps (steam fittings), an automatic air valve and a regulator on each radiator. Shut-off valves will be needed to disconnect the radiator from the heating system. The air valve automatically bleeds air from the radiator, both when starting the heating system and during its operation.
Pipe routing and installation of additional equipment
As a rule, pipe routing begins from the heating boiler, in accordance with the previously drawn up wiring diagram, and using the necessary fittings (tees, angles, connectors, adapters, etc.). All types of pipes differ in their installation and wiring features.
The wiring can be of an open type, when the heating pipes remain visible, or hidden, when it is laid in special grooves or niches and, after installation, is sealed with putty or plaster.
Along with the pipework, the batteries are connected and additional equipment for water heating of the house is installed. In closed heating systems with forced circulation, this means installing a circulation pump, a filter, a hydraulic storage tank, and a safety unit (pressure gauge, safety and air valves). In open heating systems with natural circulation, this is an expansion tank installed at the highest point of water heating.
Typically, in open systems with forced circulation, the expansion tank is installed in front of the circulation pump and fixed at the maximum height (in the attic or under the ceiling).

Air heating
This heating method is now quite in demand. Air heating implies the presence in each room of special ventilation ducts or heaters through which hot air enters. Such devices are located on the ceiling or walls.

There are three types of air heating:
- central;
- local;
- curtains of air.
Local heating
This method of heating a home cannot be classified as full-fledged heating, but be that as it may, it can be of high quality. To do this, you need to install heat guns or fan heaters in each room and enjoy the warmth. There will be heat in the room only if the doors are closed.

The heat fan is installed in the room, but you can install it in the wall as part of the central air heating.
Central heating at home
Systems where hot air is supplied centrally to the house can be:
- with full recirculation;
- with direct-flow recirculation;
- with partial recirculation.
As a rule, ventilation ducts are located above the suspended ceiling, leaving holes through which hot air will enter the room.

All this can be done in the walls, if the space allows you to take away a certain part in order to hide the pipes.
Air curtains
Devices that resemble air conditioners should be installed near entrance doors or above them. A stream of warm air comes out of the curtain, blocking the cold air entering the room when the door is opened. Such a curtain in a private house can be installed only at the entrance, provided that the doors are often opened.

Making air heating in a private house with your own hands will be more expensive than water heating. Any boiler (usually gas or electric) can heat air.
The advantages of such a heating system:
- The circulation of warm air is always carried out after its filtration is completed.
- There is a constant flow of fresh air in the house, since the system takes it from the street.
- Possibility of installing a drip humidifier.
Flaws:
- High cost of installation.
- Inability to install the system in the house.

DIY installation of air heating in a private house: video, diagrams
Air heating country house DIY, implies the presence of the following equipment:
- heat generator;
- air vents;
- decorative grilles;
- fan;
- hoses for air intake from outside the house.
Main stages of installation
Do-it-yourself aerial equipment goes through several stages:
- installation of heat exchanger and boiler;

- fan installation;
- installation, distribution of air ducts;

- insulation of supply and return channels;

- creating a hole in the wall of the building for air intake and installing the hose.
The wiring process always begins with the connection of flexible air vents to the supply channel main. They usually have a round cross-section. Then they make a return air vent, the diameter of which is larger, but such a channel will have fewer outlets than the supply one.
To prevent condensation from forming in the sleeve, it should be insulated. Then a throttle valve is installed in the pipe, with the help of which the process of regulating the amount of fresh air entering is carried out. When the system is installed, it makes sense to hide all the wires and pipes with plasterboard boxes, giving the room greater aesthetics.
Electric heating
This heating is based on the presence of an electric convector in each room. How more modern devices, the more functions it has. For example, this could be a temperature controller. It can be automatic: you yourself set the temperature at which the convector turns off, and when it decreases it turns on.

Advantages of electric heating:
- speed of installation;
- ease of use;
- possibility of placing convectors between rooms.

Flaws:
- availability of a good electrical network;
- high energy costs.
This heating will be justified only as a temporary option, and where other types of fuel are not available.
Steam heating
Its operating principle is exactly the same as in a water system. The only difference is that steam circulates through the pipes. This type of heating is used in private homes. Its principle of operation and installation is exactly the same as with air circulation.

You can heat a room in this way using special boilers that work together with a device that produces steam. The system must have filters that prepare the water before it turns into a gaseous state.
Such a system for a private home has many more disadvantages than advantages:
- quite expensive installation (considering the special boiler and filters);
- operation of the system can be dangerous (if a battery or pipe bursts, a person nearby may be burned).
The advantages include energy savings and the heating speed of the entire heating system.
Do-it-yourself installation of electric heating in a private house: video, diagrams
Electric boilers are divided into wall-mounted and floor-mounted according to the installation method. An important advantage of such a boiler is that no additional room is required for its installation. Moreover, it is convenient to carry and easy to dismantle.
Installation is carried out in the shortest possible time. The device is installed in houses with an area of up to 500 m2.It should be noted that you can install an electric boiler yourself, and you will not need a large number of approvals (only permission from Energonadzor).
The boiler is attached to the wall with anchor bolts or dowels. The device must hang level, in a horizontal or vertical plane (depending on the specific model).

Usually floor standing boilers are installed on special stands, and are used to shut off the water Ball Valves. An important point: when connecting the boiler, the water in the heating system must be turned off.
Having connected the boiler to the heating system, we begin to work with the electrical part. You will need installation, a circuit breaker, and grounding.
The cross-section of the wires is selected with full consideration of the recommendations from the manufacturer and in strict accordance with the power of the device. Having connected the boiler to the power supply, you need to fill the system with water and then check its operation.
Warm floor system
Warm floors are often installed on the ground floor of a private house. However, the best way to transmit heat is through ceramic tiles. Therefore, the installation of such a system, where parquet, laminate or linoleum is used as flooring, is impractical, since they are characterized by low heat conductivity.

The essence of these systems is the same - heat will penetrate into the room immediately, but the installation, as well as the principle of operation, are different.
Water heated floor
Pipes that are connected to a common water heating system are laid on a flat surface on a special substrate that does not allow heat to escape downwards.

Installation of a water heated floor with your own hands: video, diagrams
- Preparatory stage.
Before installing underfloor heating, you need to prepare a flat and solid base. It consists of steam or waterproofing, insulation and cement-sand screed.

Moreover, the room must be equipped with doors and windows and must have plastered walls, marked connections for sewer, heating and water pipelines.
- Preparing the floor slab.
If you are installing a heated floor on a reinforced concrete floor slab, then first lay a layer of hydro- or vapor barrier on it. They use coating waterproofing based on bitumen or adhesive using fiberglass, roofing felt, fiberglass, which are also glued with compounds containing bitumen.
As a vapor barrier, you can use polyethylene tiles, the thickness of which should be at least 0.2 mm or other similar materials. Both vapor and waterproofing must protect the insulation from moisture, which can form as a result of condensation during the interaction of cold earth and a warm floor slab.
Pasted waterproofing or vapor barrier from film is carried out by laying strips of material with an overlap of 10-15 cm. If film is used, then you need to fasten the edges of the panels with tape. They are fixed with bitumen compounds. Each type of insulation is placed on vertical surfaces above the insulation and glued to the walls of the house.
- Preparing the soil base.
Often individual houses are built without floor slabs when they are not satisfied basements. In this case, preparation is carried out from crushed stone and sand in layers, with a layer height of within 10 cm. Moreover, each layer is moistened and compacted.
Then the area of the room where you plan to install the water floor is filled concrete mixture. For reliability, you can lay reinforcement mesh.
The surface must be horizontal, for which a building level is used. Concrete is poured along beacon slats, which, in addition to maintaining horizontality, serve as expansion joints. According to building rules and regulations, horizontal differences of no more than 1 cm are permissible.
- Insulation.
Thermal insulation is an important link in the system of such a floor. It should block access to heat from hot water pipes to the lower zone of the underground space - to the basement or ground, and, accordingly, vice versa, direct heat upward into the living space.
Attention! How profitable the heating will be depends on the correctly selected material to provide thermal insulation and its thickness.
The thickness of such an insulating layer is calculated based on:
- climate features;
- data on wall material;
- groundwater level – spruce floor slab is missing;
- volume of the room where the heated floor is installed.
The thickness of the insulating layer on which floors are screeded above a cold basement or soil foundation, according to the standards, should be from 50 mm. For floor slabs it may be less.
Expanded polystyrene, which is covered with foil on one side, is usually used as insulation. When using it, some inconvenience may arise, since the pipes must be secured using improvised means, for example, clips or clamps.
Today, the market offers a huge number of polystyrene foam boards, the installation of which is carried out with best quality and faster. Their design provides for reliable fastening to each other as a result of locking devices. As a result, a strong, continuous and even base is created.
This material is covered with a vapor barrier in the form of a polystyrene film and is characterized by high density. Moreover, in the body of the slabs there are special channels into which heating pipes are laid.
When installing them, a tape measure or other measuring tools are not required, since there are linear markings on their edges. Thus, installation can be carried out much faster. Therefore, such slabs have enough advantages for you to choose them.It is important to lay polystyrene foam boards over the floor area, and not just where underfloor heating pipes pass. This will be the key to the high strength of the concrete screed, as well as the reliability of the entire heating system.
Electric heated floor
It is easy to install. Ready-made mats are laid on the surface, and a minimal screed is applied on top. True, you can do without it.

A cheaper option is also available. A cable must be laid on a special substrate, which is secured, and a floor covering or screed on top.
Usually heated floors represent only part common system heating.

Installation of electric heated floors with your own hands: video, diagrams
We suggest you consider self-installation electric floor in a private house (it is made in the same way in an apartment). You need to make sure that the wiring in the house can cope with the loads from the heating elements, and that you have automatic switches of a certain power installed.
- Thermal insulation.
Before installing a heated floor, it is necessary to lay a layer of thermal insulation made of expanded polystyrene foam, 20-50 mm thick. This is important if there is a cold room under the floor. Thermal insulation needs to be laid on a leveled base and for reliability it would be a good idea to lay it on a special glue.

- Reinforcement.
Then you need to make a reinforced screed with a solution thickness of 10-20 mm. You can reinforce with either plastic or galvanized plaster mesh. Foil is placed on top of the screed to reflect infrared radiation from the heating elements.

- Pouring the floor.
We begin installing the electric floor with our own hands and select the location of the heating cable, taking into account the arrangement of different furniture, making sure that the wires are located at a distance of up to 5 cm from the furniture. When laying the heating cable, you need to secure it to the lower base using polyurethane foam, after which they are filled with cement-sand screed or a ready-made mixture.
You can see various technological difficulties that arise during installation by studying the video of the installation of an electric heated floor with your own hands, where they will be performed by experienced craftsmen. Along with laying the cable in the thickness of the screed, a temperature control system sensor is also installed, a thermostat is installed (in one place), which allows you to regulate the floor temperature at your discretion.Combined heating
Using combined heating in the house, you can get something like this: in some rooms, often in the bathroom, kitchen, corridors, heated floors are installed, and in the bedroom and living room there is water heating. But you can go the other way: the whole house will have water heating, and in several rooms (for example, which were completed later) - electric heating. The most profitable option is when the system has one coolant and one boiler.
After you install any of the above heating systems, you need to run the energy carrier into it and connect the boiler. To do this, we recommend inviting a specialist from service center where the boiler was purchased. Its start-up will go smoothly, and you won’t have to expect any surprises from the heating season, and next time you won’t need the services of such a specialist.When building a private house, one of the most important stages is the installation of a heating system, because the comfort and coziness of the household depends on this. Fortunately, today the market offers various options for arranging a heating system. In supermarkets you can easily purchase equipment, materials and tools that may be needed during installation work.
Many owners, who already spend a lot of money on construction, seek to save money and take on the task of completing some of the stages with their own hands. You can set up a heating system if you have at least the slightest idea of what it is, how it works, and what it should consist of. Of course, it is better to first consult with a professional who will help you calculate and choose the most profitable and effective options in each specific case.
Before choosing a heating system for a private home, you need to find answers to a number of questions. It is necessary to take into account the parameters of the house, the number of storeys, the total area and size of each of the heated rooms, determine where the boiler will be located, which unit to install, which coolant. All elements of the heating system are available in the construction supermarket, however, you will have to assemble them yourself. 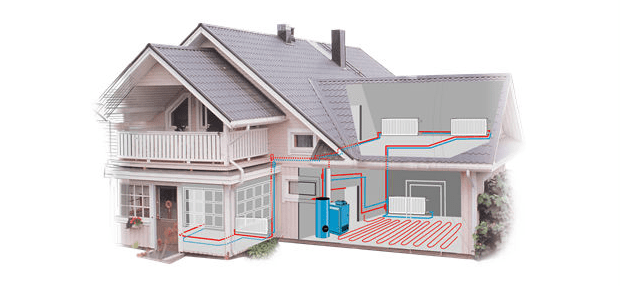
Today, two types of heating systems are actively used: open and closed. Open or gravity consists of the following elements:
- boiler where the coolant is heated;
- expansion tank;
- radiators;
- heating pipes.
The main role in open systems is played by gravity, under the influence of which the heated coolant from the boiler spreads over the batteries. The main advantage of this option is its energy independence. As for the disadvantages, there are more of them: the system warms up slowly, the coolant constantly evaporates from the expansion tank, and the latter must be located at the highest point of the system. 
A closed heating system requires the installation of a closed expansion tank and a circulation pump. This option is more practical, since you can additionally make a “warm floor”, the house is always warm and cozy, the elements of the system are arranged arbitrarily, there is no need to calculate and observe the slope of the pipes when performing installation work.
Types of heating systems
In most cases, owners of private houses prefer heating systems with water coolant. This is the most versatile, convenient and economical option, however, there are others. There are two main questions that you need to find answers to before you start installing a heating system: what to warm up with and what to heat with.
- Air. This can be either an all-air heating system or a “warm floor”. In this case, the low heat capacity of the air must be taken into account. This option justifies itself when heating rooms such as a corridor, hallway, veranda;
- water vapor used primarily for heating large industrial premises. Such a system requires constant monitoring;
- Water- the most optimal way to heat a large private house. Such a system is efficient and compact, undemanding in maintenance. Plastic pipes are used for the arrangement;
- Antifreeze its qualities are in no way inferior to water coolant, however, it is much more expensive and releases toxins, so you definitely need to take care of high-quality sealing.
As for the heat source, there may also be different options. For our latitudes, natural gas is considered the most economical fuel, so most households use gas boilers heating. There are also electric, solid fuel and combined ones. There is a wide range of models on the market, which allows you to choose the most suitable option in each specific case. 
With water coolant
Water heating is an affordable, economical, effective option for heating a private home, which has been used for many years, but has never lost its popularity. To ensure high-quality operation of the heating system, it is necessary to correctly calculate the number of radiators, buy a powerful boiler, correctly connect all the elements and start the coolant (water). This system is easy to maintain, durable and reliable. Liquid circulation through the pipes is carried out either using a circulation pump or by gravity.
- Forced circulation- a great way to heat a large house on two or three floors. A mandatory element of such a system is a pump that supplies cold water to the boiler and hot from it. There are fully automated pumps on sale that are capable of starting independently at the right time and controlling the temperature of the coolant;
- Natural circulation. Water can circulate independently through the elements of the heating system if the equipment is placed correctly during installation and the pipes are positioned at a certain slope. This option is used extremely rarely today and justifies itself in one-story houses with a small area.
Any boiler is suitable for installing a water-based heating system, but only an electric one does not require a chimney. The number of radiators and pipes depends on the area of the house.
Air heating
An air heating system is increasingly being used, which involves installing special ducts or air heaters in each room of the house through which hot air flows. Heating elements can be located on the ceiling or walls. There are several types of air heating.
- Local used if there is a need to heat a separate room. The essence of the method is that a fan heater is installed in the room, which heats the air to the optimal temperature (drying it out);
- Central can be called a complete heating system. The air is heated by special equipment and supplied to individual rooms through ventilation ducts;
- Air curtains- an expensive, but very convenient and functional way to heat a house. Devices that resemble air conditioners in appearance are installed near the entrance to the rooms. Through them a flow of heated air enters the room.
Air heating is used less often today than water heating. The main reason is high cost and impracticality. You can set up such a system at your dacha, in small house, but this method is not suitable for heating a two-story mansion. 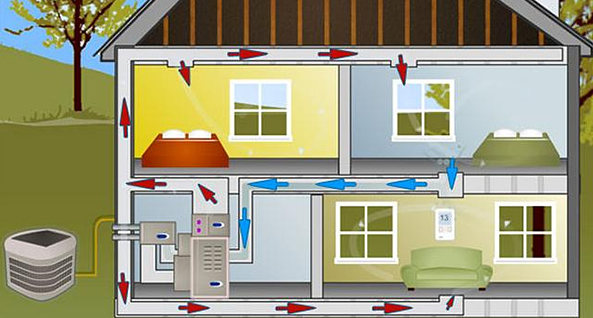
Electric heating
The use of electric convectors is justified in cases where it is not possible to use other types of fuel. The equipment is installed in one room, easy to connect, and simple to maintain. Modern models are equipped with a whole arsenal of functions: automatic switching off and on, adjusting the air temperature in the room. Convectors are small, compact, they do not take up much space and can be moved from one room to another. 
To equip your home with such a heating system, you need a powerful, new electrical network. Old wiring is unlikely to withstand such increased voltage. When choosing this option, be prepared for the fact that the bills for public utilities there will be big ones.
Electric convectors are ideal if you need to temporarily heat a room (in a country house, for example), but in a large private mansion it is better not to use them.
Steam heating
A steam heating system can be used to heat large private homes, commercial and industrial premises. Build one with your own hands complex system Only a professional can do it. To ensure its functionality, reliability and safety, everything must be done according to the instructions, even the slightest mistake during installation can lead to the fact that the system either does not work or will soon fail.
The operating principle of this option is that water flows through the pipes in a gaseous state. To start the system, one boiler will not be enough; additional equipment is installed that is responsible for filtering water and converting it into steam. Main advantages: the system warms up quickly, provides warmth and comfort in every room, and significantly saves energy. Disadvantages of steam heating:
- expensive equipment (as you will need to install a special boiler and filters);
- requires professional maintenance;
- emergency situations may occur.
Water vapor in a closed system is supplied under pressure, so if a radiator or pipe ruptures, a person nearby may be burned or seriously injured.
Heating system "warm floor"
A modern, effective and very comfortable way to heat a house is to install a “warm floor”. The system is installed during the construction or major renovation of a house. It is advisable to use this option if you plan to use ceramic tiles as a floor covering.
“Warm floor” can be installed everywhere: in the bedroom and nursery, in the living room and kitchen, in the bathroom and toilet. In this case, heat will come from below. A whole network of pipes or wires is installed under the floor covering, through which the coolant passes. If water is used, a special lining must be laid on the base of the floor, which will not allow thermal energy to escape downwards. Next, the pipeline is laid, then the screed and floor covering. The option is quite labor-intensive, but economical.

It’s easier to create an electric “warm floor” with your own hands. In a specialized store you can buy either special mats or wiring. In the first case, installation is very simple, you do not need to use any additional elements, just ready-made mats with a floor covering on top. In the second, a thin layer of screed or ceramic tiles are laid on the cable.
Selecting a heating boiler
A mandatory, if not the main, element of the heating system is the heating boiler. The modern market offers a wide range of options that differ in technical characteristics, cost, size and appearance. A few years ago, gas equipment was at the peak of popularity. Today they are being replaced by electric and solid fuel appliances. When choosing a boiler, a number of criteria should be taken into account.
- Convection- the most common, has simple design, uses only the energy of the fuel that burns. Condensation costs more, but produces more heat;
- The combustion chamber. If it is open, air is used from the room. In closed chambers, air can be consumed both from the room and from the street, however, a chimney is required;
- Circuit. To provide comfort and warmth to your household, you need to take care not only of the heating system, but also of the water supply. The issue can be solved using a double-circuit boiler, which will both heat the house and provide hot water.
When choosing a gas, electric or solid fuel boiler, you should pay attention to such parameters as unit power, fuel consumption, size and design, and cost. 
Advantages of gas boilers
Gas is an affordable and economical fuel. Gas boilers are considered the most common and are widely used in the installation of heating systems in private homes. The equipment can operate on natural or liquefied gas. The advantages of gas appliances include the following:
- ease of operation;
- reduction in heating costs;
- high performance;
- environmental Safety;
- reliability and durability.
 To install such equipment at home, it is necessary to develop a gas project and agree on all the details with the company that supplies the fuel. You can install and connect the boiler yourself without outside help, but a gas service representative must put it into operation.
With the installation of a gas heating boiler, difficulties may arise already at the installation stage. First of all, the device should be adapted for operation in conditions where there is an increased range of operating gas pressure. It is very important to pay attention to this if you have purchased an imported boiler. You will also need to install a chimney to remove exhaust gas. Only turbo boilers are equipped with special turbines through which combustion products go outside.
Electric heating boilers
The best option in cases where there is no access to a gas main is to install an electric heating boiler. Its power is enough to heat a house on two or three floors. The equipment is capable of efficiently heating a cottage with an area of up to 300 square meters. m. This option does not provide for the installation of additional ventilation or chimney. During operation, electrical appliances do not emit harmful substances and do not pollute the air or the room in which they are located. Compact dimensions allow you to install the boiler in a small, not necessarily separate, room.
How to choose a heating boiler that runs on electricity? Which device is best suited for heating a private home? How to save on buying an electric boiler, but still get really high-quality equipment?
But there are also disadvantages to electric heating systems. Firstly, the house must have powerful, reliable electrical wiring. Secondly, the numbers on receipts will increase significantly. Modern models are used not only for heating, but also for hot water supply. They are completely safe, convenient, and effective. Prices for equipment depend on the manufacturer, the power of the device, and additional functions.
Solid fuel models
Solid fuel boilers that operate on the principle of Kolpakov stoves have very high efficiency. To maintain the coolant temperature, it is necessary to add fuel to the boiler once a day. Modern models on the market are safe and effective. The equipment is mounted on the floor, although it is compact in size, however, it requires a separate room. The main advantages of solid fuel units:
- the body does not heat up, so there is no risk of getting burned;
- Not only peat, but also firewood, sawdust, and paper can be used as fuel;
- all devices are characterized by high power;
- compact size and modern design;
- economy.
However, there are also disadvantages. The operation of such heating devices is accompanied by the accumulation of dirt and dust in the room, so it is recommended to allocate a separate room for the boiler. There should be a place in it for storing fuel, and it is also necessary to clean the device from ash from time to time. 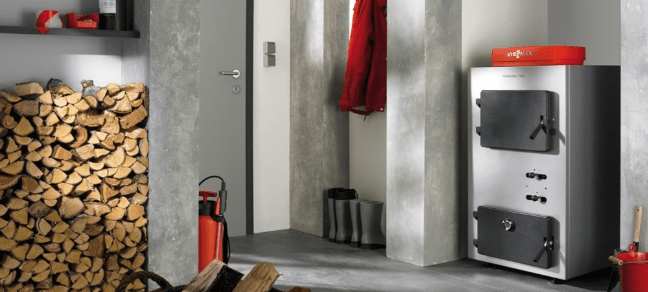
To heat a house using a solid fuel boiler, you will have to spend at least an hour until the coolant warms up. In addition, it is necessary to properly design the chimney. During operation of the equipment, you need to ensure that the combustion chamber does not become clogged. The advantages of solid fuel boilers include the fact that it depends only on the owner what kind of winter will be for his home: warm or cold, because he himself prepares the fuel.
Combined units
 In some regions, a problem such as lack of gas or electricity often occurs. But this does not mean that the residents of the house are doomed to the cold, because there are combination boilers on sale that can operate on not one, but two types of fuel. The most common models are those that can run on gas and solid fuel. This ensures the reliability and autonomy of the heating system. Each such device is equipped with two combustion chambers. You can switch from one type of fuel to another by changing burners.
Combined heating boilers are not without their disadvantages. For example, they cost more than gas or solid fuel equipment separately. The efficiency of such units rarely exceeds 90%. To install the device, you need to allocate a separate room and arrange a chimney.
It is impossible to unequivocally answer the question of which heating boiler to choose. Each has its own advantages and disadvantages. When choosing, you should focus on such parameters as the area of the house, heat loss, type of coolant, availability of one or another type of fuel.
A powerful, reliable unit will ensure uninterrupted and efficient operation of the heating system in a private home.
Heat loss calculation
In the process of planning a heating system, it is necessary to calculate the heat loss of each room and the entire house. To carry out calculations correctly, you need to know the following data:
- design and thickness of walls;
- thermal resistance of materials;
- the average temperature of the coldest month and the average winter temperature.
The main criterion necessary for calculating heat loss is the thermal resistance of materials. It can be obtained from special collections and tables. This parameter needs to be multiplied by the thickness of the material (in meters), we get the thermal conductivity of each layer of the wall, which we multiply by the temperature gradient and by the area of the room.
What is heat loss at home? Formulas for calculating the power of a heating system for a private home. What criteria should be taken into account when calculating heat loss?
DIY heating system installation
Installation work should begin with the installation of the heating boiler. If the equipment power does not exceed 60 kW, you can install the device in the kitchen; if it is higher, a separate room should be allocated for the boiler. Heat sources that burn different types of fuel must have air flow. In addition, it is necessary to ensure the removal of combustion products. This can be done with the help of a properly equipped chimney.
When installing a heating boiler, certain rules must be followed. The distance to the nearest equipment and walls must be at least 0.7 m. The wiring of units that operate on different types of fuel is practically the same. The figure shows an option for piping a gas boiler with a forced circulation system.

This tying method is used most often. Other schemes provide for the presence of their own pumps to ensure continuous circulation of the heated coolant.
If solid fuel heat generators are used to service the heating system, the following nuances must be taken into account when connecting them: due to the inertia of the device, the coolant may overheat and boil. To avoid unpleasant situations, it is necessary to install a circulation pump on the return line. Also mounted additional system security, which consists of the following elements:
- safety valve;
- automatic air vent;
- pressure gauge
An important function is performed by the safety valve, because it is responsible for relieving excess pressure in cases where the coolant overheats. The most effective piping scheme for a solid fuel boiler is shown in the figure below. 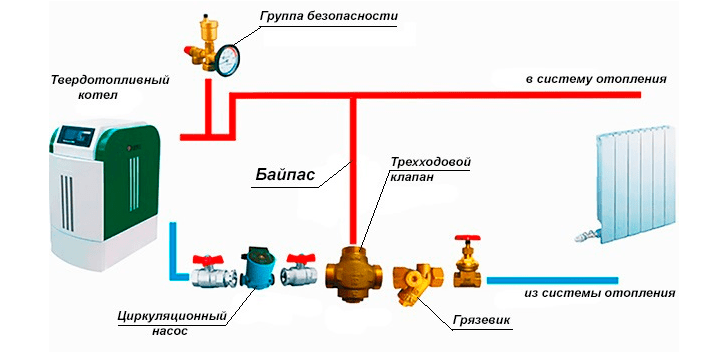
Another problem that is often encountered when operating a heating system with solid fuel boilers is the accumulation of condensate on the elements of the unit. This happens due to cold water entering the hot cut. To prevent condensation of the coolant, a three-way valve and a bypass are installed in the systems.
Installation of heating pipes
It is impossible to install a heating system in a private house without a pipeline. In old houses there are cast iron pipes from the last century. They boast a long service life, durability and reliability. However, today such products are used extremely rarely, because they have been almost completely replaced by lighter, more convenient and cheaper pipes that can be made from the following materials:
- steel;
- copper;
- stainless steel;
- polypropylene;
- polyethylene;
- metal-plastic.
 Copper and steel products are strong and durable. They are excellent for arranging a heating system in multi-storey country cottages and private houses. The only drawback is the high cost. The most affordable polypropylene pipes, however, it is quite difficult to carry out the entire complex of work yourself.
The most suitable options for arranging a heating system pipeline: metal-plastic or polyethylene products. Such pipes are used in systems with different types coolant, as well as for laying water-based “warm floors”. The products are excellent technical characteristics, are cheaper than metal ones, and working with them is easier and more convenient due to their low weight. Metal-plastic and polyethylene pipes are reliable, durable, safe, and have a long service life.
Selection and installation of radiators
Previously, traditional, cast-iron, not very aesthetic batteries were available, which were used in every private house or high-rise buildings. Today, in specialized heating equipment stores there are so many models of radiators, they all differ from each other in price, technical characteristics, and appearance, that it may be difficult to choose. As a rule, these products are classified depending on the material from which they are made.
- Aluminum The batteries are light, durable, reliable, and have excellent heat transfer performance. The products are made from solid alloy, which ensures their durability;
- Bimetallic Radiators are used primarily in central heating systems. Internally they are equipped with a tubular steel frame;
- Steel panel batteries – the best option, which experts recommend for use when installing a heating system in a private home. To regulate the air temperature in the room, you can install thermostatic valves;
- Cast iron Heating radiators today are presented in a wide range. These are not Soviet “accordions”, but durable, safe and reliable products, which are characterized by an attractive design.
When choosing heating radiators, give preference to those that you like the most and suit the price. Modern models are efficient enough to provide warmth and comfort in a private home.
The type of heating system and the type of coolant depends on the number of floors and area of the house, the availability of one or another fuel. You can install a heating system in a private home with your own hands, if you follow the recommendations for selecting and installing equipment.
Organizing heating with your own hands is a difficult task, but doable. This will require minimal knowledge of plumbing, as well as welding and construction skills. After all, to lay pipes you will have to make holes in the walls, and solder the pipes themselves. Otherwise, the main thing is to organize the process correctly!
Choosing a boiler for a heating system
The heating scheme does not depend on the type of boiler chosen, but it is a key element of the heating system in a private house. The cost of heating, boiler maintenance and time to refuel will depend on the correct choice.
Gas, solid fuel or electric?
The type of boiler depends on the availability of different types of fuel. Thus, installation of a gas boiler is possible only if there is a gas main and the house is connected to it. This will require additional costs and obtaining permits, and connecting the boiler to the heating system can only be done by a specialist. Such a boiler requires a ventilation and chimney system.
Solid fuel boilers guarantee complete autonomy from external factors. But at the same time you will have to organize a place to store fuel, and loading the boiler takes a lot of time. After all, even long-burning boilers need to be loaded once every 3 days. A chimney and ventilation are also needed.
The most inexpensive and easiest to use is electric. But electricity bills can scare off even very lazy owners. Such a boiler is suitable for mild climates, a small house and, preferably, with solar panels and a windmill.
Single-circuit and double-circuit?
Double-circuit boilers perform two functions at once - they heat the room and heat the water. This is much more economical and does not require the installation of additional equipment. But in the summer, their use is unprofitable; the only solution is gas double-circuit boilers. They have the ability to turn off the heating circuit and operate only in DHW mode.
With solid fuel boilers, you can get out of the situation by closing the heating circuit using taps. This way, the heat will be spent only on heating water, which significantly reduces fuel consumption. The only inconvenience is that loading the boiler is necessary even in summer.
When using a single-circuit boiler, you will have to additionally install a boiler or a column, but in some cases this scheme will be more profitable. For example, if you also install an indirect heating boiler, in winter the water will still be heated by the boiler, saving electricity.
This difficult choice - radiators or heated floors
Another dilemma facing the owners of a private home is the choice of heating method. After all, both radiators and heated floors have their advantages. For example, installing radiators is much simpler than installing a heated floor, but the latter is much better in terms of efficiency.
Cast iron, steel or aluminum radiators?
Considering the low pressure in the heating system of a private home, the choice of radiators is not limited in any way. Cast iron is durable, unpretentious to the quality of the coolant and pressure drops. But cast iron batteries cannot be used in systems with thermoregulation, because they heat up slowly and cool down just as slowly.
Aluminum radiators can be considered universal. Small price, fast heating and the ability to connect a thermostat make them very popular. But with increased alkalinity of water, there is a high chance of corrosion and leakage between sections.
The only problem steel batteries– instability to water hammer, which does not occur in the system of a private house. Wherein low price, corrosion resistance and fast heat dissipation make them ideal for autonomous heating.
Advantages and disadvantages of water heated floors
The complexity of laying a water-heated floor makes it practically impossible to install with your own hands. But as a separate heating element it is very convenient and relatively simple to implement. For example, in a bathroom, a heated floor will come in handy.
For such a solution, only collector wiring is suitable - the most technologically advanced, but also the most difficult to implement with your own hands. At the same time, heated floors may be contraindicated for health reasons, for example, with varicose veins. But for families with small children, heated floors are an ideal solution.
Heating schemes - single-pipe, two-pipe and collector
Scheme of a single-pipe heating system - economical, but inconvenient
A single-pipe heating system allows you to use the heating pipe as efficiently as possible - because only hot water flows around the entire perimeter. This option is suitable for small one-room cottages, because each subsequent radiator will be colder than the previous one.
In addition, you will have to install a pump that provides forced circulation of the coolant. And this makes the house dependent on electricity, even if the boiler runs on solid fuel.
Two-pipe scheme - ease of installation and ease of use
If the goal is to make the house completely autonomous, you can arrange heating with natural circulation. But to do this, you will have to lay pipes with a slope of at least 0.05% so that air bubbles enter the open expansion tank, and the coolant itself circulates better.

Along the riser, hot water rises to the required height on its own, and on the floor, the slope of the pipes should always be downward from the riser - this way the heated coolant will flow into the radiators, and the coolant from them, which has already cooled, will enter the boiler. For a two-story building, natural circulation is not always suitable, since the lower floors will always be colder than the upper ones.

The forced circulation scheme of a two-pipe system is much simpler. For organizing heating yourself, this is the best option, because the pipes can be laid from below along the wall and hidden in decorative panels. This will not require cutting walls or pouring floors over pipes.

Collector circuit - keeping up with progress
In this case, a collector is installed between the heating devices and the boiler. With its help, you can optimally distribute the coolant in each room depending on needs. But such a heating scheme is much more complicated and can only be implemented with your own hands if you have experience.

Another disadvantage is its high cost due to the large amount of material consumed. Pipes, manifold cabinets, pumps and filters are mandatory elements of a manifold heating circuit. But this allows you to combine different heating devices and very accurately regulate the temperature in the rooms.
DIY heating installation
After choosing a heating scheme, calculating the amount of materials and purchasing heating equipment, it is installed. The correct order must be followed:
Boiler installation;
connecting the pump and other measuring instruments near the boiler;
collector installation;
pipe routing;
installation of heated floors
installation of radiators;
connecting all heating devices and starting the system.
The boiler must be installed in a separate room with ventilation. The exception is electric boilers, which can be installed in residential premises, and gas boilers with a closed combustion chamber.

Wall-mounted models are attached to a special strip on the wall. It is prohibited to mount them directly on the wall. Floor-standing models are also installed on a stand - in the photo the solid fuel boiler is standing on a brick stand. The distances from walls and other objects specified in the passport must be observed, and the room itself is equipped in accordance with fire safety standards.

The circulation pump is connected after installing the boiler. If the selected model is equipped with an expansion tank and a safety group, there is no need to install them separately. Also at this stage, boilers and backup boilers are installed, if they are provided for in the scheme.
Pipe layout and installation of heated floors
If a manifold scheme is chosen, manifold cabinets are installed, and after that the heating pipes are routed and laid. Installing pipes along the walls can significantly simplify the organization of home heating with your own hands. But in this case, the consumption of materials increases.

Heated floors are installed in two ways - concreting or laying. In the first case, it will take up to 4 weeks for the concrete screed to dry, but the floor will warm up much faster.

It is much easier to use special plastic or wooden modules, but they are more expensive and the floors warm up more slowly. But in case of malfunctions, it is much easier to disassemble such floors.
The batteries are installed under each window opening, and the number of sections is calculated depending on the size of the room. Radiators are mounted on brackets that are leveled. It is important to maintain distances - at least 6-10 cm from the floor and window sill, about 5 cm from the wall.

Connection to the heating pipes is made after installing the battery on the brackets. The connection is made using adapters, so it is not necessary to adjust the wiring to the location of the holes. In addition, the supply elements to the radiators must have a slope of 0.5 cm towards the circulation for each meter of pipe. Otherwise, the accumulated air in the battery will have to be blown out manually.

Results
The simplest to implement is a two-pipe heating system with forced circulation and installed radiators. But still, for those who have never encountered the installation of a heating system and do not have construction skills, it is better to turn to specialists.
At the same time, do not forget to control the performers! Everything a novice “builder” needs to know to properly organize a heating system is described in the video: