What size should a horse's pen be? Places for horses and sizes of passages in the stable
Despite its size and strength, the horse is an animal sensitive to conditions. If kept improperly, she may get sick. Many diseases and ailments can be avoided by providing the animal with a good stable. You can not only buy or order it, but also build it yourself. Horse stables are the central topic of the article, read on and learn a lot of useful information.
You should start working on building a stable by choosing a project. You can buy it, order it from specialists, download a ready-made one from the Internet, or develop it yourself. It doesn’t matter which option you choose, the project must reflect the following:

Selecting a location
When choosing a place to build a stable, you need to consider the following factors:

In addition, we must take into account that the stable premises are only a small part of the territory necessary for keeping horses. We also need to build a levada in which horses will walk, a room where hay and other feed will be stored, a platform for training horses, and a place for storing manure.
Independent design
You can create a stable plan yourself, modifying the standard one or completely anew. You can draw it manually, or you can use computer programs. After this, you will need to submit the plan to the local authorities in order to obtain planning permission. To successfully develop a plan, it is necessary to take into account the specifics of individual structural elements.

- the cost of all materials with a small margin;
- payment for the services of builders, watchmen, and auxiliary workers during construction;
- the cost of providing all necessary communications;
- state duties.
Construction estimates for a standard project are easy to find on the Internet. An individual project will have to be calculated independently. You will need to add 10% to the total amount for unforeseen expenses that will definitely arise.
Walls
The design and construction of walls should be treated with special responsibility. Both the strength of the building and its performance qualities – thermal conductivity, water resistance, ease of maintaining an optimal microclimate for horses – depend on them to a greater extent. The thickness of the walls depends on two factors - the climate zone and the selected material.
In areas with a warm climate, the walls will be thinner; in a cold climate, the opposite is true. Under equal conditions, a wooden wall will be thinner than a brick one.

The thickness should be sufficient so that even in frosty conditions the walls do not freeze through and the room maintains a positive temperature of at least 10 degrees. In central Russia, where sub-zero temperatures last for 3 or more months, the minimum thickness for wooden walls is 20 cm, for brick walls - 40.
There must be a foundation. The base of the walls near the foundation is laid with waterproof material, such as roofing felt or asphalt.
Roof
It is made inclined. Traditionally, this is a gable structure, although recently single-pitched structures with an attic and hayloft have become widespread. The height of the eaves of a gable roof should be more than 2 m, and the height of the ridge should be more than 4 m. For a shed roof, the lower edge of the slope should be at least 3 m from the foundation. It is imperative to provide gutters to prevent moisture from precipitation from accumulating on the roof.

Cover the roof with materials that should not allow water to pass through. Weather and weather resistance and fire resistance are also highly desirable. Traditionally, roofing materials are roofing felt or slate; if you have a sufficient budget, you can make a tiled roof.
If the height allows, you can equip the attic for storing hay. This way you can save space for the feed store.

Door
The size of the door is calculated so that a horse and rider can freely pass through it. Recommended dimensions are 2.5x1.5m.
Very convenient is the double door design, the top of which can open independently of the bottom, like a window. This will help to quickly ventilate the room without opening it. Horses often learn to open simple bolts, so there should be two locks. One for the opening part, and one more - from below, at a distance of 10-15 cm from the floor. The upper edge of the lower part is covered with tin or an iron sheet, otherwise horses will chew it. It is very important to ensure that both parts fit snugly against each other, without gaps that create a draft.

Partitions between stalls are usually made of unpainted boards. Recommended height – 2.5 m. Their lower part is made solid up to a height of 1.5 m, and the upper part has gaps sufficient for the horses to see each other. In some designs, partitions are made collapsible.
Floor
Here opinions differ. There are several options, each of them has many fans and critics among owners and builders of stables. Therefore, it is advisable to present all the main options with a description of the advantages and disadvantages of each.
The classic version of the adobe floor still has many fans. It is cheap, easy to make and repair, and gentle on horses' hooves. In addition, it is easy to make a drainage groove in it. The disadvantages of an adobe floor include the impossibility of its sanitary treatment and good absorption of liquid horse excrement.

Cement floors have gained well-deserved popularity because they are easy to clean, do not allow soil moisture to pass through, and are very durable. Drains are made from the outside, but drainage needs to be taken care of inside. A drainage hole is made in the back of the stall, and the floor is given a slight slope, sufficient for urine to flow into these holes. The disadvantages include its hardness and poor thermal conductivity, so it is recommended to cover the cement with a wooden covering or simply a thick layer of sawdust.

The wooden floor also performed well. A pit 30 cm deep is filled with large crushed stone, a timber is placed on top, which is covered with a board 5 cm thick. An air cushion is not made for reasons of stability of the entire structure. A drainage ditch 0.5 m deep is being dug along the perimeter of the building.
Window
Window openings are made at least 1.5 m from the floor, maximum - 2 m. The standard size of openings is 0.5 m x 0.7 m. The number of windows is chosen from the consideration that the total area should be slightly less than an eighth of the total area of the frame walls of the room.

It is imperative to include shutters in the design of the windows to darken the stable at night and for safety requirements, and mosquito nets to prevent insects from entering the premises during ventilation.
Communication design
Although there may be no communications in a stable, especially a summer or temporary one, there should be communications in the permanent place where horses are kept.
Electricity
In a winter stable there must be light not only in the corridor, but also in the stalls. The duration of daylight hours in the place where horses are kept permanently must be at least 8 hours. In addition, in an unlit room it will be problematic to clean stalls and care for horses.

You will also need sockets for electrical appliances. It is better to place them either outside at the front door under a canopy in the case of a summer house, or in technical rooms and in the corridor from the inside at the front door. If the stable has a rest room for staff, sockets should be there too.
Ventilation
It must be there! Sometimes, during construction, to ventilate the room, a gap is left between the roof and the crowns of the walls, but this cannot be done. Constant drafts can cause horses to catch colds. However, it is impossible without ventilation, since the air must be clean and dry, otherwise problems with the horses’ health may begin. In addition, these animals quickly heat the room with the heat of their bodies, and the stable should be cool.

It is optimal to space the ventilation holes at different heights. This creates the air flow necessary for traction. The inlets are made in the stalls, and the outlets are on the roof.
Good ventilation can also solve the problem of condensation.
Water supply and heating
If possible, you need to supply water to at least the technical room, this will greatly simplify the work of the grooms. If this is not possible, then the design provides space for large barrels in which water will be stored. Their volume is derived from the fact that each horse requires 50 liters of water per day.

In places with harsh climates it is necessary, but it must be used with caution. Low temperatures are not as dangerous for horses as stuffiness and heat. The optimal temperature for a stable lies in the range from +5 to +15.

Safety in the stables
The finished stable must meet safety requirements. And we are talking not only about fire safety, although the presence of fire extinguishers and containers with sand is strictly necessary. When building a stable, it is necessary to take into account several not obvious points:

These rules can be called banal, which is why they are often forgotten. And the horses pay for this with their health and their owners with money.
Materials
There are many options for materials for building a stable. There are debates about which one is better, there is no consensus. Even the best materials have their drawbacks.
Generally speaking, materials with the following characteristics are suitable:
- the presence of pores that facilitate effective gas and water exchange with the external environment;
- good heat retention in the room;
- high thermal resistance coefficients;
- moisture resistance.

The best materials for building a stable are considered to be wood, brick, and, a little worse, foam blocks. Backfill frames can only be used in extreme poverty, and stone and concrete are unsuitable materials for construction.
Tree
This material perfectly retains heat indoors, at the same time, buildings made from it are permeable to atmospheric air, which allows for natural gas exchange. If you compare a brick and a wooden wall with the same thermal conductivity, the brick wall will be several times thicker. Wood costs relatively little, and building with it is easier and more convenient.
Ideal would be logs with a diameter of 20-25 cm, or timber covered with clapboard.

This material has not only advantages, but also disadvantages. These include:
- fragility. The service life of a wooden building is several times lower than that of a brick one;
- fire hazard;
- susceptibility to rotting and the destructive action of living organisms, for example, wood-boring beetles. This problem is partially solved by impregnating lumber before construction.
Video - Step-by-step construction of a stable from lumber
Brick
This material also has many advantages. It is strong, buildings made from it are durable and resistant to environmental influences. It conducts air and water well, without creating the effect of heat loss and excess humidity. Brick buildings retain heat well inside, preventing excessive condensation and the “greenhouse effect”. However, they retain heat worse than wooden ones, so in central Russia, for the construction of stables, the walls are laid in 2 bricks, their width must be at least 40 cm.

The disadvantages of brick as a material for construction include high cost and low speed of work.
Video - Stable made of foam blocks
This material does not rot, does not burn, and retains heat well.
Frame-and-fill design
The filling component is usually sawdust mixed with expanded clay or slag. The slightest crack causes it to spill out, which leads to the formation of voids in the wall. This reduces the thermal insulation of the room, and it begins to lose heat in winter. In addition, rodents live in voids.
This design has one advantage - price. The frame-and-fill design is the cheapest. This explains its relative popularity.
The following materials are not suitable:
- stone. It is difficult to process and construct, does not retain heat well, and contributes to the formation of dampness. Despite the durability and resistance of stone buildings, this material is not suitable;
- concrete blocks. They crumble easily, remove heat well from the room and do not protect against dampness.

When choosing a material, you should proceed from the climatic conditions of the place where you plan to install the stable, as well as other factors (depth of groundwater, presence of ventilation and heating systems, etc.).
Construction of a summer stable
The summer stable differs from the winter one in being less “solid.” It has fewer requirements and is easier to build. In addition, it does not require a deep foundation and registration, since it is not a permanent structure.

This is what the step-by-step construction of a two-horse flyer using frame technology looks like. The dimensions 6x3m were chosen based on both the comfort of the horses and economy. Lumber has a standard length of 6 m, so you won’t have to overpay for what will be scrapped.
Video - Construction of a summer stable
Step-by-step instructions for building a summer stable
There are fewer requirements for summer stables than for regular ones. Therefore, this can be installed using frame technology. We will build without a stationary foundation, on posts. This design helps make the building collapsible and can be moved. We take the sizes based on the number of horses, we will have 2 of them.
Foundation
You should start by marking the outer perimeter of the flyer. This is done as follows. Using a tape measure and any device for measuring angles, mark a 6x3 rectangle on the ground. The length of the diagonals also needs to be checked to ensure that the rectangle is even.
Pegs are driven in around the perimeter and tied with rope. It marks the boundaries of the pit, which must be dug to a depth of 30 cm. A drainage drain is made, a film is laid for waterproofing, after which the resulting hole is filled with layers of graphite and sand several centimeters high in turn.

Piles are installed on the resulting gravel-sand “cushion,” which can be bricks or blocks made of any strong material. They are covered with roofing felt to prevent direct contact with the tree, and the first stage of construction is completed.
Building a frame step by step
Step 1. We begin the construction of the frame from the bottom frame. It is fastened at the corners so that the logs are embedded in the frame. The location of their installation must be calculated so that they pass along the foundation blocks. To strengthen the structure, a 15 x 15 cm board is placed between the joists.

Step 2. Then, it’s time to form the corners, for which corner vertical posts are installed on the harness. The main ones are also placed in the place of future windows and doors. Intermediate between them, so that the maximum gap does not exceed 3m. Their height is equal to the desired height of the stable, in this example it is 3m.

Step 3. Using levels, we measure the angles, after which we fix the racks with braces and cross members, which will prevent the structure from “floating.” The upper harness is done in the same way as the lower one. Crossbars indicate door and window openings. The front wall is raised by a beam, forming a roof slope. We put it on the floor joists.
Step 4. Then the middle wall is formed. To do this, a beam of the required height is placed vertically according to the marks.

Finishing and insulation
The next stage of construction begins with the installation of the roof. Then, it’s the turn of the external walls - they are covered with insulation and sheathed with any lumber. After which the roofs and walls of the stable are insulated.

Insulation is inserted into the cells of the frame, after which the entire internal perimeter is covered with heat-insulating material using a construction stapler and sheathed with moisture-resistant plywood. Then, the floor is covered with boards, windows and doors are inserted, and the summer stable is ready.

Levada
In conclusion, I need to say a few words about how to arrange the levada. It must be near the stables, since horses need to move and be in the fresh air every day.

Stall size
The ideal stall size can vary depending on the size and purpose of the horse. For ponies and small breeds (for example, Arabian) 3x3 m will be sufficient, while for horses whose height exceeds 150 cm, the size of the stall should be at least 3.5x3.5 m. Large horses of warm-blooded and heavy breeds will need even more a spacious stall measuring 4x4 m or 4.2x4.2 m, and a mare with a foal or a stud stallion must be provided with at least 20 m2 of free space. On the other hand, miniature horses thrive in stalls as small as 2.4 m2. In general, it is recommended that the length of the stall wall be 1.5 times the length of the horse, but as they say, the longer the better.
Ceiling height in stall
When thinking about ceiling height, you should be guided by the principle “the higher the better”, both from the point of view of the horse’s safety and from the point of view of ventilation. The minimum ceiling height should be 3 m (if you are equipping stalls in an existing old building and you simply have no other choice). Increasing the height of the ceiling will not only improve air circulation, but will also help minimize the risk of your horse hitting his head if he stands on the candle out of fear. High ceilings also mean that wiring and other communications will be located higher and, as they say, out of harm's way.
Doors
There are many different stall doors on the market these days that are both beautiful looking and safe for horses. Most architects agree that doors should be at least 1.2 m wide and 2.4 m high, otherwise horses risk injuring their shoulders or hips (especially those that tend to “fly into” the stall), and also injure the owner. Unfortunately, many manufacturers rarely comply with these proportions and more often offer doors about two meters high and a meter wide.
As a rule, there are two types of stall doors - outward opening and sliding. Those that open outward create some inconvenience, blocking the passage, and can injure horses in the corridor. It would seem that you can use doors that open inward, but this is a big misconception: if something happens to the horse (it falls and cannot get up, lies down from an acute attack, etc.), you simply will not be able to get into the stall and provide her with the necessary help. Sliding doors are attached with their upper and lower edges to special gutters or hinges along which they move. They are expensive, but more convenient - they do not take up the passage and create more space for maneuver, so they are often installed in large clubs and stud farms. When using such doors, you should pay attention to the presence of a limiter - it prevents the door from opening too wide so that it does not fly out of the gutter (as happens with sliding wardrobes).
Stall doors can be solid, lattice or combined. It is best to install combined doors (half iron/wood - half lattice, mesh or pole): this, firstly, will provide good ventilation, secondly, it will allow the horse to observe what is happening in the stable, and thirdly, will prevent her from getting injured by getting her hooves stuck in the lower part of the grate.
Stall partitions are also important: if designed correctly, they give horses the opportunity to communicate with their neighbors. Specialists from companies involved in the design and construction of stables unanimously say that ninety percent of clients, when they are first asked about the design of partitions, want them to be continuous from floor to ceiling. But stable designers always recommend that such owners allow the animals to interact and just be horses.
Partitions between stalls
We tend to lock our canine partners behind bars and treat them like prisoners, but horses that aren't confined within four walls are much happier. Their mental state improves markedly when they have the opportunity to be surrounded by their relatives. This is why in most European equestrian clubs the partitions between stalls are only one and a half meters high. Even stallions, when kept in this way for several days, easily find contact with their neighbors, become less aggressive and dominant. The only exception is stables that specialize in foaling: the mare feels much safer when she is separated from other horses and from imaginary predators, so in such stables it is preferable to have solid partitions about 2.4 m high.
The material from which a stable can be built will depend on your budget, climate and your idea of what your dream stable should look like. In the first place in the list of popularity, of course, is wood: it is notable for its low price and availability, but at the same time it is short-lived and quite difficult to thoroughly disinfect (especially for stalls with mares and foals). Oak is considered one of the strongest types of wood, but it is becoming increasingly expensive. Less durable species - spruce or fir - are cheap, but quickly become unusable under the blows of hooves. A good solution may be to use lumber coated with galvanized metal, which adds strength and prevents horses from chewing the wood. Galvanized steel, in theory, does not rust, but it is important that the galvanizing process be carried out after cutting the metal. Galvanized and then cut steel will have raw, unfinished edges that can rust under the influence of ammonia fumes in as little as three months. You should also avoid using powder-coated steel, as the horse can easily scrape the paint off with his teeth, causing the metal to rust again.
Floor covering
Each owner decides for himself which type of coating to choose, but in general, the floor must meet the following requirements:
Not too stiff to reduce stress on the animal's tendons
- be dry
- do not absorb odors
- be non-slippery so that the horse can lie down
- be durable, not deformed when the horse digs
- be durable
- be easy to clean
- be accessible, inexpensive
Now that we've discussed the many parameters of stall size and design, it's time to talk about what's under the horse's feet. Experts say that the health of animals' legs and hooves largely depends on the type of coating chosen. There are two main categories of such surfaces - porous and moisture-proof. The basic foundation of porous floors consists of sand and/or gravel, which allows water to penetrate into the ground, while waterproof floors are, for example, concrete covered with a rubber mat.
When choosing flooring for a stall, special attention should be paid to removing manure and urine. So, a four hundred and fifty kilogram horse produces about fourteen kilograms of feces and two and a half liters of urine daily. Floors that absorb this moisture will also retain odor. For many years, the most popular coatings were clay or a mixture of clay and stone dust over a layer of gravel. Such floors are physiological for the horse and have a porous structure, however, they also have a number of disadvantages.
Clay floors are difficult to keep clean. They need to be leveled and re-ground at least annually and completely replaced every few years due to the holes that form when the horse digs. Also, these coatings remain wet longer than we would like, and still absorb odors. Cement and concrete floors are more durable, but too cold and hard.
A good solution in such cases is a rubber mat or mat placed on top of a clay or concrete base. The mat should not be placed on a soft surface such as sand, as it may move or bunch up. The mats have a number of advantages: they are non-slip, moisture-resistant and odor-resistant, they are easy to clean, plus some mats contain a safe antifungal and antibacterial additive. Recently, new rubber mats with a special locking system have appeared: they are more expensive than ordinary mats and are distinguished by the fact that they are assembled like a puzzle and fit tightly to the surface, so that manure and sawdust do not get clogged under the edges.
The most suitable place to house and live a horse is a stall. It goes by many names: pen, stall, stall. A stall is needed not only for the convenience of keeping, but also for raising and training the animal.
Where to start, what to grab onto, what to come up with. Let's start in order.
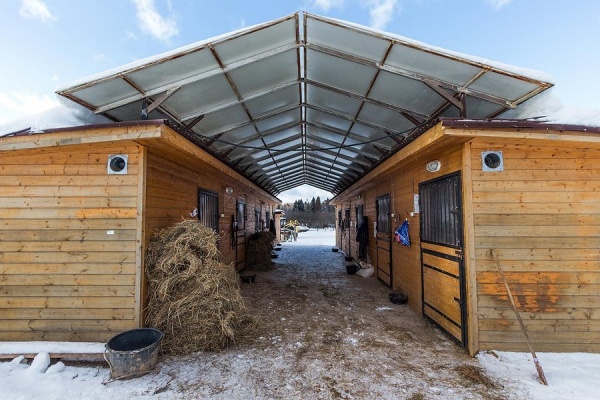
The most ideal option is a box with a paddock. It allows the horse to be both indoors and outdoors. Naturally, in bad weather, you need to control the time the animal spends outside. If funds or space do not allow this, then you can solve the problem with the help of an external box. When the top door is open, the horse also takes an active part in the life of the stable and does not get bored. Protect your horse from drafts.
Open upper door
Dimensions
In almost all stables, the size of the stall is no more than three meters by three meters - nine square meters. All these sizes are suitable for keeping horses in a “satisfactory” condition. Accordingly, we can observe trampling, hitting, gnawing - all this from a very confined space.
If we think logically and calculate correctly how to make a stall for a horse, we have the following picture: the length of a horse is on average two meters and forty centimeters. Accordingly, the side is slightly small. The ideal option for a horse is four meters by five meters. This is necessary so that the animal can calmly turn around in the stall.
Many people simply remove the top layer of soil, sprinkle it with peat, and the coating is ready. This is due to savings, but this can hardly be called savings; the costs for a doctor will be much higher. Peat, together with manure and urine, forms an excellent environment for infectious diseases.
There is an option for an adobe floor, but you have to knock it down two or three times a year and lay a new one, it is very warm and not slippery, but you need to always have a clay quarry with you, and this is also not cheap. Wooden flooring is also a good option, but over time it becomes slippery. We recommend the best option - a concrete floor. Only he will protect you from rats.
 Concrete floor
 The walls of the box must be made of proven brick. Horses do not chew or hit it with their hooves. But if we take into account the needs of the animal, many simply lose their will because they gnaw on a tree, suffer from it, or hit it with their hooves:
- It’s very easy to make a wooden partition and you don’t have to skimp on the profile. The dividing partition should cover half the height of the stable. Side partitions must be equipped with ventilation holes.
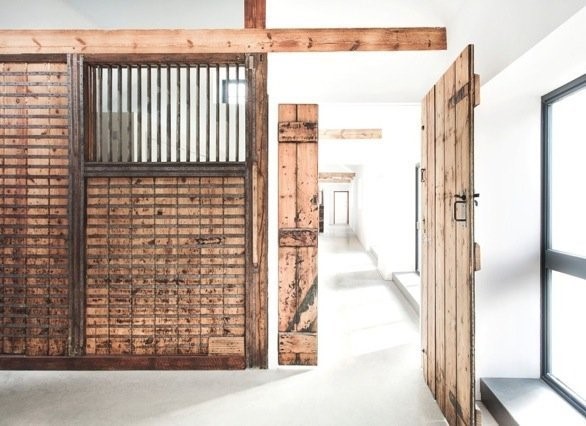
- The front wall can have a different appearance and production method. The front mesh made of metal bars resembles a prison, but is convenient for stables with regular visitors - the horse cannot reach out and bite.
 Front mesh
 - For a private stable, an open front wall is suitable. If the dividing partitions are made of brick, then the front wall is also built from it. It can also be made from a channel and a board. Or simply abandon metal structures altogether and install a completely wooden partition.
Almost all types of doors are equally good and equally bad. If your stable does not have the required width, then it is better to make sliding doors. An ordinary rotary or, as it is also called, “rotating” one, withstands the pressure of horses better and more reliably. The size of the door must be at least one meter and fifty centimeters. And pay attention to the fittings, there is, of course, a great choice here, but two galvanized bolts for a regular door are the most reliable and durable lock.
 Sliding doors
 Rules for placing parts
The disadvantage of the stall is that only the front wall remains for feeding and it is necessary to place a manger, a feeder, and an automatic drinker on it at the same time. This gives the horse a reason to indulge in water and food and do other fun things. If it is not possible to divide the stall, then you need to follow the rules:
- The stall size ranges from three meters long to three and a half long and two meters long.
- Slope up to one and a half centimeters per meter in the direction of the gutter.
- The separation pole is tightly attached to the feeding table.
- The stable pole is attached at a level of one meter from the ground.
- To avoid collisions with a neighboring horse, a shockproof casing is attached.
The box stall is very convenient; it provides the horse with a comfortable bed, measuring two and a half by one and a half meters. You can provide a grill on top to prevent bickering between animals.
In the end, one thing we can suggest is that the best stall for a horse is a box. First of all, this is the health of our horses, which will always reciprocate our feelings.
Many landowners are wondering how to build a stable on their property. The fact is that some people have dreamed of horses since childhood, while others want to professionally breed animals for further resale. Moreover, the business associated with horseback riding is now gaining momentum. It is not surprising that this topic has become more relevant than ever.
We are building a stable
Start of construction
Before you start building a stable with your own hands, you need to create a project. It will include drawings, estimates, descriptions of the required materials and other important information. This document will be your roadmap towards a completed concept. It needs to take into account the following points:
- The main purpose of the building is to ensure maximum comfort for horses. You must take into account that horses need a lot of space. Moreover, the stable must be properly insulated and have enough light. There should be no drafts in it. Animals are extremely sensitive to them.
- It is best to choose a hill as a construction site. This will prevent moisture from forming inside. Otherwise, horses will often suffer from hoof diseases.
- Determine which direction the wind blows most often. It is necessary that the cold streams fall on the corner of the stable.
- A special role is played by drawing up estimates without this document, it is impossible not only to build a stable, but simply to begin construction. Clearly assess your capabilities and calculate your budget.
After the main points have been clarified, you can proceed directly to the construction of the stables.
Deciding on the material
In fact, this issue needs to be decided during the process of creating the stable project. But since the topic is very extensive, it is better to separate it into a separate section. Among professional horse breeders, brick and wood are recognized as the best materials. This choice is explained quite simply. These materials are better than any other at ensuring dryness and warmth inside the stable.
Brick allows you to create a strong and reliable building. In addition, this material also breathes. And this is a very powerful argument when creating an optimal environment for animals.
In turn, the timber copes well with moisture and creates a microclimate that is ideal for the life of horses. Thanks to him, the stable will become a place where animals will feel as comfortable as possible.
There is an option even for those who do not have enough funds to purchase the required amount of brick or wood. To make the building warm, dry and inexpensive, use adobe. This material is a kind of mixture of clay and straw. It is natural and has good thermal insulation properties.
Advice ! A very budget option for a stable consists of boards in the form of a frame. The clay-sawdust mass is poured into the space between them.
It is better not to use stone when creating a building. It, of course, has amazing durability and reliability, but dampness will certainly form inside the stable. In addition, heating such a room costs a lot of money.
Making walls
The thickness of the walls of the stable directly depends on the material and climate in which the building is being built. If construction takes place in the northern zones of the country, the thickness of the walls should be from 22 to 25 centimeters. In turn, in southern latitudes, logs 20 cm thick are quite sufficient.

Walls must be built on a good, solid foundation. Moreover, the space between these building elements is best paved with roofing felt. If this material is not available, use roofing felt or even asphalt. In principle, any waterproofing material will do.
Important ! The construction of the stables should be carried out taking into account the fact that the temperature inside should not be lower than 10 degrees.
The internal layout of the walls of the building is carried out with the expectation that the horse in the stall should be able to change position without problems. Otherwise, the animals will be extremely uncomfortable inside.
Roof
It is best to make the roof in the stable pitched. Moreover, it needs to be equipped with ebbs and gutters. It is necessary that the water be drained into special containers and not under the walls of the building. Otherwise, the appearance of dampness inside is simply inevitable.
The ceiling must be located at such a level that the animal can easily fit into the stable. At the same time, it should not hit its head on the ceiling. Of course, the maximum height of each horse depends on the breed, but it is better not to make ceilings lower than three meters.
The ridge in a gable roof is installed at a height of about four meters, but not more than five. The lower edge of the roof should rise above the ground by at least three meters.
5-centimeter boards have long been recognized as the best material for building a stable. A clay-sand mixture is laid on them and sawdust is poured. You can also use dry reeds.
In theory, the roofing material for building a stable can be anything. But it should not allow moisture to pass through, be resistant to any weather conditions and not succumb to combustion. Slate is ideal.
Creating a floor is the most important stage in building a stable.

The stable floor must have the following properties:
- strength,
- waterproof,
- softness,
- thermal insulation.
The floor in a stable is most often made of wood or adobe. Each option has its advantages.
Perhaps the easiest way to make an adobe floor. To do this, you need to first level the ground in the construction of the stable. Then you need to lay a thick layer of clay, and then compact it. The thickness of the coating is at least 15 cm!
Important ! When pressed, clay is compressed twice, keep this in mind when purchasing.
At the end, all you need to do is dry the floor in the building. Immediately after this, cracks form. To eliminate them, use a mixture of clay and lime. Pour the solution into the damaged areas and wait until it dries. Sprinkle the resulting surface with sand on top.
The adobe floor is deservedly popular among horse breeders. It is warm and great for animal hooves. The only negative is that it is difficult to care for.
The surface of the adobe floor of the stable must be covered with a special bedding. Horse breeders bear the task of repairing dents, which appear quite often as a result of the animals’ natural obstinacy.
Wooden flooring is also often used in stables. During construction, the boards are placed as close to each other as possible. There should be no gaps or cracks at all. It is best to embed the logs into the ground.
Important ! The main advantage of a wooden floor in a stable is its ability to retain heat inside.
Rarely do you build a stable with a brick or asphalt floor. They are quite good, but their installation is a very expensive undertaking. If there are practically no funds, but the desire to start your own business has not gone away, you can resort to one trick.
A dirt floor for a stable costs almost nothing, but provides relatively good comfort for horses. You need to mix the loosened soil with straw and compact it well. That's all.
Important ! The floor in the stable should have a slight slope towards the passage from the feeder, no more than two degrees.
Installing doors
Doors in the stable should not be narrow. The animal should not experience the slightest discomfort when passing through them. The standard parameters are as follows: height of at least two meters, width of one and a half meters.
Important ! Door jambs should be rounded.
Doors can only open outwards. Pay special attention to the shutters; they should be rounded and not protrude outward. In most cases, they are the ones that lead to animal injuries.
The stall is the animal's home
After the construction of the stable is completed, you need to start working on the interior arrangement. Stalls play a special role in this context. The height of the premises is at least two and a half meters.
Denniki, of course, provide horses much more convenience than stalls, but since the former require much more space, and their construction is more expensive, in most cases you can do without them.
Horse stalls They can be blind, when the partitions reach the ceiling, and semi-partitions. The first ones are not good because they isolate the horse too much and deprive it of the company it needs. Therefore, half-partitions are considered more suitable, and the partitions themselves are made closer to the depth of the stall, i.e. to the place where the horse's head is located.
The manger should have sufficient depth and be located at such a height from the floor that the horse can freely get food without bending the neck too much. Very high mangers are harmful because they teach the horse to hold his head high. Hay racks are made above the manger. The distance between the bars should be about two inches.
The windows are located near the ceiling so that the light does not fall directly into the horse's eyes. The light in the stable should be moderate, because too bright spoils the horse’s vision, and insufficient light makes him obese and makes him lethargic and lazy. The most suitable window size is 5 feet. in length and 2 feet. in width. Thresholds should be very low.
In small stables, doors can be made in the middle of the stable; it is better to make them on both narrow sides, because in the summer air will flow more freely, and in the event of a fire, you can quickly take all the horses out of two doors.
The air temperature in the stable can vary from +5 to +15°C. Therefore, in the cold it is necessary to take possible measures against
cooling, as well as insulate doors and windows.
Plastered and whitewashed walls, which reflect both light and the warmth of the sun, are more effective in counteracting excessive heating of the stables.
During intense and prolonged heat, when the atmosphere heats up without hope of a quick cooling, one has to rely only on the cooling effect of the soil under the stable, because the layer of air under the roof acquires the same temperature as the surrounding air; Of course, all that remains is to submit to circumstances and try to refresh the room with ventilation at night, closing and curtaining windows and doors during the hottest part of the day. 
The room where the horse stands should be clean, dry, light, so that there is no draft wind, not cold in winter, and not stuffy in summer.
A smeared and whitewashed, light-colored wicker barn is better than a bad wooden or stone stable, where there are cobwebs, dust, all kinds of uncleanliness, harmful air, dirt, slurry and cracks. You just need to check that there are no sharp twigs sticking out of the walls in the barn, which the horse could stumble on, gouge out an eye, skin its legs, neck, torso, or scratch them.
The floor should be level, well-made, made of clay or just earthen, and there should be a small slope on one side, towards the doors, for drainage of urine.
In warm weather, windows and doors in the stable should be open, but only on one side to avoid draft winds.
Change the litter daily and, in addition, every time it becomes very wet.
In large cities where racing societies exist, it is customary to build stables near the racecourses, and some athletes see special advantages in this. Meanwhile, such a view is very erroneous and for the following reasons: the “hippodrome life” of a horse, no matter how rich in victories it may be, has essentially little attractive. The memory of each victory is associated with difficult moments for the horse, and any unnecessary anxiety or excitement is definitely undesirable.