Instructions for assembling and installing sliding interior doors. How to install sliding interior doors? How to install a sliding door into a wall
Installing sliding doors is one of the ways to solve the issue of rational and competent use of every meter in the apartment; you can do them yourself. Information on how to implement this and what is needed to make the structure will be useful for many owners of small-sized housing.
Varieties
In a specialized construction supermarket you can see a huge variety of models of sliding doors. They are divided into types and subspecies, taking into account various parameters:
- dimensions;
- forms;
- material;
- functionality: parallel-sliding and folding.
Depending on the design and material of the model, its price category also differs, and given how rich the choice is, everyone can find a door option that suits them.
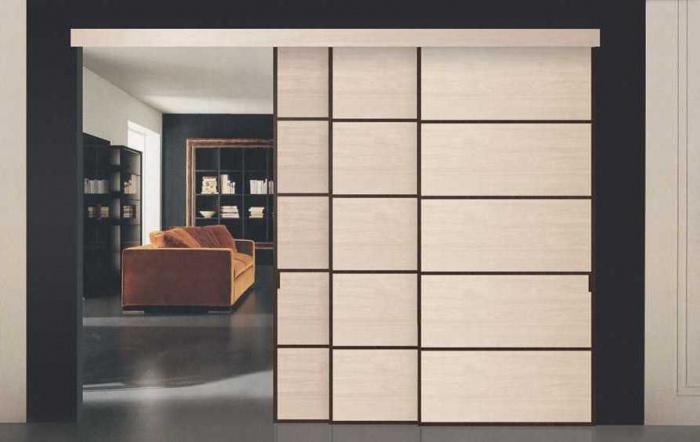
Sliding doors
This type of sliding door is the most common. It consists of one or two sections, which, when opened, move in one or different directions. In this case, the leaf panels are suspended on a rail mechanism, which sets them in motion.
Cassette
The principle of operation of the cassette system is similar to that of a compartment door, with the only difference being that when moving the door is hidden in a special niche, which is camouflaged in the wall. It is sold complete with doors, but if we're talking about about self-production, it is made mainly from plasterboard.
Cascade
Cascade doors are a structure of several leaves, one of which is fixed in a stationary position, and the rest move along a rail mechanism across the entire width of the opening when closing. When the structure is opened, all parts of its fabric are assembled on the side of the fixed sash.
"Book" and "accordion"
These types of doors are almost identical. Their designs consist of several sections connected by special hinges, with the help of which the sashes are compactly assembled on one side of the opening. The difference between “book” and “accordion” is only in the number of sections involved in the design.
For reference! It is not for nothing that these mechanisms are called “book” and “accordion”, as they resemble the principle of their movement. Their action can be compared to moving a screen.
Sliding door mechanism
Regardless of the type of sliding interior doors, the operating principle of their mechanisms does not differ significantly. Rollers are mounted on the canvas, which, moving along the guides, ensure the movement of the sashes.
The guides are usually attached to the wall, but in some cases they are also fixed to the floor. In the case of framed door options, a separate running element must be installed on each section.
Sliding door devices are divided into hanging and rail. In the case of a suspended mechanism, the running gear, one or more, is installed only on top of the structure, and an additional roller is fixed below to ensure easy movement.
The rail mechanism looks the same, but the running elements are attached both above and below the door frame, that is, the lower roller does not move along the floor, but along a rail built into it. This design is more resistant to heavy loads, so it is suitable for door models with large dimensions.
In order for the device to operate smoothly, it is necessary to carefully ensure that dirt and debris do not accumulate on the bottom rail.
Step-by-step instructions for installing a sliding structure
Before you buy all the necessary components to make a good-quality sliding door yourself, you should make sure that its installation is possible in a particular room. It must meet the following conditions:
- the wall is strong enough to support the weight of the entire structure;
- the doorway is level;
- The width of the wall is enough to roll back the sash.
If the room meets all of the above parameters, you can decide on the type of model and begin preparing for installation. To select the most suitable option For self-made, you can use photo or video catalogs that can easily be found on the Internet on popular platforms.
What is required to install the compartment?
One of the simplest models to make with your own hands is a single-leaf sliding door.
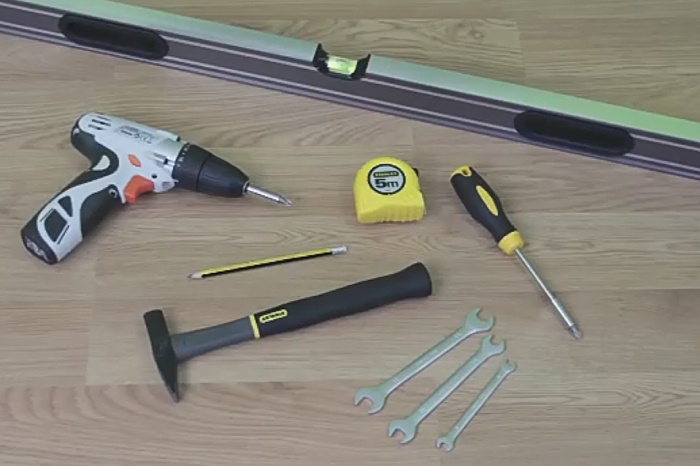
For reference! To install a sliding sliding door with one section, you will need a minimum set of tools, such as a screwdriver with self-tapping screws, a building level and a tape measure.
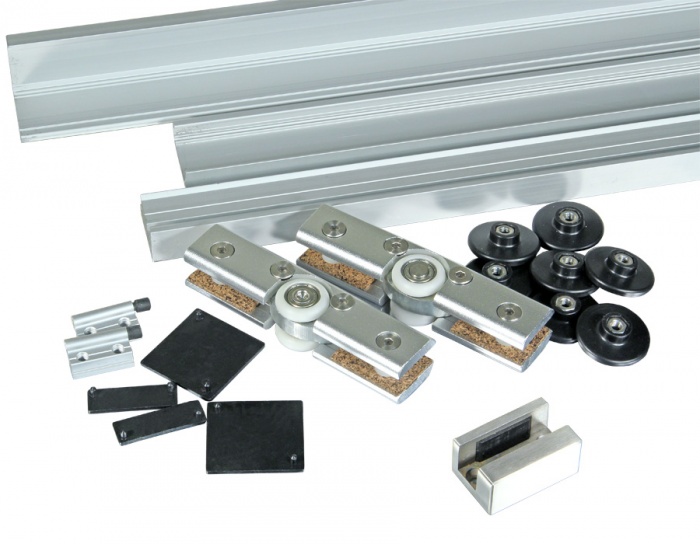
The mechanism for the design can be purchased ready-made or assembled from parts:
- running parts;
- staples, clamps;
- roller carriages;
- platbands.
When choosing a canvas, you should consider that it optimal size is considered to be the one that slightly exceeds the perimeter of the opening, and the length of the guide rail is twice the width of the door.
Installation of the structure mechanism
First you need to determine the height sufficient for the door to block the entire opening when closed. To do this, apply a sheet to the wall of the proposed installation and to the side where the sash will slide off and, taking into account the height of the rollers, as well as an approximate distance of 2 cm, use a pencil to mark the place for attaching the guide. The result should be a smooth horizontal line.
Next, a guide is installed on the drawn line, which can be fixed to the wall with self-tapping screws or special brackets. At this stage, it is important to take into account that there should be a small distance between the sections and the wall.
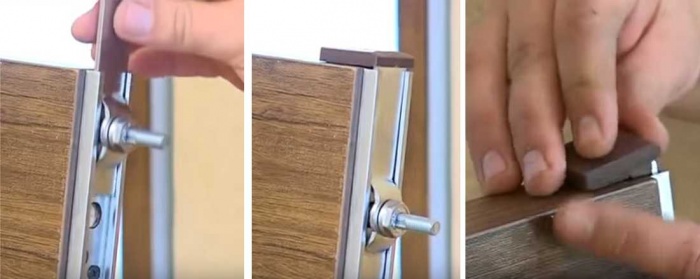
After securing the guide, you need to assemble the roller device. To do this, mount the carriages, insert a screw into them and place them in the running element. Their number directly depends on the weight of the sash, that is, the heavier the structure, the more of them will be required.
Securing the sash
First of all, staples are placed on the door leaf at a certain distance from each other, but in such a way that they can withstand the weight of the entire section. Then the sash must be lifted, thread the screw into the brackets, and then fix it on the right level. To make the structure even, the best solution would be to use someone else's help.
After the canvas is hung on the chassis, clamps are installed. They should be positioned in such a way that the leaf completely covers the doorway when closing and moves to the side at a convenient distance when opening.
Handle installation and finishing
To fully use sliding doors made by yourself, it is enough to install a mortise handle on them, ready-made option which is easy to find in a construction supermarket.
Attention! If it is necessary to install a locking device in the structure, then you should choose a vertical type lock.
The final stage in making doors with your own hands is their final finishing. It includes hiding the slopes behind the platbands and decorating the guide with a suitable strip. After which the installation of a single-leaf compartment door can be called complete.
If the budget does not allow, but you still need to free up space in a small room, make sliding interior doors You can do it yourself even using improvised means. To make them, you will need any suitable fabric, for example, old door, and as a guide rail - an ordinary steel cornice with hinges. However, the service life of such a design is short, and no one guarantees its safety.
2018-04-18Reading time ≈ 3 minutes
Recently, the trend of installing sliding doors at home has become increasingly popular. They are preferred to ordinary doors for a reason. In fact, sliding structures have a number of advantages, some of them: they open conveniently without squeaking or other noise, are non-traumatic, simple and inexpensive.
Sometimes the main advantages include the fact that they allow you to save precious space in the room - well, one cannot but agree with this. Next we will talk about how to install sliding doors with your own hands, the material will be arranged as step-by-step instruction to installation.

One thing to note important point. If you have irrevocably decided to install sliding doors with your own hands (videos and photos of an auxiliary nature can be found directly on this page), then remember that such work is best entrusted to professional personnel, since only a masterful approach can ensure highest level installation, and therefore guarantee long and trouble-free operation of door components. The conversation about how to make a sliding door with your own hands is very complicated, so it is highly recommended to buy a ready-made kit.
Step-by-step instructions for installing sliding doors

You need to imagine the moment that the door block is delivered to the apartment where it will be installed in the future, in a disassembled state. He gathers on the spot. The door leaf, frame and trim are packaged to avoid damage during transportation.

Let's consider an installation method when the door leaf has freedom of movement along the doorway. Here it is necessary to note the main possible options finishing the doorway: these are tiles, a decorative false frame and, the simplest thing, ordinary wallpaper. We will not dwell on finishing with tiles or wallpaper, but will pay special attention to how to install a sliding door with your own hands using a false frame.

The false box is installed in a pre-prepared doorway and is fixed with special wedges. To properly control the current installation, it is necessary to use a level and plumb line.


An important point: rollers, which are the main components of the sliding system, are attached to the upper end of the door leaf. A screwdriver is used for this. The holes are marked with a pencil.


There are special fastenings for the rollers, which, like the first ones, come complete with the entire structure. Most often, a mortise handle is installed - this will make opening the door more convenient.


The most important point is when the rollers with the web are mounted in the guide. The blade is adjusted by level using the same pegs.


We must not forget that a special groove must be cut in the lower end of the door leaf for the flag roller, which, in turn, is designed to protect the door from lateral vibrations.


This roller is attached, of course, directly to the floor. To fill any gaps, it is used polyurethane foam, which serves as a good fixative.


We can conclude that assembling sliding doors with your own hands is a difficult undertaking that requires certain skills and availability necessary tools. It is recommended to entrust the assembly to professional workers.
A sliding interior door will add a special touch of comfort, sophistication and individuality to the interior of any home. In addition to the fact that it looks very beautiful, it is also convenient for small apartments, as it saves space.
There are 3 ways to install sliding interior doors with your own hands, and they depend on the types of structures.
Types of sliding systems are distinguished by the method of sliding:
1. These can be two parts of the canvas that open in both directions
2. One door goes left or right along the wall.

3. When the canvas goes into the wall, hiding in the opening of a pocket (pencil case) made of plasterboard or a finished metal cassette.

Until recently, doors were installed without handles if they completely fit into the pencil case or if the handles served as limiters. Now there are enough handles on sale that will not interfere with the installation of the door (both with and without locks).

Single and double field systems
When the sliding door system is single-sided (it goes into the pencil case), the doorway should be twice as wide as the door.

The installation of a double-floor system (two doors) will require significant changes to the opening. This also applies to the guide along which they move. It is equal to the width of the canvas multiplied by 4, plus 10 cm. Accordingly, the doorway should be the same.

If the door is hidden in the wall, the pencil case into which it goes will be one of the main elements during installation. The guide rail and the carriage with the suspended canvas will be fixed in it. The pencil case can not only be covered with plasterboard, there are finishing options: plaster it, cover it with panels.
Stores and construction companies sell finished products. As a rule, they are intended for doors standard sizes. Imported sliding products may be non-standard. Pay attention to their configuration, especially the presence of platbands (decorative elements, extensions or framing strips). There are quite enough options for making a sliding door.

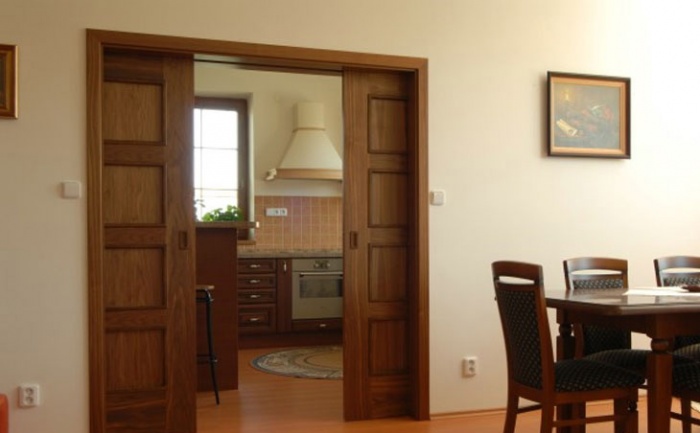
It is convenient to make sliding doors on an adjacent wall located between two rooms, when both panels are moved into one pocket. It should be designed for the width of two doors so that they can be opened simultaneously.

How to make a pencil case for a sliding door
The pencil case is made to match the width of the canvas, plus five to ten centimeters. Having decided how the door will open, they either widen the opening or install a pencil case next to the wall. Then the wall is built up with a frame.
It is covered with plasterboard or decorative panels are installed. It is necessary to make preliminary measurements, check how smooth the wall is, whether its defects will interfere with the movement of the door, and then calculate where and how to mount the pencil case.
It is positioned based on the way the door is opened, so that it moves freely in and out of the pencil case. A slatted frame made of bars is quite suitable for a not too heavy canvas. It will support doors up to 70-80 kg. Their width is no more than 45-50 cm.

If the door weighs more than 80 kilograms, a pencil case is made based on a metal frame, then its dimensions will depend on the size of the door and on what kind of sliding system will be installed.

The size ratio is shown in the following image.

Installation of a sliding system
Any door installation option begins with careful preparation of the walls. They must be even and level. The floor and ceiling are parallel, with a permissible deviation of 5 mm. The doorway must be checked for verticality and have clear dimensions.
When the door slides along the wall, it can only be secured at the top. Special attention You need to pay attention to installing the upper guide profile. It should be positioned as much as possible, to say the least – perfectly level. In addition, regardless of the evenness of the wall, it must fit snugly against it.
The slightest deviation is enough for your dear (literally and figuratively) door to begin to groan and twitch painfully. It is better to do the work with an assistant; if he has straight hands and some experience, then everything will go as it should.

Single Rail System Installation
Typically, the system includes a profile, stops, rollers, guides, and fasteners. The fittings are selected independently. Spacers (profile) can be replaced with a 50-40 mm block. As a rule, its lower edge at the top is 60 mm from the edge of the doorway.
- Marks are made and holes are drilled along them., then the timber is drilled to the wall using self-tapping screws. If a profile is used, holes are made on it in advance. Then a guide rail is attached to the beam (profile, spacer). Don't forget to check the level!
- Next, you should make sure that nothing will prevent the door from sliding freely along the wall and only then fix the rail to the block, insert the carriages into the guide rail, install the stops. Rubber shock absorbers are also located inside the rail.
- The next step is installation of door fasteners on carriages. They do not need to be fixed immediately; you should make sure that the rollers move smoothly and that the stops are correctly positioned. For fine-tuning, adjusting fastening bolts are used. Then the handles and trims are fixed (they must be removable so that the carriage mechanism and rollers can be cleaned).
Sliding door and pencil case
If the sliding door requires a pencil case, then installation becomes more complicated. If you bought it ready-made, then it is installed in the prepared opening, leveled very carefully, attached to the walls using anchor bolts or self-tapping screws, and the gaps between it and the wall are sealed with foam. Then comes the installation of the sliding system.

If there is no pencil case, the installation principle is the same as in a single-floor system; there are also two guides: top and bottom. It is important to ensure that the lower and upper guides are absolutely consistent, parallel and level.
Check correct location doors in the following way. The lower profile and guide are installed, the carriage and rollers are assembled, they are secured (without final fixation) on the door, placed on the rail, and the verticality is verified. The location of the upper beam (profile) is determined by the upper extreme points.
Stoppers are installed. To insert the door into the upper and lower guide rails, it is first inserted into the upper guide, slightly lifted, and the rollers are placed on the lower guide. The top and side of the system are closed decorative panel, platband, fastenings are covered with decorative furniture plugs.
Do-it-yourself installation of sliding interior doors with your own hands is difficult not only because installation requires precision and accuracy. It is necessary to know before installation what kind of door the door will be, what sliding system is supposed to be installed, how it is designed and what loads it can withstand (there are many of them and all are different).
In order not to make a mistake with the installation, use the services of a professional measurer to understand how the straightness of the opening is determined, what you need to know about its angles, the thickness of the walls and their verticality, and other necessary parameters.
You can buy ready-made sliding system kits, or you can complete it yourself. The top rail can be purchased ready-made, or you can order it and have it made individually, including installation instructions. Please note that the system must include adjusting bolts.
There are both inexpensive and long-life, reliable and easy-to-install mechanisms that can withstand loads of up to 120 kg. You will have to pay a lot of money for them, just like for the ready-made “pencil case” system that appeared on sale not so long ago.
in our practical guide.
- Keep in mind that, as a rule, there are no sockets and switches near the installation of the sliding door cabinet. If you still need them on the wall, consider installing them before you make the pencil case. In finished products, there is usually no space for wiring and sockets (or switches). But look, there are already manufacturers who provide such options.
- A sliding door can be higher than a standard swing door.
- In order to increase sound insulation, use seals.
- If you are making a door in a new building, do not forget to consider how the finished floor will be located so that you can take this into account when making calculations.
- To install the finished pencil case, foam is used, which has a reduced expansion coefficient (it hardly expands)
- When buying a ready-made pencil case, find out what material it is mounted in (plasterboard, brick, concrete, etc.)
- Use a plumb line when working; it will more accurately show the place, after installing the upper profile (or beam), where the lower guide rail should be located.
- To ensure that fasteners do not become unscrewed or become loose anywhere in the system, all adjustment screws must be secured using the locknut principle, applying glue or sealant to the fastener threads.
- Before inserting the rollers into the upper guide, thoroughly blow it out so that small debris, shavings, and scale cannot spoil their movement.
In small rooms, every meter of usable space counts. This is why many homeowners are replacing swing doors with sliding doors. Installing sliding doors yourself is quite simple. However, the mechanism for such a design costs almost the same as the canvas. Such expenses are justified if it takes up too much space; in other cases it is better to install a swing model.
Sliding sliding doors have very low sound insulation, since they do not fit tightly to the wall. The noise of a structure installed in a pencil case is much better at hiding the noise. However, they do not reach the sound insulation level of a swing door.
Types of sliding doors
Sliding structures differ in the type of movable mechanism. On this basis, they are divided into rail and suspended. Each model has its own pros and cons.
Hanging type model on top rail
The suspension mechanism consists of a square profile with a groove, inside of which there are two curved strips. The rollers attached to the product run along these slats. The guide is made of metal, as are the rollers. But they have rubber or plastic linings that provide a soft and quiet ride.

When installing a sliding interior door on a rail, no devices or mechanisms are installed on the floor. All the fasteners that are on the canvas are two rollers on top. They move along the groove due to special wheels. Such doors are considered one of the easiest to install. Installing a sliding door includes the following steps:
- installation of profile rails;
- installing rollers to the top of the door;
- inserting the product into the rail groove;
- installation of gate valves to limit rail movement;
- inserting the lower roller into the groove and installing the door;
- installation of decorative overlay on fittings.
The door fastening itself is very simple; in addition to the rollers and rails themselves, the kit includes plugs and fasteners. A product with a top rail has extremely low sound insulation rates. Therefore, it is not recommended to use such structures in living rooms.
Sliding structures on rails
There are two fastening rails on sliding doors. Movable rollers are mounted at the top and bottom. This method of fastening makes the product very stable, so it can be shaken.
Note! The metal profile of the fasteners is constantly clogged with dust and debris, which complicates cleaning in the house.
Mounting options
Regardless of the type of fastener, the installation of sliding interior doors can be:
- Kupeynaya.
- The rollers are installed above the door leaf in the opening. The guides should fit tightly in the groove.
- Cassette.
This option is considered the most labor-intensive and costly. A niche in the wall is equipped for the product, in which a guide is placed. When opened, the canvas is pushed into the wall. Such designs are the most effective at saving space.
Cascade.
Similar designs are very popular in Asian countries. The model consists of 2-3 canvases. One is stationary, while the others ride on rails and move behind it. If you plan to install sliding doors yourself, choose a compartment design. The models are easy to assemble and highly maintainable. The main feature that is necessary for installing an interior door with your own hands is a smooth opening. You cannot place anything near the wall to which the base of the sliding door is moved, otherwise the movement of the door leaf will be disrupted. A significant disadvantage of the models is their low sound insulation. This is due to the fact that sliding doors are installed with a gap. Without it, the canvas will scratch against the wall. Cassette designs provide best access
to the space of the room. Inside the niche you can install
soundproofing materials
, which will hide the noise. However, installation of such a model is possible only at the stage of repair or construction. In addition, a decorative wall is assembled for the rail, and this deprives the room of useful space.
Cascade products are a modification of compartment structures. The main difference is the larger number of guide rails. Installing such products is the most difficult, as high precision is required. Cascade structures are classified as premium for their complexity and aesthetics.
Installation Features
- You can install sliding interior doors with your own hands even if you don’t have specific skills. Installation instructions are included with each product. By following it, you can complete all the work yourself. Below the assembly process is described in more detail than in the standard instructions.
- Do-it-yourself sliding door installation
- Both the walls and the opening must be pre-finished with a leveling compound and decorative coating.
After aligning the opening, you can begin installation. The first step is to attach the rollers. Depending on the manufacturer and model, fasteners may have their own characteristics. To assemble some products you need to step back 15-20 cm from the edge, but most often the rollers are mounted right at the edge.
To begin with, markings are made on the canvas for fasteners.
Important! Make sure that the distance from the edge to the roller is the same on both sides.

At the marking site, drill holes 1 mm smaller than the diameter of the fastener with a drill. After the grooves are ready, the plates are fixed. Self-tapping screws are used as fastenings; their length must be at least 75 mm. The greater the weight of the canvas, the longer the fasteners. Special support holders are mounted into the plates, into which rollers are inserted. The fasteners on the sides of the canvas must be secured with plugs.
The rollers come with pins. The movable elements themselves are screwed onto them. If the model is not equipped with handles, they must be purchased separately. It is recommended to install the handles before installing the product in the opening. In a model without a groove, markings are made with a pencil and the material is removed along the contour with a carpentry tool. Fittings are attached to the resulting hole.
Note! Only submersible fittings are suitable for sliding doors.

When the canvas is ready, the rail is attached. The easiest way is to screw the guide to the block, and not directly into the opening. To do this, take a wooden plank of square or rectangular cross-section with a side of 60 cm. The length of the block should be twice as long as the door itself and a margin of 5-10 cm. The rail is cut along the length of the block.
The guide is screwed to the block with self-tapping screws from 85 mm. The minimum number of fasteners is 4, the more often the better. The recommended step between screws is 10 cm, the same distance is made from the edge of the canvas to the first fastener.

Next you need to measure the height of the bar. The rail is threaded onto rollers of the canvas and the height is measured. Using this value, holes are made on the wall for attaching the guide rail. The canvas should not stand on the floor. A distance of 8-10 mm is left from the floor to the structure itself. If there are no coverings on the floor, the thickness of the floor finishing is added to the value.
The level is used to adjust the mark for mounting the bar. For this, fasteners from 12 cm are used, but anchor bolts are more reliable fasteners. IN concrete walls use dowels.

Markings for the guide are made with a thin drill or nail. After that, holes are drilled for dowels or screws and the timber is mounted. The final stage is inserting the sliding doors into the rail. After rolling up the structure, plugs are placed on the sides of the fittings; they protect the structure from slipping.
When the door is open, a flag roller is screwed onto the floor. It regulates the movement of the blade along the vertical axis.
The installation of a decorative overlay on the fastening profile will give the structure an aesthetic appearance. It is placed on finishing nails or self-tapping screws with decorative plugs. Screw the cover directly into the block.

To install a sliding structure you will need more materials and tools. If you want to learn how to install sliding cassette doors, watch the detailed video instructions:
Almost any panel can be attached to a rail and a sliding door can be constructed. But for the system to function without failures, it is necessary to install high-quality fittings. Durable fasteners and rollers ensure long door life. Therefore, there is no need to save on accessories.
The canvas itself can be made independently. The cheapest option is a frame made of timber with a body made of plywood or chipboard. A solid product made of solid or laminated wood looks most aesthetically pleasing in the interior. However, the assembly of such a product will cost more. Products made from particle boards are covered with a film or a laminating surface. Wooden panels can simply be sanded and coated with protective compounds.
It is very difficult to design a roller mechanism on your own. If you don’t have a special tool, including a cutter, you won’t be able to make the fittings yourself. It is much easier and cheaper to purchase a ready-made product.
Sliding doors are the ideal solution for small rooms. Such designs do not hide space; moreover, they look very original and non-standard. In this article we will talk about the features and types of such doors, and also tell you how to install a sliding door with your own hands.
Types of sliding doors
Such designs can be classified according to various signs. For example, depending on design features, sliding interior doors are divided into:
- cascade structures;
- radius doors;
- accordion doors;
- single-leaf, double-leaf, three-leaf doors.
Doors can also be made from different materials, the most popular are wooden and glass structures. This factor is important if the system is to be installed by hand. For example, to install the simplest wooden door you will need a guide with one channel, as well as two carriages with rollers. If you install a glass door, you will have to stock up big amount materials, namely, prepare a lot of roller mechanisms, since heavy glass exerts significant pressure on the entire structure.
If glass sheets are poorly secured, they run the risk of falling and breaking, so it is recommended to mount them using two rails: top and bottom. This installation method will ensure good stability of the door. In this case, the sliding mechanisms themselves are fixed between two plates lined from the inside with special rubber pads.
There are two types of sliding door systems:
- The hidden in-wall mechanism provides for the functioning of the structure in which it is hidden in the wall. Such a door can only be mounted at the stage of wall construction, since it is necessary to provide a gap in its thickness in which the doors will be hidden. It should be taken into account that the thickness of the wall will increase, and this will reduce the free space in the room. But the door itself will subsequently save much more space than a conventional swing structure.
- Doors with an open mechanism can be installed not only during the construction of walls, but also at any convenient time. If there is such a mechanism, the doors will move along the wall, but for this it is necessary to provide free space on the side into which the door will open.
The external sliding mechanism allows you to use a lot of door movement options, so you can choose the most convenient method. To close a very wide doorway, it is recommended to use systems with four leaves, where the internal leaves will open towards the external ones.
Before installing a sliding door, you should familiarize yourself with their classification by type of fixation. Depending on this characteristic, three types of structures are distinguished:
- Doors that are fixed on the top suspension.
- Structures that are fixed to the lower suspension. With this method of fixation, a small threshold is obtained at the bottom, which is acceptable for cabinets and dressing rooms, but inconvenient for interior doors. The threshold can be recessed into the floor, but this will require additional time and labor. But installing systems on the lower suspension is the fastest and easiest process.
- Doors that are fixed in the two ways described above. This type of installation is considered the most reliable and durable.
Advantages and disadvantages of sliding doors
Before installing sliding interior doors, it doesn’t hurt to familiarize yourself with the pros and cons of such structures. First, let's look at the advantages:
- The advantage of sliding doors is their originality and originality, attractive and unusual appearance;
- saving space is another advantage of such systems. You cannot place furniture or other interior items behind a regular swing door, whereas if there is a sliding structure, the entire area of the room can be put to good use;
- The safety of such doors is also considered an indisputable advantage, because it is simply impossible to hit a hard corner in the dark;
- Sliding doors do not swing open due to drafts.
Such designs are not without their disadvantages, among which are the following:
- complex and labor-intensive installation method;
- if the door is not installed independently, you will have to spend money on paying for the work of craftsmen;
- low sound and heat insulating properties can also be considered a disadvantage;
- If the system has a hidden internal mechanism, caring for it is quite problematic. If you need to clean a space deep in the wall, you can simply vacuum it using a convenient attachment, but to minor repairs part of the wall will have to be dismantled;
- Over time, some rollers may become unusable and require replacement.

Sliding door installation
Regardless of the mechanism of action and fastening, all sliding doors consist of the same type of elements. These include guides, roller mechanisms, as well as the door leaves themselves. In addition, various decorative details, fasteners, extensions, as well as various accessories in the form of locks and handles are used. The work of installing a sliding system can be described step by step.
Step 1: installation of guide profiles
The first step is to apply markings to the wall in those places where the structure will subsequently be installed. Using these markings as a guide, guides for sliding doors are fixed to the surface. If the system has lower hangers, they can be embedded into the floor to get rid of the threshold. In this case, in the thickness flooring you will have to make a gap, but you can plan everything in advance and fix the guides on the concrete screed before finishing the floor.
Important: during the installation of profiles, be sure to check their horizontalness using a building level.
The next stage is the installation of the upper guide profile. This profile must be fixed strictly above the lower one, and its position can be checked using a control line. The installation height of the top profile should be equal to the height of the door itself and take into account a small increase of 1.5-2 cm. This increase is needed to ensure gaps between the door leaf and the surfaces of the ceiling and floor. Please note that the guides must be mounted strictly horizontally so that the structure stands level and does not move spontaneously.
As for the length of the guide profile, this figure should be equal to double the width of the leaf and take into account an increase of 5 cm for normal door movement. If the system has a door closer, you need to leave a reserve for it.
When installing normally wooden structure profiles can be fixed with brackets, but if we are talking about a heavy door made of glass or solid board, it is better to further strengthen the system with wooden beams. First, such a beam is mounted on the wall, and subsequently a guide profile is fixed to it.
If the wall in the house is lined with bricks or consists of monolithic concrete, then dowels should be used as fasteners. In case of plasterboard wall, in its frame you need to equip an additional profile in advance, and install the guide directly on it. It is recommended to use drywall anchors.

Step 2: fixing holders and fittings
The next step in installing sliding doors is to attach brackets to the leaf that will hold the door on roller carriages. Such brackets are mounted according to the instructions and are located on the sides of the upper end. The optimal type of holders for all types of sliding systems, with the exception of the accordion design, are clamps that are attached to the sides of the door. In the case of a glass sheet, metal fasteners with rubber gaskets are used, between which the glass is fixed. These clamps eliminate the need to drill holes for fasteners in the glass door.
When installing an accordion door, special brackets with a rotating roller are placed on each section.
During the installation of the holders, the doors can also be equipped with handles and locks if they are needed. Then, when the sliding system takes its place and is adjusted, it will be possible to install the locking mechanism. Please note that when installing hidden systems, handles and other fittings must be recessed into the thickness of the door leaf.

Step 3: hanging the door
The next step in installing a sliding door with your own hands is the direct installation of the door leaves. This type of work is best done together. One person will hold the door while the second moves the carriages into the grooves of the guide profiles. If the door plays a role interior partition and the profiles are mounted from wall to wall, the rollers for the sliding door are inserted into the groove in advance through a specially provided window. After this, the holding brackets at the end of the blade are connected to the anchor extending from the carriage.

Step 4: installing closers and limiters
To prevent the carriages with rollers from falling out of the grooves of the guide profiles, you need to install stops. As such limiters, special plugs in the shape of the profile are used, as well as studs, which are installed in the guide in designated places.
Tip: to prevent the door from making loud sounds when opening, choose stops with rubber stops. Such details will also prevent the moving elements of the system from deteriorating too quickly.

Step 5: installation of extensions and platbands
The trims on the sliding door are mounted in order to protect the mechanism from dust and various contaminants. Another function of such details is decorative. Platbands are used to give a neat look to systems with an open mechanism; they are not needed for interior doors.
The platbands are mounted on the wall using brackets, but you can fix them on the guide profile with special latches.

Step 6: Adjusting the Mounted Structure
The last stage of installing a sliding door is to check the result of the work and adjust the system. If on initial stage When installing the door, the guide profiles were fixed strictly horizontally; the door leaf should remain level and not move anywhere on its own. In this case, the adjustment process will not take much time. It will be enough to check whether the door fits tightly to the restrictive structure, whether the door leaf moves parallel to the floor, and whether there are unnecessary gaps where the door comes into contact with the wall. At the very end of the work, you also need to check whether the shutters move easily and freely along the guides, whether the fittings work properly, and whether all parts are well secured.
Sliding doors, photo:


Sliding interior doors. Video
How to install sliding interior doors
In an effort to make your home more comfortable and cozy, you often come up with the idea of replacing conventional swing doors with sliding doors (they are also called sliding, sliding, hanging). The good news is that you can install sliding doors yourself without any problems. The bad thing is that a normal mechanism costs about the same as a high-quality blade. What is captivating about them is that when open they hardly “eat up” space. They either hide in the wall (a better, but more difficult to implement option), or move along it.

You can hang interior sliding doors yourself
All this is true, but there is a significant drawback - a very low degree of sound insulation, especially in the sliding door version. When the canvas simply covers the opening. When installed in a pencil case (in the wall), the situation is a little better, but the degree of sound insulation of a swing door cannot be achieved even with this installation method. If all this doesn’t scare you, you can start studying the systems, selecting them, and then installing them.
Sliding door systems
There are two types of mechanisms: suspended and rail. Neither is perfect. Briefly about their advantages and disadvantages - below.
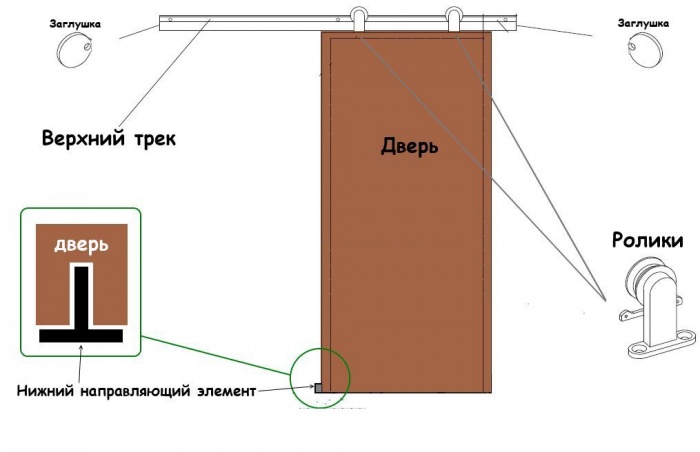
Top rail suspension system
The suspension mechanism is a supporting beam to which a guide in the shape of the letter “P” with “legs” bent inward is attached. The rollers to which the door leaf is attached move along this guide. If we talk technical terms, this is a hanging door on the top rail.

Basic design of sliding interior doors on the top rail
When installing such a door, the floor under the door remains smooth, only the lower roller is installed on the right and/or left of the doorway. It slides along a groove made in the lower end of the blade. It is necessary so that when moving it does not deviate vertically. This design is the easiest to install. Installation is very simple and consists of several steps:
- secure the top rail;
- screw the roller mechanism to the upper end of the canvas,
- roll the canvas into the guide;
- install stoppers at the top (so that the doors do not fall out);
- Having opened the doors, insert the lower roller into the groove and secure it to the floor.

Single-leaf interior sliding doors
That's all. Doors on rollers are installed. But this system, in the form shown in the photo, has very low noise insulation characteristics. They are practically zero: the passage is simply blocked.
Rail sliding doors
This type of door has two rails: top and bottom. Rollers are also installed at the top and bottom. Thanks to this design, the system has high degree rigidity: it can be shaken, and this will not cause much damage.

Rail sliding doors
The disadvantage of having rails in the floor is known: they are difficult to clean. Debris and dust constantly get into the grooves, so you have to keep them clean. This type of door is most often used in closets and dressing rooms. They are used as interior doors if there are active children in the family. Then safety is more important than difficulties with cleaning.
Mounting options
Regardless of the sliding door system, installation methods can be:
- Sliding doors. Guides are fixed on the wall along which the canvas rolls.

Sliding doors. The guide is mounted on the wall above the correct opening

Cassette sliding interior door: the door is hidden in a wall niche

Cascading sliding doors: one leaf pulls the other
The simplest installation option is sliding doors. They can be installed independently, not only at the repair stage, but also after it. It is only important that the opening is smooth and the wall has normal load-bearing capacity. The disadvantage of such a system is that you cannot place anything close to the wall in the place where the door rolls back. There is one more thing: very low sound insulation. This is easy to explain: if you look from the end, there is a gap of several millimeters on the sides. It is necessary so that the canvas does not “shuffle” along the wall. And all sounds penetrate perfectly through it, becoming only a little quieter.
Cassette doors are good because when open, the door leaf is located in a niche in the wall and does not interfere. The second plus is that seals can be installed around the perimeter of the opening, which provide much higher sound insulation performance. The disadvantage of installing a sliding door in a niche is that it can only be done at the renovation stage. The second drawback: to make a pencil case for sliding doors, they usually install a false wall, and this means stolen centimeters of space.
Cascade doors are one of the types of sliding doors. It simply has a larger number of guides: according to the number of movable door leaves. Installation is perhaps the most difficult: there are many parts and high installation accuracy is required. The systems belong to the elite category, and they rarely save on installation: repairs will cost more.
Features and installation procedure
You can install sliding doors yourself even without much experience. It is quite possible to do without installers. It will take a little time, and also installation instructions. We will try to give detailed description process with photo and video materials.
Self-installation of sliding interior sliding doors
Systems may vary slightly, but general rules remain the same. There are several requirements that must be met before installation:
- The opening must be level, otherwise you will have to take a canvas that covers all deviations with a margin.
- The load-bearing capacity of the sides of the doorway should be high, as should the wall above it.
- The opening must already be finished: plastered and painted, covered with wallpaper or decorated with decorative panels.
Next we proceed to assembly. First you can attach the rollers. Different manufacturers have their own recommendations. Some recommend retreating 1/6 of the width of the door leaf from the edge; in other systems, they are attached immediately from the edge, and the mounting plates provide the indentation. This is the system we install: in it, roller platforms are installed immediately from the corner.

Marking the installation location of the rollers
We center them, measuring so that the distances are the same. Having positioned the plate, use a pencil or marker to mark the locations for the fasteners. Drill holes in the marked places. The diameter of the drill is 1 mm less than the diameter of the screw.

Securing the Roller Shoes
We set the plates and screw in the screws. The length of the fastener depends on the weight of the canvas, but not less than 70 mm. We twist them exactly perpendicularly, otherwise unnecessary stress will arise.

Supports for the rollers are inserted into the installed plates. They are fixed with a lid on the side surface. Next, roller platforms are screwed onto the threaded pins.

Roller platforms are screwed onto the pins
It is also convenient to install handles and locks before hanging. They need special, mortise ones. If you bought a ready-made kit, the required holes are available. If you have used a regular canvas, you will have to trace the outline with a pencil and remove the excess with a chisel. After the handle or lock fits into the recess, the attachment points are marked, holes are drilled for them and the fittings are installed.

The most convenient way is to hang the sliding doors on a dry wooden beam. Its cross-section is less than 50*70 mm, its length is twice the width of the door leaf + 5 cm. We cut the guide to the same length.

We measure the length of the carrier and mounting bar
Having aligned the guide along the beam, it is attached to the beam with self-tapping screws no less than 8 cm long. The number of fasteners is at least three, departing 10 cm from the edges and in the middle (more often is possible, less often - not).

Attaching the guide to the beam
Now you can measure at what height to mount the timber. A guide with a beam is “rolled” onto doors with installed rollers. This way you can accurately note how tall the doors are. We drill at least four holes in the side edge of the beam for mounting to the wall.

The guide with the beam “rolls” onto the rollers on the door
Add 7-10 mm to the resulting mark - the doors should hang and not shuffle along the floor. 7 mm is the minimum gap, which is sufficient if there is no floor covering in the opening. If they are planned (later to lay laminate, carpet, linoleum, etc.), then the thickness of these coverings must also be taken into account.

Trying it on to the doorway
To prevent the canvas from “walking” during installation, it is wedged with small wooden wedges. At least two stops are required - near both rollers.

Having placed the beam against the wall and adjusted its position using a level, we mark its position with a pencil. If the wall allows, you can fasten it to the wall through and through, but for this you need to use self-tapping screws at least 120 mm long, or better yet, place it on anchor bolts.
If the wall, for example, is concrete, the installation of dowels is required. To do this, you need to transfer the marks for the fasteners to the wall. This can be done using a thin and long drill, the diameter of which is smaller than the drilled hole.

Transfer the marks to the wall using a thin drill
An even simpler option: a long thin nail. It is inserted into the hole and a mark is made on the wall with a couple of blows. The following procedure is known: drill holes for the dowel plugs, insert the plugs, hammering them in if necessary. Then we install the doors.

Attaching sliding doors to the wall
Stoppers must be secured along the edges of the guide. They are inserted from the sides, the required location is established experimentally (so that the canvas covers the opening completely when closed, and rolls back sufficiently when opening. They are fixed using clamping screws.

Installing stoppers on sliding doors
Having opened the doors, we install the flag roller on the floor. It fits into a groove cut into the bottom of the blade. It is necessary to ensure that the doors do not deviate vertically.

Installing Flag Roller
First, we insert it into the groove, mark holes for fasteners, drill, then secure with short self-tapping screws (length about 15-20 mm).

This is what the installed flag roller looks like with the doors open
At this point we can assume that the sliding doors have been installed. They are already fully functional. Remained Finishing work. The mounting beam with the guide is covered with a decorative overlay, matched to the tone of the door leaf. It can be nailed directly to the timber with finishing nails.

The decorative overlay can be nailed directly to the beam
Only when you put it out, make sure that the wheels are closed. It’s much more beautiful this way)) Now that’s it, you’ve installed the sliding doors with your own hands.
A video tutorial on how to install such a door is shown below. There are several installation options.
We install cassette-type sliding doors (in a pencil case)
The process of installing the guide and hanging the door leaf is almost identical to those described above. There is no need only for finishing, but all other stages are necessary. Instead of installing a decorative strip, a false wall is mounted at a distance of at least 10 cm from the wall. It is usually made from plasterboard profiles, which are covered with wall plasterboard. But this is not important - you can use gypsum fiber board or plywood, or any other suitable material.
Where does the distance of 10 cm come from? The thickness of the door leaf and the gaps on both sides are 5 cm. At least another 5 cm is added to this for installation of the profile. So it turns out to be 10 cm.
Since the main load will fall on the wall, the frame made of profiles need not be reinforced. If such a wall does not seem very reliable to you, you can insert wooden blocks inside, which are screwed with self-tapping screws. This will make the structure very rigid.
The basic principles for calculating a pencil case for a sliding door, as well as marking features and principles for preparing a doorway for installation, see the video.
Homemade sliding doors
Any door leaf can be installed on rollers and will work as a sliding door. The guide and all other components - rollers (carrying and flag), stoppers, stops - can be purchased. Hang on them at least a piece of plywood or a door assembled from several boards. This will be the simplest and cheapest option. But making the mechanism yourself is a more difficult task. One of the options for a sliding door mechanism made from scrap materials (from round pipes of different diameters) is in the video. The system was intended to be installed in a closet, but judging by the design, it can easily withstand even a solid oak door.
Complete instructions on how to make and install a sliding door in an interior opening with your own hands
Installing sliding interior doors can save space in apartments and private houses when owners want to expand their living space. You can install the structure yourself if the home owner has carpentry skills and the necessary tools.
There are several types of design:
- sliding;
- cascade;
- folding;
- radius sliding.


- %0A
%D0%A1%D0%B4%D0%B5%D0%BB%D0%B0%D1%82%D1%8C%20%D0%BE%D1%82%D0%BA%D0%B0%D1%82 %D0%BD%D1%8B%D0%B5%20%D0%B4%D0%B2%D0%B5%D1%80%D0%B8%20%D1%81%D0%B2%D0%BE%D0 %B8%D0%BC%D0%B8%20%D1%80%D1%83%D0%BA%D0%B0%D0%BC%D0%B8%20%D0%BB%D0%B5%D0%B3 %D1%87%D0%B5,%20%D1%87%D0%B5%D0%BC%20%D0%B4%D1%80%D1%83%D0%B3%D0%B8%D0%B5% 20%D0%B2%D0%B8%D0%B4%D1%8B%20%D0%BF%D0%B5%D1%80%D0%B5%D0%B3%D0%BE%D1%80%D0% BE%D0%B4%D0%BE%D0%BA.%20%D0%AD%D1%82%D0%BE%20%D1%81%D0%B2%D1%8F%D0%B7%D0%B0 %D0%BD%D0%BE%20%D1%81%20%D0%BF%D1%80%D0%BE%D1%81%D1%82%D0%BE%D1%82%D0%BE%D0 %B9%20%D0%BA%D0%BE%D0%BD%D1%81%D1%82%D1%80%D1%83%D0%BA%D1%86%D0%B8%D0%B8,% 20%D1%84%D0%BE%D1%80%D0%BC%D1%8B,%20%D0%BC%D0%BE%D0%BD%D1%82%D0%B0%D0%B6%D0 %B0%20%D0%BF%D0%BE%D0%BB%D0%BE%D1%82%D0%BD%D0%B0%20%D0%B8%20%D1%83%D1%81%D1 %82%D0%B0%D0%BD%D0%BE%D0%B2%D0%BA%D0%B8%20%D1%84%D1%83%D1%80%D0%BD%D0%B8%D1 %82%D1%83%D1%80%D1%8B.%20%D0%92%20%D0%B7%D0%B0%D0%B2%D0%B8%D1%81%D0%B8%D0% BC%D0%BE%D1%81%D1%82%D0%B8%20%D0%BE%D1%82%20%D1%88%D0%B8%D1%80%D0%B8%D0%BD% D1%8B%20%D0%BF%D1%80%D0%BE%D0%B5%D0%BC%D0%B0%20%D1%83%D1%81%D1%82%D1%80%D0% BE%D0%B9%D1%81%D1%82%D0%B2%D0%BE%20%D1%80%D0%B0%D0%B7%D0%B4%D0%B2%D0%B8%D0% B6%D0%BD%D1%8B%D1%85%20%D0%B4%D0%B2%D0%B5%D1%80%D0%B5%D0%B9%20%D0%BF%D1%80% D0%B5%D0%B4%D1%83%D1%81%D0%BC%D0%B0%D1%82%D1%80%D0%B8%D0%B2%D0%B0%D0%B5%D1% 82%201%20%D0%B8%D0%BB%D0%B8%202%20%D0%BF%D0%BE%D0%BB%D0%BE%D1%82%D0%BD%D0%B0, %20%D0%BA%D0%BE%D1%82%D0%BE%D1%80%D1%8B%D0%B5%20%D0%BF%D0%B5%D1%80%D0%B5%D0 %BC%D0%B5%D1%89%D0%B0%D1%8E%D1%82%D1%81%D1%8F%20%D0%BF%D0%BE%20%D1%81%D0%BF %D0%B5%D1%86%D0%B8%D0%B0%D0%BB%D1%8C%D0%BD%D1%8B%D0%BC%20%D1%80%D0%B5%D0%BB %D1%8C%D1%81%D0%B0%D0%BC%20%D0%B2%D0%B4%D0%BE%D0%BB%D1%8C%20%D1%81%D1%82%D0 %B5%D0%BD%D1%8B.%20%D0%9F%D0%B5%D1%80%D0%B5%D0%B3%D0%BE%D1%80%D0%BE%D0%B4% D0%BA%D0%B8%20%D0%BC%D0%BE%D0%B3%D1%83%D1%82%20%D0%B1%D1%8B%D1%82%D1%8C%20% D1%81%D0%B0%D0%BC%D0%BE%D1%81%D1%82%D0%BE%D1%8F%D1%82%D0%B5%D0%BB%D1%8C%D0% BD%D0%BE%20%D0%B8%D0%B7%D0%B3%D0%BE%D1%82%D0%BE%D0%B2%D0%BB%D0%B5%D0%BD%D1% 8B%20%D0%B8%D0%B7%20%D1%80%D0%B0%D0%B7%D0%BD%D1%8B%D1%85%20%D0%BC%D0%B0%D1% 82%D0%B5%D1%80%D0%B8%D0%B0%D0%BB%D0%BE%D0%B2.
%D0%94%D0%BE%D1%81%D1%82%D0%BE%D0%B8%D0%BD%D1%81%D1%82%D0%B2%D0%B0%20%D0%B8 %20%D0%BD%D0%B5%D0%B4%D0%BE%D1%81%D1%82%D0%B0%D1%82%D0%BA%D0%B8
%0A%D0%9C%D0%B5%D0%B6%D0%BA%D0%BE%D0%BC%D0%BD%D0%B0%D1%82%D0%BD%D0%B0%D1%8F%20 %D0%BE%D0%B4%D0%BD%D0%BE%D1%81%D1%82%D0%B2%D0%BE%D1%80%D1%87%D0%B0%D1%82%D0 %B0%D1%8F%20%D0%B8%D0%BB%D0%B8%20%D0%BC%D0%BD%D0%BE%D0%B3%D0%BE%D1%81%D1%82 %D0%B2%D0%BE%D1%80%D1%87%D0%B0%D1%82%D0%B0%D1%8F%20%D0%B4%D0%B2%D0%B5%D1%80 %D1%8C%20%D0%B8%D0%BC%D0%B5%D0%B5%D1%82%20%D1%81%D0%BB%D0%B5%D0%B4%D1%83%D1 %8E%D1%89%D0%B8%D0%B5%20%D0%B4%D0%BE%D1%81%D1%82%D0%BE%D0%B8%D0%BD%D1%81%D1 %82%D0%B2%D0%B0:
- %0A
- %D1%8D%D0%BA%D0%BE%D0%BD%D0%BE%D0%BC%D0%B8%D1%82%20%D0%BF%D1%80%D0%BE%D1%81 %D1%82%D1%80%D0%B0%D0%BD%D1%81%D1%82%D0%B2%D0%BE%20%D0%BF%D0%BE%D0%BC%D0%B5 %D1%89%D0%B5%D0%BD%D0%B8%D1%8F; %0A
- %D0%B2%D0%B8%D0%B7%D1%83%D0%B0%D0%BB%D1%8C%D0%BD%D0%BE%20%D1%83%D0%B2%D0%B5 %D0%BB%D0%B8%D1%87%D0%B8%D0%B2%D0%B0%D0%B5%D1%82%20%D1%80%D0%B0%D0%B7%D0%BC %D0%B5%D1%80%D1%8B%20%D0%BA%D0%BE%D0%BC%D0%BD%D0%B0%D1%82%D1%8B; %0A
- %D0%BE%D1%82%D1%81%D1%83%D1%82%D1%81%D1%82%D0%B2%D1%83%D0%B5%D1%82%20%D0%BF %D0%BE%D1%80%D0%BE%D0%B3; %0A
- %D0%BC%D0%BE%D0%B6%D0%BD%D0%BE%20%D1%80%D0%B0%D0%B7%D0%B4%D0%B5%D0%BB%D0%B8 %D1%82%D1%8C%20%D0%B1%D0%BE%D0%BB%D1%8C%D1%88%D0%BE%D0%B5%20%D0%BF%D0%BE%D0 %BC%D0%B5%D1%89%D0%B5%D0%BD%D0%B8%D0%B5%20%D0%BD%D0%B0%20%D0%B7%D0%BE%D0%BD %D1%8B. %0A
%D0%9A%20%D0%BD%D0%B5%D0%B4%D0%BE%D1%81%D1%82%D0%B0%D1%82%D0%BA%D0%B0%D0%BC %20%D0%BE%D1%82%D0%BD%D0%BE%D1%81%D1%8F%D1%82:
- %0A
- %D0%BF%D0%BB%D0%BE%D1%85%D1%83%D1%8E%20%D0%B7%D0%B2%D1%83%D0%BA%D0%BE%D0%B8 %D0%B7%D0%BE%D0%BB%D1%8F%D1%86%D0%B8%D1%8E; %0A
- %D0%BD%D0%B5%D0%BE%D0%B1%D1%85%D0%BE%D0%B4%D0%B8%D0%BC%D0%BE%D1%81%D1%82%D1 %8C%20%D1%81%D0%BB%D0%B5%D0%B4%D0%B8%D1%82%D1%8C%20%D0%B7%D0%B0%20%D1%87%D0 %B8%D1%81%D1%82%D0%BE%D1%82%D0%BE%D0%B9%20%D1%80%D0%B5%D0%BB%D1%8C%D1%81%D0 %B0; %0A
- %D0%BB%D0%B5%D0%B3%D0%BA%D0%BE%D0%B5%20%D0%BF%D1%80%D0%BE%D0%BD%D0%B8%D0%BA %D0%BD%D0%BE%D0%B2%D0%B5%D0%BD%D0%B8%D0%B5%20%D0%B7%D0%B0%D0%BF%D0%B0%D1%85 %D0%BE%D0%B2%20%D0%BC%D0%B5%D0%B6%D0%B4%D1%83%20%D0%BA%D0%BE%D0%BC%D0%BD%D0 %B0%D1%82%D0%B0%D0%BC%D0%B8; %0A
- %D0%BD%D0%B5%D0%BE%D0%B1%D1%85%D0%BE%D0%B4%D0%B8%D0%BC%D0%BE%D1%81%D1%82%D1 %8C%20%D1%82%D0%BE%D1%87%D0%BD%D0%BE%D0%B9%20%D0%BF%D0%BE%D0%B4%D0%B3%D0%BE %D0%BD%D0%BA%D0%B8%20%D0%B2%D1%81%D0%B5%D1%85%20%D1%8D%D0%BB%D0%B5%D0%BC%D0 %B5%D0%BD%D1%82%D0%BE%D0%B2%20%D0%BA%D0%BE%D0%BD%D1%81%D1%82%D1%80%D1%83%D0 %BA%D1%86%D0%B8%D0%B8. %0A
%D0%9F%D1%80%D0%B5%D0%B6%D0%B4%D0%B5%20%D1%87%D0%B5%D0%BC%20%D1%83%D0%B7%D0 %BD%D0%B0%D1%82%D1%8C,%20%D0%BA%D0%B0%D0%BA%20%D1%81%D0%B4%D0%B5%D0%BB%D0% B0%D1%82%D1%8C%20%D1%80%D0%B0%D0%B7%D0%B4%D0%B2%D0%B8%D0%B6%D0%BD%D1%83%D1% 8E%20%D0%B4%D0%B2%D0%B5%D1%80%D1%8C,%20%D0%BD%D1%83%D0%B6%D0%BD%D0%BE%20%D0 %BF%D0%BE%D0%B4%D0%B3%D0%BE%D1%82%D0%BE%D0%B2%D0%B8%D1%82%D1%8C%20%D0%BC%D0 %B0%D1%82%D0%B5%D1%80%D0%B8%D0%B0%D0%BB%D1%8B%20%D0%B8%20%D0%B8%D0%BD%D1%81 %D1%82%D1%80%D1%83%D0%BC%D0%B5%D0%BD%D1%82%D1%8B.
%D0%9C%D0%B0%D1%82%D0%B5%D1%80%D0%B8%D0%B0%D0%BB%D1%8B%20%D0%B8%20%D0%B8%D0 %BD%D1%81%D1%82%D1%80%D1%83%D0%BC%D0%B5%D0%BD%D1%82%D1%8B
%0A%D0%9F%D0%BE%D0%BD%D0%B0%D0%B4%D0%BE%D0%B1%D1%8F%D1%82%D1%81%D1%8F%20%D1%82 %D0%B0%D0%BA%D0%B8%D0%B5%20%D0%B8%D0%BD%D1%81%D1%82%D1%80%D1%83%D0%BC%D0%B5 %D0%BD%D1%82%D1%8B:
- %0A
- %D1%80%D1%83%D0%BB%D0%B5%D1%82%D0%BA%D0%B0,%20%D0%BB%D0%B8%D0%BD%D0%B5%D0% B9%D0%BA%D0%B0,%20%D1%83%D0%B3%D0%BE%D0%BB%D1%8C%D0%BD%D0%B8%D0%BA%20%D0%B8 %20%D0%BA%D0%B0%D1%80%D0%B0%D0%BD%D0%B4%D0%B0%D1%88; %0A
- %D1%8D%D0%BB%D0%B5%D0%BA%D1%82%D1%80%D0%BE%D0%BB%D0%BE%D0%B1%D0%B7%D0%B8%D0 %BA%20%D0%B8%D0%BB%D0%B8%20%D1%86%D0%B8%D1%80%D0%BA%D1%83%D0%BB%D1%8F%D1%80 %D0%BD%D0%B0%D1%8F%20%D0%BF%D0%B8%D0%BB%D0%B0; %0A
- %D1%88%D1%83%D1%80%D1%83%D0%BF%D0%BE%D0%B2%D0%B5%D1%80%D1%82; %0A
- %D0%B4%D1%80%D0%B5%D0%BB%D1%8C; %0A
- %D1%81%D0%B2%D0%B5%D1%80%D0%BB%D0%B0%20%D1%80%D0%B0%D0%B7%D0%BD%D0%BE%D0%B3 %D0%BE%20%D0%B4%D0%B8%D0%B0%D0%BC%D0%B5%D1%82%D1%80%D0%B0%20%D0%BF%D0%BE%20 %D0%B4%D0%B5%D1%80%D0%B5%D0%B2%D1%83%20%D0%B8%20%D0%B1%D0%B5%D1%82%D0%BE%D0 %BD%D1%83; %0A
- %D1%81%D0%B0%D0%BC%D0%BE%D1%80%D0%B5%D0%B7%D1%8B; %0A
- %D1%80%D0%BE%D0%BB%D0%B8%D0%BA%D0%BE%D0%B2%D1%8B%D0%B5%20%D0%BC%D0%B5%D1%85 %D0%B0%D0%BD%D0%B8%D0%B7%D0%BC%D1%8B; %0A
- %D1%81%D1%82%D1%80%D0%BE%D0%B8%D1%82%D0%B5%D0%BB%D1%8C%D0%BD%D1%8B%D0%B9%20 %D0%BE%D1%82%D0%B2%D0%B5%D1%81%20%D0%B8%20%D1%83%D1%80%D0%BE%D0%B2%D0%B5%D0 %BD%D1%8C; %0A
- %D1%84%D1%80%D0%B5%D0%B7%D0%B5%D1%80%D0%BD%D1%8B%D0%B9%20%D1%81%D1%82%D0%B0 %D0%BD%D0%BE%D0%BA; %0A
- %D0%BD%D0%B0%D0%B6%D0%B4%D0%B0%D1%87%D0%BD%D0%B0%D1%8F%20%D0%B1%D1%83%D0%BC %D0%B0%D0%B3%D0%B0%20%D0%B8%D0%BB%D0%B8%20%D1%88%D0%BB%D0%B8%D1%84%D0%BC%D0 %B0%D1%88%D0%B8%D0%BD%D0%BA%D0%B0; %0A
- %D1%81%D1%82%D0%B0%D0%BC%D0%B5%D1%81%D0%BA%D0%B0%20%D0%B8%20%D0%BC%D0%BE%D0 %BB%D0%BE%D1%82%D0%BE%D0%BA. %0A
Canvases can be made from the following materials:
- plain or laminated chipboard;
- strained glass;
- solid wood;
- combination of several materials.
The weight of the structure depends on the material of manufacture. To install sliding doors with your own hands, you need to select mechanisms based on this indicator. The material for the door leaf is selected based on the owner’s budget and the functional purpose of the door.
How to make sliding doors with your own hands?
To make glass partitions, you need skills to work with this material. If they are missing, you should contact a professional. To work with glass you need special tools that are expensive.
It is necessary to consider how to assemble a sliding door made of wood. This material is easy to process, stronger and more reliable, has better sound insulation, frame products weigh less than solid wood, and panels can be made if desired.
Design Features

Before starting work, you should draw up a diagram or drawing of the structure and indicate all the parameters. The design of sliding doors can have one or more leaves depending on the size of the opening. You can make a solid canvas or with panels of various materials. Depending on the weight of the structure, the door can be suspended or on roller mechanisms.
Sometimes a product is installed that slides deep into the wall. To do this, dismantle part of the partition and make a niche from plasterboard.
Preparatory work
Before making a sliding door with your own hands, you should prepare the material. Boards or bars must be processed with a plane and sanded sandpaper or a sander. You should also prepare a shield if you plan to have a hollow door inside. It is worth deciding in advance on the method of attaching the boards. Common connections are:
Measurements and markings
When making a door on rollers with your own hands, you must take into account that the door leaf should be several centimeters larger than the opening on each side. If the passage does not exceed 80 cm in width, then a single-leaf door is made. When the opening width exceeds 1 m, 2 panels are made. All dimensions are transferred to beams or boards.
Manufacturing
To make frame sliding doors with your own hands, you need to make a frame. Pre-prepared beams are cut according to the drawing. If the structure includes panels, in the inner part of the frame and lintels milling machine make recesses into which the inserts will be mounted.
The joints of boards or beams are coated with wood glue or PVA. Wood should be treated with an antiseptic to protect the material from rotting and the harmful effects of insects. Additionally, the structure is coated with fire retardants, which prevent the wood from quickly igniting.
To make a sliding door mechanism with your own hands, you will need:
- upper and lower guides along which the canvas will move;
- a wooden beam to which the top rail is attached;
- rollers and fastenings corresponding to the weight of the structure;
- clamps that prevent the web from coming out of the rails.
Paneled
First, a frame is made from solid boards or laminated veneer lumber. The cross members and the mullion are made from this material. On the inside, the timber is processed with a milling cutter, making a groove for the panels. If you make a shaped cut, you don’t have to use glazing beads. When it is planned to install the latter, the surface near the groove is made smooth.

Vertical and horizontal elements are connected to each other using a tongue and groove. The tenon is cut out in the transverse parts. It should fit into the groove up to half the width of the beam. The recess is adjusted to the dimensions of the tenon so that the parts fit tightly into each other.
The panels can be:
Inserts can be smooth or have a textured surface. In the second case, plywood or boards are used, which are processed with a milling machine. The edges of the product should be 1-2 mm smaller than the groove in the frame. This will allow the panels to move freely. When all the elements are ready, they are treated with antiseptics.
Assemble the entire structure on the table to avoid distortions. The joints are coated with glue. First, all the crossbars and panels are inserted into one longitudinal beam, then the second vertical beam is glued. The beads are installed after assembling the entire structure and are fixed with glue.
Panel
This structure can be solid, small-hollow or hollow. The first type consists of a frame and boards that are laid between the vertical elements. Hollow and shallow-hollow contain transverse elements that give rigidity to the entire structure.
First, a frame is made according to the size of the canvas. To do this, cut a beam with a section of 30x120 mm according to the drawing. The elements are connected to each other by fastening in half a tree or in a paw. The surfaces are coated with glue and clamped with clamps. It is necessary to ensure that the internal angles are 90°.

After the glue has dried, the joints are additionally secured with dowels. To do this, make holes of 7-9 mm and insert dowels pre-treated with glue into them. Then one side of the frame should be covered. The material chosen is plywood or fiberboard, which is cut to the size of the frame. The facing material is fixed with glue.
If the structure is solid, then the frame is filled with timber, pieces of MDF or other low-quality wood. All parts are glued together and additionally glued to the facing sheet. In the frame of hollow or hollow-core doors, cross members are installed, which are fixed with glue to the sidewalls and facing material. The second sheet is installed only after the glue has completely dried.
How to install a sliding door?
The installation of sliding doors may vary depending on the design features. Installation involves the following steps:
- doorway preparation;
- fastening guide elements;
- installation of the canvas;
- insertion of handles.
To ensure proper installation, you must follow the sliding door installation instructions exactly.
Preparing the interior opening
First of all, you need to prepare the opening. If the canvas moves along the wall, you should remove all protruding elements, level the surface, and fill the cracks. The canvas should move without obstacles. Since the design does not provide for luting, the walls are plastered. The opening should be as even and smooth as possible.
If you plan to install a sliding door inside the partition, you should dismantle part of the wall. To do this, increase the opening by the width of the door leaf, and then install a plasterboard niche. The partition should fit into the wall so that only a small part of the canvas remains, on which the handle is located.
Installation of guides
If the canvas is light, it is hung only on the upper guide. If the sash is made of wood and has a lot of weight, it must be fixed in the lower runners. Since the sliding door can be installed on 1 or 2 rails, it is necessary to consider both options.
To mount the upper guide, a canvas is placed against the opening. Measure the position of the door in the closed and open state. From the resulting line, step back 7 cm and draw a horizontal line. It determines the position of the beam on which the rail is attached.

The length of the beam must match the guide. It is placed so that the middle is exactly above the upper corner of the opening on the side of the open door. Then the guide profile is attached.
The upper runners are fixed using self-tapping screws. Then the carriage with rollers is assembled and inserted inside the guides. It is necessary to check whether the mechanism moves freely in the rail. Stoppers are installed along the edges of the guides to prevent the canvas from jumping out of the track.
The bottom groove is made using a milling machine. It should be 1-2 mm larger than the guide knife, and the depth should be 18 mm. If the design does not provide for a bottom rail, then a flag guide stopper is installed on the floor. It should fit into the groove in the door leaf. Its task is to limit the movement of the canvas and eliminate transverse vibrations of the sash from below.
Installation of the canvas
Installation of sliding doors is carried out after installing all the guides. First you need to install the mounting brackets. They are fixed with self-tapping screws to the upper end of the door, after making holes using a thin drill. The canvas is hung on the upper rail, and then inserted into the lower guide. The carriages with rollers are connected to the brackets so that the nut and washer are on top. Then the fasteners are tightened with a wrench. After checking the movement along the upper guide, the blade can be installed in the lower groove.

Accessories
Installation of sliding interior doors will be incomplete without installing fittings. For such structures, mortise handles and special locks are used. Locking devices are rarely installed, since the level of protection of such mechanisms is low. To make handles you will need:
- Ruler and pencil;
- milling machine;
- chisel and hammer;
- screws and a screwdriver.
First, mark the position of the handles. They are placed at waist level at a distance of 4-5 cm from the vertical edge of the canvas. The handles are applied to the door and outlined with a pencil. A recess is made to fit the thickness of the fittings using a milling machine or chisel. You can also use a drill with a core drill of the required diameter. A hole should be made on the bottom and top sides of the handle. The wood between the recesses is removed with a chisel or router.

To install sliding doors with a mortise lock, you need to make a hole in the end of the door with a drill. A locking mechanism is installed in the groove and closed with a special strip. Handle in in this case It is not a mortise bracket that is used, but a bracket. A recess is made in the opening for the counter plate. If the lock is padlocked, it is screwed with self-tapping screws to the door leaf.
To prevent dust from entering the room, special brush seals are attached to the lower end of the canvas. If the partition design includes 2 doors, special seals are additionally installed at the ends of the adjacent panels.
Installation of sliding doors should be carried out on high-quality roller carriages. Despite the high cost of the mechanisms, they significantly save money in the future. Cheap rollers quickly break down with frequent use and need to be replaced. High-quality carriages will last a long time.
The cheapest way to make a door leaf is from plain or laminated chipboard or MDF. This material You can decorate it to your taste. This can be done using varnish, paint, self-adhesive film, wallpaper or any other method.
For wooden doors You should choose material that has been dried in special cabinets. Otherwise, the structure may become deformed in the first months of operation, and then the frame will have to be redone.
Repair
Sometimes sliding door repairs may be necessary. A common failure is poor movement of the blade in the guides. To do this, you need to either adjust the roller or replace it. Sometimes debris gets into the guides, dust and dirt accumulate, which over time does not allow the mechanisms to move freely. To avoid this, you should clean the rails in a timely manner.
Instructions for installing sliding interior doors
In an effort to free up as much space as possible in a small apartment, the owners even remodel the door blocks. One of the smart solutions is to install a sliding interior door, the leaf of which rolls back behind the wall without forming a dead zone.

Features and Benefits
The main difference between sliding systems is the operating mechanism. Traditional hinges are replaced with rollers. The web moves along the rail. Rollers can be attached only to the top of the sash or simultaneously to the top and bottom. In the second case, the load is evenly distributed over two rails. The service life of the mechanism increases, but there is one drawback. The lower element often becomes clogged with dirt. If you don't clean it, the sash will jam.
It is not difficult to install interior compartment doors yourself. The main work consists of correct measurements, installation of the roller mechanism, guides, and hanging the door leaf. The door is suitable from solid wood, paneled, veneered, or any other material.
There are two types of sliding structures:
- the door goes behind the wall;

- the canvas goes inside the wall.

The second option is more convenient, but difficult to manufacture. The system involves the assembly of a pencil case installed instead of a partition.
The popularity of sliding structures is due to the large number advantages:
- saving useful space due to the absence of a dead zone;
- creating a beautiful modern style;
- simple installation;
- single-leaf or double-leaf design allows you to close an opening of any width;
- increase in service life door block due to uniform distribution of load along the rail.
Disadvantage is considered to reduce the level of sound insulation and tightness. A gap of about 5 mm is formed at the top and bottom of the door structure, through which extraneous sounds and odors penetrate into the room.
What is needed for installation?
Having decided to install compartment doors with your own hands, you need to know which ones you will need materials:
- Railing. It is a beam secured with anchors to the wall surface. Usually a wooden beam with a cross section of 50x50 mm is used. A rail is fixed to it.
- Mechanism. The set includes rollers, stops, guide blade, and rails.

- Accessories. For sliding systems, special mortise handles and locks are produced.

From tools You will need a drill, screwdriver, screwdriver, jigsaw, level, tape measure and pencil.
How to install sliding interior doors with your own hands?
The installation of sliding interior doors begins after the walls are leveled. The room must have a clean floor and the verticality of the doorway must be checked. If there is no floor covering, then its thickness is taken into account when taking measurements.
The main problem with how to install compartment doors is the difficulty of installing the top beam and rail. The railing must be perfectly aligned in level and height, fit tightly to the wall, and securely fixed with anchors.
Before the beginning installation work determine in which direction the sash will roll back. If there are two products, then provide free space on both sides of the opening.

The instructions for installing a sliding door consist of the following points:
- timber installation;
- rail fastening;
- assembling the mechanism and hanging the canvas;
- installation of accessories;
- decorative finishing of the opening.
Installation of timber
The beginning of the installation of compartment doors involves applying markings on the wall for the upper beam. The sash is leaned tightly against the opening. Taking into account the width of the rail and a gap of 5 mm, mark the boundary of the beam location on the wall. The canvas is set aside. A horizontal line is drawn along the mark.
For a right-opening sash, the beam is positioned so that its middle is above the right side of the frame. The level is set to horizontal. Holes are drilled in the timber and the wall and the upper beam is securely fastened with anchors.

Guide installation
When installing sliding doors, the top rail is screwed with self-tapping screws to the bottom plane of the beam. For convenience, it can be secured to the beam in advance. After fixation, rollers are inserted into the rail and driven to check for unhindered sliding.

If the installation of an interior compartment door involves bottom mount, then the installation of the guide is carried out in three ways:
- A groove is cut into the floor covering. The bottom rail for the rollers is immersed inside.
- The guide is fixed from above to the floor covering without cutting a groove. They close with a threshold on both sides.
- The guide is installed on the end of the lower part of the sash inside a pre-cut groove.
The third method is suitable if, instead of lower rollers, a guide knife is used, which simply holds the opening blade. The element is fixed to the floor covering.

How to assemble sliding doors?
Begin assembling the sliding door by installing the rollers. The location is chosen based on the manufacturer's instructions. The rollers can be installed at a distance from the edge of 1/6 of the sash width or directly on the edge. In the second option, the indentation is formed by mounting plates.
At the end, mark with a pencil the place for the rollers. You can pre-drill holes for free entry of hardware. The mounting plates are screwed with self-tapping screws no less than 70 mm long. Threaded supports and side covers are inserted into them. The roller platform is screwed onto the threads of the pins.

If sliding doors on rollers have a guide knife installed at the bottom, then a groove is made at the end of the leaf 2 mm wider than its thickness. The rail itself doesn't even need to be installed. The depth is usually between 10 and 18 mm. The groove is not selected for the entire width of the end of the blade, but a section without a slot of about 10 mm is left at the edges. These will be the limiters.
After assembling the mechanism, they begin to install the sliding door with their own hands on the prepared guides. The product is rolled along the rail to check its progress.
Installation of fittings
The final step in installing a sliding door with your own hands is the installation of fittings. It is more convenient to attach all elements before hanging the canvas. First you need to install a door limiter - a rubber shock absorber - into the runners. The sash is checked again for free movement, the places for the handles and the lock are marked, and the leaf is removed from the guide.

Grooves are cut for fittings. Wood cutting is usually done with a chisel. Drilling helps partly. After installing the handles and lock, the sash is hung back on the guide.
Finishing the opening
Once the installation of the hinged doors is complete, they begin decorating the opening with trims and trim. The elements give the structure a complete look. In order to hide the mechanism, an additional board is attached to the beam.

Care and operation
When using a sliding structure, it may be necessary to adjust the canvas if sagging is noticed. To eliminate the defect, remove the top panel. An adjusting screw is located on the roller. It must be scrolled while simultaneously checking that the sagging of the canvas is eliminated.
Caring for the sliding system involves cleaning the guides from debris. The rollers are lubricated and replaced when worn. The door closes smoothly. With sudden movements, the rollers may fly out of the guide.
How to remove a compartment door?
Methods for removing the sash depend on the type of sliding system. If there are rollers with one wheel on top and a guide knife on the bottom, then the blade is slightly raised so that the knife comes out of the groove. The bottom is pulled towards you. The canvas is lowered to the floor at an angle. At this time, the rollers should come out of the guide.
If there are double rollers at the top and bottom of the sash, then first unscrew the stops. The door leaf is simply rolled out of the guide. Premium sliding systems are equipped with a closer. The mechanism fastening is unscrewed only from the canvas. The closer remains hanging on the door frame.
The sliding system is convenient to use and easy to install. If you follow the operating rules, high-quality rollers will last for many years.
Installation of sliding interior doors - independent installation of a sliding door system
Few people want to have an apartment or house without interior doors. But almost everyone has thought about which doors between rooms are best to install. So that it’s both beautiful and functional, and doesn’t take up space.
This is exactly what sliding interior doors are - a slider (diverging, sliding, sliding to the side (into a wall, opening, pencil case) in one plane, i.e. doors that ride on rollers, slides on rails).

Sliding interior doors - pros and cons
From a constructive point of view, there are two types of interior doors:
1. Hinged interior doors.
 Hinged interior doors In this case, the door leaf is hung on awnings. Hinged doors are traditional and have proven themselves well. They give the room a rich look, but take up a lot of space, which leads to inconvenience in implementing interior solutions.
2. Sliding interior doors.
A modern solution that allows for more efficient use of room space.
Sliding doors are divided into two subtypes:
 Sliding doors built into the wall Built into the wall(in a pencil case) and working on the compartment principle.
Sliding doors hidden in the wall (sliding into the wall, recessed into the wall) have a mechanism that allows the door to be moved parallel to the wall.
The operating principle of sliding doors built into the wall is as follows: rollers are installed on the door leaf, and guides are installed on the doorway (the door will go into the wall) or above the doorway (the door will go behind the wall).
The rollers move along the guides, freeing the doorway for passage.
 Accordion sliding doors Accordion sliding doors.
They consist of small lamellas (wood or plastic), which, when moved, can significantly save space.
The principle of the device is interesting, but cheap options are not practical. Instructions for assembling and installing accordion doors are supplied by the manufacturer.
Material prepared for the website www.moydomik.net
Advantages of sliding doors:
- unusual, non-standard solution;
- absence of blind areas and problems with furniture placement;
- safety. The owner of sliding doors is not in danger of hitting the corner of the door in an unlit room (however, you need to be careful, children can stick their fingers between the wall and the door);
- such a door will not open with a draft.
Disadvantages of sliding doors:
- high installation cost. But by doing the work yourself, the costs are kept to a minimum and are no higher than when installing swing doors;
- poor insulation. The absence of obstacles to the penetration of noise, light, and odors can be eliminated by installing a felt gasket on the end of the door;
- difficulty in caring for the pencil case, i.e. the place where the sliding door goes with a hidden structure. This problem can be solved in two ways. Using a vacuum cleaner with the attachment removed, remove debris from the pencil case. The second option, more radical, involves removing drywall from one side of the wall. It should be noted that in a residential building, the vacuum cleaner copes with the task perfectly;
- difficulty of repair. When installing a sliding door yourself, you can buy several rollers in reserve to replace them if necessary.
Mechanism for sliding doors – sliding systems
![]() As you can see, the main difference between sliding doors and swing doors is their functioning mechanism, which determines the door movement options.
As you can see, the main difference between sliding doors and swing doors is their functioning mechanism, which determines the door movement options.
Thus, the sliding mechanism for interior doors can be:
1. In-wall (hidden mechanism). As the name suggests, this mechanism allows the door to move inside the wall. The system of such doors must be implemented at the stage of wall construction, because free space is created in the wall - a pencil case for a sliding door. Consequently, the wall becomes thicker by the width of the pencil case. This somewhat reduces the usable area, but it frees up the walls, near which you can install furniture, hang pictures or place flowers.


2. External (open mechanism). This sliding door system can be installed at any time, because... does not require rebuilding the wall. In this case, the door moves along guides along the wall. Therefore, you need to leave free space on one or both sides of the wall (depending on the number of sashes and the direction of their movement).
 Open (external) mechanism for sliding doors
It is worth noting that there are quite a lot of door movement options with an external mechanism (see diagram). What allows you to choose the best way for a specific room. Sliding doors consisting of four leaves deserve special attention. Here the internal doors open towards the external ones. This is especially important when you need to close a wide doorway or niche.
 Sliding door movement options
Guides for sliding doors
The last thing to consider before you start installing sliding doors is the guide rails (profiles) along which the door moves during operation. They can be placed on top or bottom, or on both sides.
- top guides. The most popular way. They should be used when the door leaf is light in weight. The guides located at the top last longer and are less susceptible to breakage;
- bottom guides. Rarely used on their own as they are easily deformed by simply being stepped on. In addition, the runners will need constant cleaning. And a door without an upper support will not slide smoothly;
- combined. Used when doors are heavy or for smoother opening.
Do-it-yourself installation of sliding interior doors
In this article we will look at how to install sliding interior doors with an external sliding mechanism.
1. Material
Knowing everything related to the types and mechanisms of door functioning, you can begin purchasing materials and preparing tools.
- the door itself (leaf, frame, trim);
- accessories (guide profiles (runners), rollers, handles, locks);
- timber 50x30 for fastening the guide.
- hardware for fastening;
- level;
- roulette;
- hacksaw with fine teeth;
- drill;
- chisel.
To prevent handles and locks from deforming the wall and damaging the wallpaper when sliding, it is worth installing hidden options, i.e. the ones that crash into the door.
2. Preparation
At this stage, it becomes clear where exactly the door will be installed and in which direction it will open. If two sliding doors are installed side by side, then you need to consider the convenience of opening them.
If necessary, the old door is dismantled, the doorway is brought into the desired condition and a door frame is installed, taking into account the gap between the door and the finished floor.
3. Interior doorway
- We determine the dimensions of the doorway - the height and width of the door are measured.
- The beam is installed. To do this, draw over the top edge of the box straight line. The distance from the box to the line is equal to the width of the guide. The timber is attached exactly to the line. In this case, the middle of the beam should be located above the right side of the interior door frame if the door opens to the right.
- Upper guide profiles for sliding doors are installed. The runners are installed on the timber and secured with hardware.
- The lower runners (rails) are installed. To do this, you can choose one of several options:
- a part of the subfloor (or parquet, laminate, tile) is selected and the lower guide is inserted there. The lower rollers will move along it;
- the guide is installed directly on the floor (parquet, laminate), and in order not to destroy it, a threshold is installed;
- installation of the guide knife. But, since the system of lower guides is rarely used, if necessary, a so-called packet knife is often installed. Its purpose is to hold the door and prevent it from deviating from the given direction of movement.
The threshold-free sliding door system allows the door to operate without destroying the floor covering (there is no need to lay rails). The mechanism works thanks to carriages with rollers on ball bearings, which move along guides with shock absorbers and a bottom liner. The upper guide is hidden behind a decorative trim, in the same color as the door.
4. Assembling sliding doors
We hang rollers (roller mechanism) on the upper end of the door.
At the bottom end, at a distance of 15 mm. Holes are drilled from both edges. A groove is selected between them along the entire length. Its width is 2 mm. exceeds the width of the knife. The depth is equal to the height of the knife and is usually 10-18 mm. The part of the end without a groove will act as a natural limiter for the door travel.
5. Installation of fittings for sliding doors
Installation includes installing handles and inserting a lock. This must be done carefully so as not to damage the appearance of the door. This procedure is often entrusted to specialists.
6. Installation of a sliding interior door
The door is installed in the guides. After the door has been moved, limiters (rubber shock absorbers) are inserted into the runners; they will not allow the door to “fall out” of the guides when opening and will soften the stop.
7. Decorative design of sliding doors
To make the doorway look beautiful you need to close everything structural elements. Platbands are used for this. They are installed on door frame and top runners.
But this is not a prerequisite, because often structural elements are an integral part of the solution. For example, when using high-tech or modern style.
The installed door in section will have the appearance shown in the diagram (drawing).
 Sliding door diagram
Instructions for installing sliding interior doors video
8. Care and operation of sliding doors
To ensure that doors do not create problems during operation, you need to properly care for them. To do this you need:
- avoid getting water on the door to prevent it from leaking (if the door is made of wood);
- keep the guides clean. Debris that gets inside the guides will cause the door to be difficult to close;
- close the door smoothly. Do not close the door with force, this will accelerate the wear of the rollers. In the worst case, the stopper may fall out and the door will “fly” out of the guides;
- Check the condition of the fittings from time to time. It is easier to replace the rollers in time than to deform the guide profiles over time;
- use special means for door and glass care.
Conclusion
Correct installation of sliding doors between rooms and timely replacement of components is the key to the long-term functioning of any door.