Making original toys - master class. DIY toy from scrap material: simple ideas Plant containers
Everyone was once a child. It’s even a little funny that things that we now consider garbage were then valuable to us. We diligently collected candy wrappers, jars, and boxes. We were a little envious of those who had more of this “good”. We haven’t been collecting these “treasures” for a long time, but our children... Although, as for the newfangled material - plastic bottles, not only children, but many adults today are seriously interested in it.
An article about DIY crafts made from waste materials will help both adults and children find useful uses for all these seemingly useless things.

Waste material
What is waste material? These are items that were used for their intended purpose and are no longer suitable.
What could become such a material? Anything:
- plastic and glass bottles
- boxes and boxes
- car tires
- parts of mechanisms that cannot be repaired
- bottle caps and caps
- candy wrappers
- old buttons
- paper towel tubes
- toilet paper tubes
- old newspapers
- other unnecessary things


There are an unimaginable variety of crafts on the theme of waste materials!
What is the benefit of waste creativity?
It's no secret that the world is on the brink of an environmental disaster. The more waste is recycled, the lower the height of the world's landfills will be!

It's cheap, beautiful and original! Garden accessories are quite expensive. A flowerpot made from an old bucket, decor from a broken clay pot, a flowerbed from a stylized tire, a border made from plastic bottles, an old bird cage with petunia inside, a table for seedlings from the tabletop of a non-working Singer sewing machine will cost you completely free.

Waste material in skillful hands can turn into absolute masterpieces! A bottle made using decoupage technique will be a wonderful gift. Decoupaged box - a beautiful box. A composition made from paper towel tubes, complemented by decor - a vintage pencil holder.

This material opens up endless horizons for children's creativity! No, no one is saying that now you don’t need to buy your child toys. It’s just that children really really like making crafts with their own hands. This has always been the case!

The Internet today is replete with photographs and master classes on crafts made from waste material. So there can be no shortage of ideas.

Garden decor
A DIY garden craft made from waste material can unexpectedly become the main decoration of the garden! Here's just one interesting idea!

If you are the owner of an old bicycle that cannot be repaired, you are already provided with one element of garden decor. Paint your bike your favorite color with shiny or matte spray paint. Securely install the former vehicle in the desired area of the garden. Attach or weld three baskets of different sizes - to the handlebars, rack and saddle.

Place three pots with blooming petunias in improvised flowerpots. An original and creative flower stand is ready!

Ladybug family
Waste material is a great option to organize more than one craft evening for children! This is just one drop from a whole sea of ideas.

You will need:
- six plastic bottles - one two-liter; two 1.5 l; two liter and one 0.5 l;
- wallpaper knife (only an adult can use it);
- three disposable dark brown plastic forks;
- candle and sheet of paper;
- flat brush and acrylic paints;
- artificial eyes for soft toys - 12 pieces.

Step by step process
Cut off the bottoms of plastic bottles with a wallpaper knife. Paint each bottom inside and out. All of them can be of different colors - red, yellow, orange, blue, green and light green. Dry. Place the bottoms with the outer sides facing up.

Ladybug heads can be anything from foam balls to balls of toilet paper or napkins. Trim the bottom of the ball, making it flat. Cut the back wall of the ball, which will later stick to the bottle, with a semicircular notch. Paint the balls black.

Place a sheet of paper on the table in front of you. Hold the tips of the tines of plastic forks over the candle flame for a few seconds. Bend the softened ends slightly, pressing them onto the paper. Cut the cloves from the base of the forks with scissors or bite off with wire cutters. These are blanks for antennae.

Glue the heads with the recess of the back wall to the bottom of the plastic bottle, placing them so that the flat bottom side of the head touches the plane of the table. Glue on the eyes. You can simplify the task and, instead of store-bought eyes, cut out circles from white paper and draw a black pupil with a felt-tip pen.

Poke holes in the heads for the antennae, drop a little glue inside, and insert the antennae. Add large black dots on the backs - be sure to do so in the most prominent places and wherever you like.


Did you know? In recent years, a technique called trash art has appeared and is actively developing. The English translation of “trash” is trash. Artists from different parts of the world create in this direction, wanting to attract the attention of caring people to the environmental crisis.

Next time, before throwing, think carefully. Maybe this is not garbage at all, but a wonderful idea for some masterpiece? It’s easiest to throw it away, but to create a piece of art... Enrich your collection of ideas by looking at a few more photos of crafts made from waste material.

Photos of crafts made from waste material


New Year's holidays are just around the corner, and everyone wants to transform their home, create an atmosphere of magic and comfort. Prices for decorations are rising every year, but this should in no way spoil the pre-holiday mood. There is a way out - a do-it-yourself toy made from scrap material. It is not necessary to have great skills in needlework: most of the options proposed in the article are available to anyone. The main thing is that such an item will be unique, inexpensive and will give a holiday today.
DIY toy from scrap material: paper
The most common option for decorating a room before the New Year is paper products. Everyone has encountered this type of needlework since early childhood. In addition to all kinds of paper snowflakes, you can make real toys to decorate a Christmas tree or room decor.

So it could be:

New Year's toys made of fabric
Toys made from fabric are very fashionable lately and incredibly beautiful. This simple method will not only help decorate the Christmas tree, but will also be a wonderful gift for dear people. All you need: fabric (preferably bright colors), needles and threads, filler (cotton wool, foam rubber, padding polyester or felt), decorative elements.
To make a toy with your own hands from scrap materials, you need to cut out two identical pieces of fabric of the required shape (Christmas tree, snowman, star, boot, etc.). Next, they should be sewn together with the right sides of the fabric facing out, after placing a little filler inside (depending on the desired volume of the toy). At the end comes the decoration with your favorite material (beads, ribbons, buttons). Be sure to sew a loop at the top of the product so that the toy can be hung.

New Year's toys made of threads
DIY Christmas tree decorations made from scrap materials can look very gentle and make the atmosphere in the house even more cozy. Regular threads (or knitting yarn) will help with this. You won't need anything else except glue. It can be:

DIY children's toys from scrap materials
New Year is the best time to please children. The best part about the preparation process is that a do-it-yourself toy from scrap material can be made with the help of the child himself. This game will doubly please the baby and leave him with an unforgettable impression of the holiday.
Making Christmas tree decorations from ordinary incandescent light bulbs can be a fun activity. To do this, you need to take a burnt out light bulb and decorate it with acrylic paints designed for working with glass. Most often they draw penguins - it's simple and the shape matches.

But you can get creative and depict a dog, deer, snowman, Santa Claus or Snow Maiden. The main thing is imagination. For realism, you can decorate the product with an imitation of a scarf, hat or a pom-pom nose, and glue paws made of cardboard.

You can also play with your child in making toys for the Christmas tree using regular puzzles. If your baby has one that he no longer uses, you can safely take it. If not, cutting out puzzle pieces from cardboard won't be too difficult. So, the puzzle pieces can initially be decorated to your liking and fastened together with glue. Stretch a thread or wire, and you are ready to make your own toys from scrap materials. The photo below shows this option.

Materials for toys from the kitchen
DIY Christmas tree decorations made from scrap materials can be even simpler. One option is to decorate cookie baking trays, which are found in every kitchen. Such metal molds of different shapes will ideally serve as the basis for a future Christmas tree decoration. This item can be decorated with sparkles, which are attached with glue, or pieces of broken glass toys, wrapped with multi-colored threads - the flight of imagination is not limited here. One of the recent ideas of needlewomen is to insert a photo into such a mold. To do this, you need to print them (small sizes), cut them along the contour of the shape and glue them into it. You will get an original decoration similar to a family tree.

Decorations with aromatherapy effects are another reason to go to the kitchen for materials. Such toys are a very stylish solution that will not only decorate the Christmas tree or home, but also fill it with a wonderful smell.
To do this, just dry thin slices of citrus fruits, attach cinnamon sticks to them using jute, decorate them with ribbons or sparkles if desired, and the toy is ready.

Christmas tree toys made from salt dough
An affordable way to create New Year's toys with your own hands from scrap materials is salt dough. For such preparations you will need: for 100 grams of flour - 100 grams of salt, 1.5 tbsp. spoons of vegetable oil, 75 ml of water. Add salt to the flour, then butter and, stirring constantly, pour in water. The resulting mass is rolled out (3 mm) and figures are cut out with a knife or cookie cutters. The resulting blanks are dried for 2-3 days in a warm place, for example on a radiator (but not in the oven).

Jewelry made from natural materials
A DIY toy made from scrap materials can be stylish and practically free. Such materials can include Christmas tree cones, tree branches, dry rose petals, and even moss or soil.
For example, to give the appearance of decoration to a pine cone, it needs to be covered with glitter, varnish or decorated with paint. You can create compositions of different shapes from branches using threads.
You can fill a transparent Christmas ball with other natural materials (petals, leaves, moss). This will create an original decoration.

Toys made from other materials
In general, creating a New Year's toy may involve using any available materials. These can be beads decorated into openwork snowflakes, crafts made from plastic bottles, nuts, any decorated small objects (for example, keys), compositions made from satin ribbons and much more.

The main thing in this is the festive atmosphere and the right mood. And the process of work itself can attract relatives and become a wonderful family tradition.
On competition “Second life of things” Photos and master classes on manufacturing are accepted , recyclable materials, household items, as well as your “life hacks” for non-standard use of various items in everyday life will be published on this page. Read more about the conditions of the 2019 competitions.

Gontsa Inna Yuryevna, head of the circle of the House of Creativity “Dyvosvit”, Ukraine, Kiev.


Sabirova Aigul Marselevna, MADOU “Kindergarten No. 211 of general developmental type”, teacher, Kazan.

Trushina Lidiya Sergeevna, 7 years old. BDOU "Kindergarten No. 95", Omsk.

Evdokimov Mark, 8 years old, MBUDO SUT association “Umelets”, Angarsk. Additional education teacher Natalya Nikolaevna Erygina.

Zavarykina Arina, 9 years old, MBUDO SUT association “Umelets”, Angarsk. Teacher Erygina Natalya Nikolaevna.

Trushina Lidiya Sergeevna, 7 years old. BDOU "Kindergarten No. 95" Omsk:


Karadin Maxim Aleksandrovich, 6 years old, Krasnoyarsk, MBDOU No. 24. Teacher Mikhovich Alesya Aleksandrovna.
Painting "Tree of Happiness".
The picture is made from:
- candy boxes,
- colored paper for background,
- buttons,
- beads,
- plastic sticks,
- glue.

On the box we glue a background made of colored paper and sticks - the trunk and branches of a tree.

We make foliage from buttons, attaching them with glue. We glue the beads to the tree for beauty. We glue buttons and beads where they are missing.


Crafts from waste materials. Photos
Works of 2019 participants
"Our dacha." Glushkov Kirill, 2a grade.
Plastic straws for drinks, plastic bottles, cardboard, polystyrene foam.


"Pie in the Sky." Garkushin Nikita.
The crane is made from halves of a plastic plate, a spoon, ice cream scoops and a chocolate egg tray.


"Waiting for the New Year holidays." Garkushin Nikita.
Two snowmen, Father Frost and Snow Maiden, are made from bottles of children's drinking yoghurt, decorated with tinsel and other improvised and natural materials.


"Autumn Tree" Kotova Ekaterina.
Often there are puzzles at home in which the details are lost. Don't rush to throw them away. They can be painted and turned into a painting.

"Owl". Nerobova Tatyana Borisovna.
The work is made of cardboard and egg packaging.


"Gift for teacher" Maria Adyeva.
The vase is made of waste and natural material.

"Autumn Tree". Tereshchenko Daria.
Made from old buttons.

"The family is a housewife." Khlamova Tatyana.
The domovyats are made using sewing techniques. Material used: linen, synthetic padding, bast, foamiran. The toys are stuffed with rags. They stand on a wooden stand.

"Horse". Nerobova Tatyana Borisovna.
The work is made from old jeans.

Ionina Ruslana. Hat: “Emerald Tenderness” is made of cardboard and flower wrapping paper.
The hat is just a sight for sore eyes!
Amazing!
What a miracle! It's so wonderful!
The product is unusual and beautiful!
The emerald color of the hat with gold threads symbolizes the beginning of autumn. A light veil looks like a flying cobweb - and this is one of the signs of autumn.
The hat is decorated with autumn leaves, which have already changed their color, and flowers, which at the beginning of autumn still lushly decorate the flower beds.

"Bunny". Krivtsov Vova.
The toy is made from a fur pompom from an old hat.
History of creation: I work as a teacher in a kindergarten and together with my son we are constantly making something. The idea to make a Bunny was born when we were going through old things and came across an old hat with fur pompoms. My son immediately got excited about the idea of making a “fluffy”. We started work that same evening. The child was given help in cutting out ears and carrots from felt, the rest was done independently.
Materials: fur pompom, felt, eyes, nose, satin ribbon, thread, glue gun, scissors.

"Owl." Mitrofanov Alexander.
An old fur hat, coffee, pistachio shells, white and black leather, padding polyester, wire and yarn.

"Herringbone". 3 A.
The Christmas tree is made from bottles of Borskoe mineral water. And decorated according to the imagination and ideas of the children.

“Christmas tree, live.” Gabdullin Vladislav Marselevich.
The work was made of metal tubes welded together. Then it was sent for painting, where it was powder coated. The final stage of decoration: was decorated with tinsel and toys. Then this “Christmas tree” went to kindergarten, where she gave the children a wonderful “New Year’s mood.” All the children were delighted, they really liked this “MIRACLE TREE”.


"Christmas Night". Romanova Elena Alexandrovna.
The work is made from a plastic bottle with a painted design.

DIPLOMAS 1st degree:
"Patchwork map of Spassky district." Mazankova Svetlana.
The panel is made using the patchwork technique. The canvas size is 3 x 1.5 meters.

"Gold fish". Shcherbakova Elena and daughter Christina.
The goldfish is made from waste materials.
Wood, wire, and a plastic bag helped create the effect of weightlessness for the fish, making it look like the fish jumped out of the water. The fish itself is made from the remains of plasticine, and the scales are made from old rusty buttons. The fins are made of a plastic bag.
The pedestal is made of wooden planks, covered with old napkins and PVA glue. And everything is painted with the remains of half-dried paints.
Our goldfish turned out incredibly beautiful and fabulous.

Box “Tenderness”. Timofeeva Anna Fedorovna.
The box is made of matchboxes, cardboard, paper with a pattern and decorative elements (beads, lace, flowers, etc.)


Tsybulko Alexey, 13 years old, State Public Institution SO YaO SRC “Mentor”, Yaroslavl region, Rybinsk.
Head: Nikolay Anatolyevich Tsybulko
Job: "Shinomishka". The bear is made from tires.

Alexandrov Semyon
Additional education teacher Natalya Nikolaevna Erygina
Job: "Electrified lunar rover". The basis is a can of Chinese noodles. Whatman paper scraps and paper clips are also used. Electrification using electrodes, wires, a switch and a battery.


Myshkin Aristarchus, 10 years old, MBU Secondary School No. 11, 4th grade, Glazov.
Head: mother Yugova Natalya Anatolyevna
Job: "Trono chair".
The work was made from 1.5 and 5 liter plastic bottles, we also used old disks and painted the top with paint from a can. At this job, Aristarchus learned to use a riveter, difficult, but strong and reliable. The bird's wings were made from yogurt cups, and a feather was cut into any shape.

Head: Ivanova Larisa Nikolaevna
Artwork: “Beach cocktail” from bags and cocktail straws.

Alexandrova Oksana Eduardovna, teacher of kindergarten No. 267 in Izhevsk. .
The car is made of tires, the seats are made of plastic for window sills;

The fox and bear are also made from tires.

Trap - a disposable cup, leftover polycarbonate, a kinder egg;


 Kolobok is a globe in the past.

"Sea Princess". Pashentseva Varvara.
The work was made from leftover wallpaper, disposable bags, and newspaper tubes. Accessories made from natural shells.


DIPLOMAS II degree:
The caterpillar is made from 5 lids from large mayonnaise buckets. Eyes are glued to one cap using Titan glue, and a nose is glued to the cap from a liter bottle. The mouth is cut out of a red plastic cap. The hairstyle is made from foam rubber cut into strips and collected with a ribbon. The foam rubber is glued with Titan glue. Attach clothespins to 4 lids to create legs. And all that remains is to ask dad to attach the caterpillar to the fence with self-tapping screws.

Spevak Maria Viktorovna, MOBU DO DDT "Raduga", teacher of additional education, Republic of Bashkortostan, Sterlitamak district. Job: “Panel “The Three Little Pigs”. The piglets are sewn using the stocking technique from old children's tights, the fence is made from ice cream sticks.

Pivneva Olga Alekseevna and her students:
Collage " Summer in the village"(Material: feathers, threads, ice cream sticks, colored foam rubber, fabric, braid).

Yurkasova Dasha, 10 years, MBUDO SUT Angarsk, association “Umelets”.
Head: additional education teacher, Natalya Nikolaevna Erygina.
Job: "Petya the Cockerel".


Denisova Ekaterina Alekseevna, 12 years old, MBOU Lyceum No. 165 named after the 65th anniversary of GAZ, Nizhny Novgorod.
Technology teacher Kochkina Marina Arsentievna
“Photo frame “Chocolate mood”. In my work I used chocolate wrappers, i.e. candy wrappers.

Parshakova Anna Teacher - Zhirnova Irina Anatolyevna.
"House for a Dwarf". The house is made from a plastic milk bottle, covered with colored napkins and decorated with paints.

Simdyanov Fedya, 11 years old, MBU secondary school No. 66, 4th grade, Tolyatti.
Head: Mom Simdyanova Olesya Vasilievna
“Cup for pencils and markers “Cat”. Craft from a painted plastic bottle.

Chmil Victoria, Savvy Alena, Malygina Anna, Pushkareva Ulyana, Belyaev Danil, Marakov Mikhail, Kirillov Makar, Ryzhkov Denis, Kuliev Danil, 5 years old, MADOU “Kindergarten No. 86”, Berezniki, Perm region.
Teacher - Zhirnova Irina Anatolyevna.
Job: "Tale "Teremok". The work is made from old disks, colored paper, cardboard, corks and clothespins.

Trushina Lidiya Sergeevna, 7 years. BDOU "Kindergarten No. 95", Omsk.
1. Work: Aliens from plastic jars, lids, packaging.

2. Work: Decorative things.
Panel: the base is a plate on which coffee beans are glued in a circle. In the center is buckwheat. A composition in the center of buttons, pasta, leather flowers, beads and needles. The vase is cut from a bottle. Pieces of disks and circles of twine are glued around the circle.
Lightning bolts, decorative coins, cords, cotton swabs, and decorative butterflies are glued onto the mug. The bouquet of flowers is made from pine cones, shells, disposable forks, and the vase is made from a yogurt jar.
Painted with spray paint, gold gouache and hairspray. Everything is glued with Moment and Titan glue.

"Robot "Wally". Alena Vorobyova.
The work is made from paper rolls, CD discs, plastic lids, candy wrappers, and Kinder egg boxes.
DIPLOMAS III degree:
Urtieva Ksenia Alexandrovna
Bytdaeva Elena Alekseevna, teacher
"Resonant rattles". The work used walnut shells and bottle caps.

Kotikova Maria Igorevna, 11 years old, School No. 27, Simferopol.
Head: Bannova Irina Mikhailovna.
Job: "Shell made from old napkins and a crumpled ping pong ball"

Soroka Anna Viktorovna, 6 years old, MADOU No. 19, Murmansk.
Job: "Silver cat".

Sobolev Sergey, 15 years old, State Public Institution SO YaO SRC “Mentor”, Yaroslavl region, Rybinsk.
Head: Zotova L.A.
"Merry Africa". The work is made from plastic bottles.

Sobolev Andrey, 13 years old, State Public Institution SO YaO SRC “Mentor”, Yaroslavl region, Rybinsk.
Head: Sharonova N.A.
Job: "Grandma next to grandpa". Made from nylon stockings.

Novikova Anastasia, 11 years old, State Public Institution SO YaO SRC “Mentor”, Yaroslavl region, Rybinsk.
Head: Efanova G.Yu.
Job: "Brownie". Made from washcloths.

Author of the work: Baiduletov Dauren, 13 years old, public educational institution "House of Creativity", r/n Lyubinsky, Omsk region.
Job: "Santa Claus". The work was done using the technique of weaving from newspaper tubes.

Author of the work: Marchenko Ulyana
Head: additional education teacher Tatyana Evgrafovna Nikitenko
Job: "Karkusha". The work is made using the papier-mâché technique from ordinary newspaper, the dress is leftover yarn.

Author of the work: Kruglova Anastasia, 14 years old, public educational institution "House of Creativity", r/n Lyubinsky, Omsk region.
Head: additional education teacher Tatyana Evgrafovna Nikitenko
Work: “Symbol of Beauty.”

Turbanova Arina Vadimovna, 9 years old, 3 “B” class MBOU secondary school No. 20, Voronezh.
Head: Primary school teacher Galina Evgenievna Nechaeva
Job: "The Pincushion Hat". At the base of the cap is a CD. Filling - cotton wool, fabric and for decoration - a flower from a hairpin.

Skripnikova Natalya. Made from plastic bottle caps snail. I glued the lids onto the cardboard with the reverse (back) side, the eyes - I took two large buttons. Now such a snail hangs on my wall.))

Dorofeev Anton, 10 years old, MBUDO SUT association “Umelets”, Angarsk.
Additional education teacher Natalya Nikolaevna Erygina
"Robot". Made from empty matchboxes.

Yeganyan Karen, 4 years old, MADOU No. 22 “Combined kindergarten”, middle group “Dreamers”, Kemerovo. Teacher Gorbunova Inna Viktorovna.
Job: “Nature (sour cream lids).”


Spiridonova Victoria
Job: "Aquarium". The work is made from an old disk and colored paper.

Zhulanova Appolinaria, 5 years old, Berezniki, Perm region. Head: Teacher - Tatyana Nikolaevna Soldatova.
Job: "White Tree" The work is made from napkins and cocktail straws, and the background is made from a candy box. 
Zhumaniyazov Dilshod, 4 years old, MADOU “Kindergarten No. 86”, Berezniki, Perm region. Head: Teacher - Tatyana Nikolaevna Soldatova.
Job: "Sea painting" The picture is made from an old disk and plasticine.

Gavrichenko Arseniy, 5 years old, MADOU "Kindergarten" No. 86, Berezniki, Perm region.
Head: Educator - Maria Ilyinichna Mineeva.
Job: "Traffic light"from a plastic bottle.

Loboda Arina Vadimovna, 4 years old, MBDOU “Kindergarten No. 5 “Khrustalik”, Yoshkar-Ola, junior group No. 10 “Izumrudik”, Yoshkar-Ola.
Job: "Maracas in hats." Crafts from Kinder egg containers.

Ivanov Arseniy Alexandrovich, 4 years old, MBDOU “Kindergarten No. 5 “Khrustalik”, Yoshkar-Ola, junior group No. 10 “Izumrudik”, Yoshkar-Ola.
Head: Bytdaeva Elenv Alekseevna, teacher
Job: " Funny rattles". Crafts made from branches, plastic balls and iron keys.

Pakin Mikhail Vasilievich, 4 years old, MBDOU “Kindergarten No. 5 “Khrustalik”, Yoshkar-Ola, junior group No. 10 “Izumrudik”, Yoshkar-Ola.
Head: Kuvikova Anna Vladimirovna, teacher.
Job: "Creative Drum" from a plastic jar.

Tretyakova Liza, 3 years, “City Educational Center for Psychological, Pedagogical, Medical and Social Assistance in Oryol”
Head: Additional education teacher Marina Viktorovna Golovina
Work: "Santa Claus". The work is made from a paint brush, artificial snow, acrylic paint, and buttons.

Participants' DIPLOMA:
Mingalieva Adela, 6 years old, MADOU "Kindergarten No. 211 of general developmental type", Kazan.
Head: teacher, Kulaeva Aidaria Talgatovna
Work: “Box-photo frame”. Materials: 1.5 l bottle, thermomosaic, glue, scissors.


Parshakova Anna, Chmil Victoria, Savvy Alena, Pushkareva Ulyana
Head: Educator - Zhirnova Irina Anatolyevna
Job: "Princess Frog". Flowers and a frog are made from plastic bottles.

Author of the work: Strzhelinsky Georgy, 8 years old, Municipal budgetary educational institution of additional education, Center for Children's Creativity "Krugozor", studying at the studio "Posadsky Souvenir", city of Sergiev Posad.
Work: “Young border guard and his faithful friend.” The work is based on plastic bottles. The bottles were decorated with papier-mâché and painted with acrylic paints.

Volodina Yulia, 9 years old, Municipal budgetary educational institution of additional education, Center for Children's Creativity "Krugozor". Studying at the Posadsky Souvenir studio, Sergiev Posad.
Head: Additional education teacher Tatyana Sergeevna Kotenko
Work: “Vase “Elephant””.

Author of the work: Panysheva Maria, 9 years old, Municipal budgetary educational institution of additional education, Center for Children’s Creativity “Krugozor”, student of the studio “Posadsky Souvenir”, city of Sergiev Posad.
Head: Additional education teacher Tatyana Sergeevna Kotenko
Work: “1. Vase "Heat - bird", 2. vase "Bird of Paradise".


Dolgikh Artem, Sherstobitova Daria, Dokshina Sofia, Ilinykh Ivan, 6 years old, MADOU “Kindergarten No. 86”, Berezniki, Perm region.
Head: Educator - Alekseeva Inna Gennadievna
Job: "Galaxy". The work is made from an old box, plasticine, beads, toothpicks and a jar of cream.

Zayakhaev Misha, 12 years old, MBUDO SUT association “Umelets”, Angarsk.
Head: additional education teacher Natalya Nikolaevna Erygina
Job: "Snake from IVs". The snake is made from used droppers, painted inside with gouache.

Author of the work: , 9 years old, 3rd grade, Tula region, Lanshinsky village.
Job: “A hat for a doll made from a sock". From an old torn sock with a good elastic band.
Cut off the upper part of the torn sock with a beautiful pattern and a good elastic band.
Tie with wool thread or ribbon at the cutting line.
The doll's hat is ready.

Pivneva Olga Alekseevna and her students:
Bouquet " A drop of summer." Materials: mayonnaise bucket, chocolate wrappers, disposable white cups, containers for shoe covers (the middle of a flower), cocktail tubes.

Eremich Fedor, 5 years old, MADOU No. 22 “Combined kindergarten”, middle group “Dreamers”, Kemerovo. Head: Belova Ksenia Viktorovna.
Job: "Kitty (napkins)"

Sherstobitova Daria, Dokshina Sofia, 6 years old, MADOU “Kindergarten No. 86”, Berezniki, Perm region. Teacher - Alekseeva Inna Gennadievna.
Job: " Summer tree." The wood is made from ceiling tiles and painted.

Zaitseva Polina, 6 years old, MADOU “Kindergarten No. 86”, Berezniki, Perm region. Teacher - Alekseeva Inna Gennadievna.
Job: "Mini topiary." The topiary is made from a yogurt jar, colored paper and a wooden stick.

Filatova Sofia, 4 years old, MADOU “Kindergarten No. 86”, Berezniki, Perm region. Educator: Yulia Borisovna Leontyeva.
Job: "Fruit Tree" The tree is made from an old disk, colored paper and cardboard.

Oil Daria, 3 years old, MADOU “Kindergarten No. 86”, Berezniki, Perm region.
.
Job: "Our traffic light".
The traffic light is made of a box and colored paper.

Nechaeva Polina, Petrova Alexandra, 6 years old, MADOU “Kindergarten No. 86”, Berezniki, Perm region.
Job: " Guard". The guard is made of a plastic bottle, colored paper and fabric.

Marakov Ivan, 3 years, MADOU "Kindergarten No. 86", Berezniki, Perm region.
Educator - Natalia Anatolyevna Kovtun
Job: "Traffic light".

Kirdyasheva Arina, 7 years old, 1st grade, Lanshinsky village, Tula region.
Application "Ballerina"

Author of the work: Kolesnikova Ekaterina Sergeevna, 17 years old, Municipal Budgetary Educational Institution “Secondary School No. 17”, Dzerzhinsk.
Work: “Hat - pincushion.” To make a pincushion, I needed the following: a piece of an old robe, a disk for the base, a hairspray cap and a padding polyester.


Podgornykh Irina Nikolaevna, MBUDO "DSHI No. 9 named after A.A. Alyabyev", Orenburg:
Job: “Vest in folk style (decorated with an old scarf and remnants of fur”

Job: “A pillow for the sofa. From an old dress of thick crepe de Chine fabric.”

Kulakova Arina, Lopareva Alena, Kurganov Vlad, Stepanenkova Vasilisa, Kovtun Svetlana, 3 - 5 years old, MADOU "Kindergarten No. 86", Berezniki, Perm region.
Educator - Natalia Anatolyevna Kovtun
Job: "Funny cats". The cats and the flower are made from toilet paper rolls, cardboard and colored paper.

Sherstobitova Maria, 4 years old, MADOU “Kindergarten No. 86”, Berezniki, Perm region.
.
"Gold fish". Applique from fabric scraps.

Novikov Ilya, 10 years old, State Public Institution SO YaO SRC “Mentor”, Yaroslavl region, Rybinsk.
Head: Elena Olegovna Koroleva
"Daisies". The flowers are made from plastic bottles.

Anoshkin Arseny, 4 years old, “City educational center for psychological, pedagogical, medical and social assistance of the city of Orel”, Creative workshop “Caramels”.
Head of PDO Golovina Marina Viktorovna.
Craft “Flower” from plastic lids and pasta.

Matviyuk Artem, 4 years old, MADOU “Kindergarten No. 86”, Berezniki, Perm region.
Educator: Yulia Borisovna Leontyeva.
« Funny toys". The toys are made from yogurt jars and covered with pictures.

Ivanov Timofey, Goryunov Vladimir, 6 years old, MADOU “Kindergarten No. 86”, Berezniki, Perm region.
.
Job: "Satellite". The satellite is made of a disposable syringe, paper and painted with silver paint.

Kirdyasheva Arina, 7 years old, 1st grade, Lanshinsky village, Tula region. Leader: Mom.
Job: A vase in an egg “coat”.


MADO "Kindergarten No. 86", Berezniki, Perm region:
Kharina Glafira, 3 years old, Teacher - Natalia Anatolyevna Kovtun
"Traffic light on a leg."

Skachkov Nikolay, 4 years old.
Educator - Yulia Borisovna Leontyeva
Craft “Sheep” from cotton swabs, clothespins and paper.

Nebozhina Valeria, 5 years old.
Educator - Yulia Borisovna Leontyeva
Work: “Pistachio tree”.

Dolgikh Artem, Ilinykh Ivan, 6 years old.
Teacher - Alekseeva Inna Gennadievna
Craft “Mushroom” from plastic bottles.

Alekseev Saveliy, 4 years old.
Teacher - Alekseeva Inna Gennadievna
Craft from “Dragon” CDs.


Lisyansky Svyatoslav Igorevich, 7 years old, 2nd grade, Lyceum No. 2 named after. V.V. Razuvaeva, Astrakhan.
Work: “Space rocket “Super Lightning”. The base of the rocket is an empty shampoo bottle. We wrap it with paper tape, paint it with paints, use shiny paper to make portholes, nozzles, an upper cone, and glue bottle caps to the bottom of the rocket.

Guzayarova Alsou, 6 years old, MADOU "Kindergarten No. 211 of general developmental type", Kazan.
Teacher Mingalieva Leysan Minnullovna.
head of the “Fantasy” circle Sabirova Aigul Marselevna
Work: “Vase “Inspiration””. bottle 0.5; scissors, thread, stained glass paints.

Sabirova Aizilya, 5 years old, MADOU "Kindergarten No. 211 of general developmental type", Kazan.
Head: teacher Rasima Sagitovna Bashirova
head of the “Fantasy” circle Sabirova Aigul Marselevna
Work: “Tree of Happiness.” Remains of beads, pieces of wire, plasticine, jar.

Bulgakova Kristina, 9 years old, MBUDO SUT association “Umelets”, Angarsk.
Additional teacher education Erygina Natalya Nikolaevna.
Work: “Baby Elephant”. A stand for stationery can be made from any box and scraps of cardboard and colored paper.

Dovletov Kirill, 5 years old, MADOU “Kindergarten No. 86”, Berezniki.
Teacher - Fokintseva Raisa Stepanovna.
Work: “The Beehive and the Bees.” The hive and bees are made from plastic bottles and painted.

Dautova Albina Gabdravefovna, MADOU "Kindergarten No. 211 of general developmental type", teacher, Kazan.
Work: “Fridge magnet “Ladybug”.
Materials: chewing gum packaging, magnet, 5 liter bottle cap, black varnish, Moment glue. Peel off the label and paint the head and black dots with varnish. Draw a stripe in the middle of the lid. We thread the lid inside the chew packaging. elastic bands and close them so that only the black stripe is visible. On the other side we glue a magnet. The craft is ready.

"City educational center for psychological, pedagogical, medical and social assistance in Oryol"
Creative workshop “Caramels”, Orel.
Teacher of preschool education Golovina Marina Viktorovna.
Danya Kamchatov, 5 years old, Work: “Organizer for a girl.” The work is made from toilet paper rolls and tape, glue, acrylic paints, lace, beads, plasticine, and coffee beans.

Moskvitina Ksenia, 6 years old.
Work: “Snowman “Tim”. The work is made from plastic disposable cups.

Bukhtiyarov Viktor, 4 years old.
Work: “Apple”. The work is made from fiberboard, lids, rice, glue, acrylic paints.

Soroka Alexander, 4 years old.

Toichkin Artyom, 7 years old.
Work: “Handicraft basket.” The work is made of glue, twine, flowers using the quilling technique, decorations: flowers made of fabric, ladybugs, pictures with bears.


Romashova Daria, 3 years old.
Work: “Magnet Hedgehog “Fedya”. The work is made of thick cardboard, plasticine, watermelon seeds, lids, home air freshener, glue.

Soroka Alexander, 4 years old.
Work: “Mood Tree”. The work is made of scrap paper, buttons, and beads.

Baranichenko Maria, 5 years old.
Work: “Easter card”. The work is made of thick cardboard, plasticine, coffee beans, and beads.

Kamchatov Danya, 5 years old.
Work: “Magnets “Maxim and Masha”.

If your kindergarten also hosts exhibitions on this topic, send your photos and we will publish them!
- “What is its developmental property? - I ask the seller about the orange giraffe with incredibly long legs.
“This is not just a soft toy, its paws are made of fabric of different textures, its nose squeaks, and its ears rustle, the baby’s hearing is developing,” answers the polite seller.
Does a child need educational toys?
When my baby was not yet born, I was already with trepidation choosing not only rompers and diapers for him, but also toys. Developmental, of course! Our grandmothers could not even think that dolls and shovels should not only entertain, but also develop a child, but now it’s a completely different time. And this is not surprising! In the age of advanced technology, adults think about child geniuses from the very cradle. The children's goods industry sensitively responds to this request, endowing an ordinary rattle with functions of intellectual development. Not many parents realize that the benefits of such “developmental toys” are exaggerated.
“It’s a paradox, but one toy can be educational for one child, but not for another. Every toy, even a simple rubber ball, even wooden blocks or simple plastic rattles, will be educational if the child is ready for this development. But a toy with the prefix “develops” sells faster and is more expensive,” a teacher at a children’s clinic told us.
A child develops every minute, even if there are no toys nearby, he can play with a pebble, a spoon, his mother’s hair, this is also development, and expensive toys often do not even arouse interest in children.
“I poured out a whole bag of toys for the child, and he chose... a bag!” - this is a very significant example.
And if there is no difference, why overpay and follow advertising? After all, you can create educational toys yourself, using the simplest available materials.
How are homemade toys useful for a baby?
Washing, ironing, cleaning, the husband demands attention, the child did not sleep all night... what toys could there be? When to do them? Let this become your kind of relaxation, organize a family craft project or hand the baby over to dad, and lock yourself in the kitchen and create!
Homemade toys are needed not only by the baby, but also by the mother! This is her little “relaxation”, because needlework is so calming. The little rattle will be full of your love, and, therefore, the baby will like it.
Why is it worth driving away laziness and making a toy for your baby with your own hands?
- Many useful toys are not sold in stores. For example, a sensory box that develops fine motor skills of a baby’s hands so well.
- The youngest children enjoy a new toy for only a few days, and then lose interest in it, but a handicraft mother can create “new items” every day.
- This is simply profitable, because a toy made from improvised materials costs hundreds of times less than a store-bought one.
So let's get started!
Top 7 DIY toys for babies
- Balls, bagels, balls!
- Beads-gnawers
- Octopus in half an hour
- A funny snake...from a sock!
- Ring with ribbons
Balls, bagels, balls!
Soft fabrics are good for tiny hands, so we create wool balls, fur balls and fleece bagels.
What to do with them? Roll it on the floor, taste it, throw it and hide it, crush it with tiny fingers.
How to do it? Wrap a cardboard circle in fleece fabric and stitch it along the seam. You can take the ball from any of your own supplies, securely hiding the edges of the threads. And the balls can be felted from ordinary wool.
Advice: To prevent the balls and balls from falling apart, wash them in hot water and soap. This will protect the baby if he decides to taste homemade products.
Baby sling beads - a toy for walking
If you love to walk your baby in a sling, but the little fidget doesn’t agree to sit in a “cozy nest,” then it’s time for mom to buy some beads for herself. And not simple ones, but baby sling beads - an accessory that will distract the baby in the store or in the clinic.

What should the baby do with them? Fiddle with, sort out, move the beads, “ring” them, try them on your hand, and try them “by tooth.”
How to do it? Not every mother can make this toy; crocheting skills are required. Beads of different sizes must be tied with a hook and collected on a thread in the traditional way.
Note! The threads should be strong, quite dense, at the same time not bright and only from natural materials, the best option is cotton.
At the end of the article, you can download the 10 best ideas for creating a children's orthopedic rug with your own hands.
Beads-gnawers
And these beads will be a real salvation during the teething period, because they are created specifically for gnawing on them.
What to do with them? Rustle in the mouth, relieving pain in the gums during teething.
How to do it? Assemble bead bracelets from wooden beads, following important rules:
- Beads must be of high quality! The best material is wood, but specially processed.
- The thread for stringing should be very dense so that the child cannot tear or bite through it.
- Choose beads made from unpainted wood so that your baby does not “eat up” harmful substances. Paint doesn't stick well to wood, so avoid painted parts.
Little trick: To make the beads even stronger and to prevent the beads from spinning, tie a tight knot after each stringed piece.
Octopus in half an hour
Create a baby doll without using thread and needle? Easily! Such pupae are usually called motankas, or octopuses. This toy will appeal to the smallest, even newborn babies.

What to do with it? Go through the funny tentacles, try to grab onto several tentacles at once.
How to do it? Cut out a cross with wide “petals” from fleece, cut each of the 4 petals into many narrow strips, put a little cotton wool in the center of the square and assemble the figure with an elastic band so that you get an octopus. Decorate it with button eyes, but sew them securely! And for greater safety, you can draw eyes. Weave braids from thin strips - the tentacles are ready.
A funny snake...from a sock!
Let’s immediately make a reservation that this toy can only be used under the supervision of parents, as it has small parts, even if they are firmly sewn. To create a fun snake, you will need a long sock.
What to do with it? You can put her in a crib or stroller, she will become your best friend for walks, and also develops fine motor skills.
How to make it? Prepare a regular sock, preferably even knee socks, but do not use worn socks. Stuff the sock with peas or wheat and sew the edge closed with a tight stitch. Decorate the snake with buttons, threads and ribbons.
Another simple sock snake can be worn on a leg or arm. Just sew button eyes to the sock and sew a mouth, move your hand and the snake will move funny.
Ring with ribbons
Even an older preschooler brother can make this toy for a baby, and it will only take mom five minutes to make it.
 What to do with it? Touch, pull, try patchwork ribbons, try to weave or untangle them.
How to do it? Tie several ribbons of different thicknesses and textures to a thick ring made of wood or plastic, use an “inverted” knot or stitch them.
The first rattles from improvised means
Don't throw away tubes and small bottles of pills or food, they can be used to create fun rattles!
What to do with them? The same as with any rattle.
How to make them? Fill small jars with pebbles, cereals, and shells. To make them more attractive. Wrap each one in fabric, creating a kind of “candy,” and secure the ends with threads.
Watch (free at)
We told you about the benefits of homemade toys for the youngest children. Now you can easily create cute rattles or baby slings for your baby. You'll see, they will delight your baby much more than even the most expensive store-bought "educational" toy.
Now we will reveal to you seven ideas for original toys for children over one year old, which you can just as easily create with your own hands.
Top 7 DIY toys for children over one year old
“I couldn’t even imagine that our child’s first homemade toy would help us open our own small family business. My husband and I created our own busy board for our son, then friends asked us to make a similar one, now orders are booked a couple of weeks in advance, and our home “carpenter” only has time to create busy boards,” says young mother Alena Demidova about her unusual idea for a family business.
What is a busy board, and what other homemade toys for children are especially popular today?
Entertaining busy board
A toy with such a funny name may interest a child under one year old, but its advantage is that a child of two years old will not get tired of it.

What is a busy board? It's a wooden board with lots of interesting gadgets attached to it. These can be sockets, zippers, locks, handsets and cords, bells, buttons, latch, and everything that can be twisted, pressed and pulled.
How to make it? Making it seems simple only at first glance; in fact, it is purely a man’s work. The board must be well processed so that the baby does not catch a splinter; it is better to cover it with safe varnish, but not paint! All attributes for children's fun must be held securely! Neither a nut nor a bolt should fall into the baby’s hands.
At the end of the article, you can download the 10 best ideas for creating a children's orthopedic rug with your own hands.
Fun lacing
There are a lot of traditional lacings sold in stores, but children often don’t play with them. But this activity is useful for little hands. Let's try to keep the little one busy with a homemade analogue.

What is lacing? This is an item with holes through which you can thread laces.
How to do it? This is a task for dad; he will spend no more than 10 minutes on such lacing. During your next walk, find a fairly thick twig, with a diameter of five or more centimeters. Hand it to dad, let him plan it, make it smooth, and then drill several holes in it from different sides. Thread a cord through one of the outer holes and secure it with a large knot.
Note! What you need is a cord with a hard tip so that your baby can easily get it into the holes.
Sensory boxes
Planting carrots in a garden bed, weeding potatoes, grazing cows - all this can be done using a sensory box. The child will be delighted, because he may have his own field, farm, or even a pond with sea inhabitants.

What to do with it? Play in the city or in the pasture, and also study colors by selecting all the filling elements of the same color. You can also bury caps or other small objects in the box and look for them with a spatula or handles.
How to make it? This is one of the simplest to play, but at the same time exciting games. Simply fill a large box with sand, cereal, dyed rice or peas. Choose a theme for your box and fill it with “villagers.”

Happy Peas
The concept of small and large will be easily understood by your child thanks to the pea pod, which you will fill with bright peas of your own production.
What to do with peas? This game is unable to captivate fidgets for a long time; it is rather a choice for calm and diligent guys. You can simply collect peas into a pod, or you can arrange them by color in accordance with the color of the pod.
How to do it? First, sew the “pod” itself with a zipper or ties. Then knit or felt colored peas of different sizes. Let the baby learn to assemble and remove them independently by unfastening the zipper.
Bottles with filler
Every child has played with plastic lemonade bottles at least once, but to turn empty pampering into an entertaining game, simply fill them.

What to do with them? Knock, rattle, watch how the liquid contents of the bottle overflow and the dry contents pour out.
How to do it? Fill clear plastic bottles with shells, colored water, sand, and small pebbles. The choice of fillers is limited only by your imagination.
Another interesting idea for making toys from a plastic bottle: sew a cover for the bottle in the shape of an animal, the lid will be a mouth, open the lid and feed the dog or cat with grains. Let the animal have a tail, ears and eyes!
There are still a lot of ideas for creating educational toys, we told you about the most popular ones, and what toys would you create?
It’s easy to create original toys from socks and leftover fabric. See how to sew a pillow toy, Basik the cat, and make a development board.
Original DIY toys made from socks

Delight your children by making these dolls for them. To do this you will need a little, namely:
- socks;
- threads with a needle;
- scraps of light plain yarn;
- filler;
- narrow braid;
- dark colored beads;
- scissors.
Even those who do not know how to use a sewing machine can make such original toys. Only possession of a needle will be useful.
- Cut the sock in half. One part is the foot. The second is the heel with an elastic band. You only need the first one. Fill it with filler, but not very tightly. Sew with a needle on the right and left to mark the sides. You also need to make legs by stitching at the bottom in the middle. Sew up the top hole through which the body for the baby doll was stuffed.
- Cut a small circle out of light fabric, gather it on a thread, tighten it a little, and stuff it with filler. Then you need to tighten the thread and fix it. Do not cut yet, but sew the resulting head to the body using the same thread.
- Sew beads instead of eyes. You can apply blush on your cheeks to make them brighter. Tie the junction of the head with the body with braid.
- Take the second part of the sock, cut off the heel, it will not be needed. You only need the top part - with an elastic band. Fold it in at the cut and sew along the edge on the arms. Put the cap on the doll’s head, sew it at the top so that you get a “tail” at the end.

To make such an adorable cat, you will need:
- 2 socks;
- threads;
- needle;
- scissors;
- padding polyester;
- Marker is better water soluble.
Sew the hole in a straight line to create two ears.

Using a marker, draw the facial features of the original toy.
If the marker is too bright or not water-soluble, then it is better to use a simple pencil.

Now you need to embroider according to these marks, taking a thread of the appropriate color.
In order for such original cat toys to acquire front paws, you need to make them from a second sock. To do this, first cut it in half crosswise, and then as in the photo.

Now these paws need to be sewn up, stuffed with padding polyester, and sewn to the body of the toy.
This is such a wonderful animal. If you like him, make him a friend.
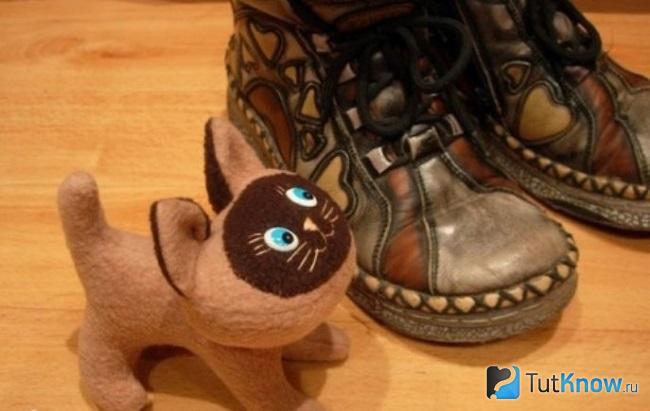
DIY soft toy cat

This character is very similar to the cartoon character. The pattern clearly shows how such a soft cat toy is made. It will require:
- soft dense fabric of beige and dark brown color;
- filler;
- threads;
- eyes for toys.
- Cut out two parts of the abdomen and stitch them in the center. Two side pieces need to be sewn on the back. You have 2 parts. Sew them together in the area of the paws, tail, and sides.
- Using the appropriate parts, create the kitten's head. Cut out his muzzle from a dark cloth and sew it onto the character’s face. Fill your head with filler through the bottom. Place it around the kitten's neck and sew it with a hidden seam on the arms.
- Each ear consists of two parts - brown and beige fabric. These triangles are sewn in pairs and turned inside out through the as yet unsewn bottom. Then the ears need to be sewn to the head, making a fold on them.
- All that remains is to sew on the eyes, embroider mustaches, eyelashes, mouth and nose with light threads, and the soft toy, which is so interesting to create with your own hands, is ready.
How to sew an original pillow toy?
Kids love these items very much. They first play with these soft toys, then when they get tired, they use them as cozy pillows.

Before sewing a pillow toy, prepare:
- fabric that is pleasant to the touch;
- filler;
- scissors;
- pink fabric for decoration.
- 2 pcs. for the head;
- 4 - for the ear;
- 2 - for the body;
- 2 - for 2 tails;
- 2 - for ear pad.
Stuff the body and tail with stuffing. Sew the tail to the body, where the markings are. Stitch the head, after filling it with a small amount of filler. Attach the pad to the ear with pins, stitch it, tucking the edges. Design the second ear in the same way.
From pink fabric, cut out a nose, a heart, and decorations for the tail. Sew them on too. It turned out to be a wonderful product. If you want to know how to sew a pillow toy so that it looks like a funny teddy bear, then watch another master class.
For this you will need:
- beige and white fabric;
- a piece of black leather;
- filler;
- threads;
- needle;
- scissors.

As you can see, they are oval, straight on the underside. Sew the pieces in pairs. Sew a light face and a black nose onto the front of the bear. To make it, cut a small circle out of leather, gather it on a thread, and stuff it with filler. Sew toys onto your face.

Now fold the front and back right sides together, placing the sewn tabs between them. Sew along the edge, leaving a gap. Turn the workpiece out through it. Fill it with filler and sew up the hole.
You can make such original toys from leftover fabric. If there is a solid color, you will get the muzzle of a dog and a cat, and if you have a colored one, you will get their bodies.

The following pattern will help you sew a toy pillow in the shape of an owl. It is created from the main fabric, and from colored fabric - a beautiful bird skirt.

If you want your child to like the toy even more, then sew small owls too. Sew a wide strip of fabric onto the owl's belly and stitch it vertically to create pockets. Place the owls in them. To keep them well, cover them with the wings of the mother bird. Button them up.

Pompom toys
They turn out warm and cozy.
To make them you will need:
- cardboard;
- pencil;
- round templates with a diameter of 2.5–7 cm;
- multi-colored yarn;
- sharp scissors;
- felt;
- glue gun

Using the lids, draw circles. Place coins of a smaller diameter in the center and outline them. Cut out the resulting cardboard rings. Make a cutout on the side of each.

Combine two pieces of cardboard of the same size. Wind the yarn tightly around them. Separate the cardboard. Cutting the yarn in the center, insert the thread in the middle, tighten it, and tie it.

For each animal you need to make two pompoms of different sizes. The smaller one will become the head, the larger one will become the body.

Connect these elements by tying them with threads. Cut out ears, eyes, nose for a charming animal, attach them with a glue gun.

The sheep is made from white threads, the eyes are cut out from black fabric, the nose from pink, the ears from white.

Create a chicken using yellow pompoms.

These are the original toys you can make with your own hands.

If you have kids at home, make useful things for them from leftover materials.
Original DIY educational toys

Soft books are an indispensable thing for a baby. It is interesting to make such developmental aids with your own hands, thereby saving a lot of money. To make such educational toys, you will need:
- textile;
- threads;
- scissors;
- sheet filler;
- finishing elements.
If you don't have a sewing machine, hand stitch each sheet using a basting stitch, using long stitches.
Do the same for the rest of the pages. Everyone should teach their child something. You can sew a sneaker onto one and attach a lace to it so that the child can practice tying it.
Let the girl learn how to braid her hair. To do this, sew three ribbons onto the top of the page.
It is useful for a child to become familiar with watches. Cut a circle from a light thick fabric and sew numbers to it. Cut out the clock hands from dark canvas. Secure them in the center of the dial.
To help your child learn geometry from an early age, cut out various shapes from scraps and sew them onto a book. The same pairs need to be created from fabric and Velcro attached to them. The baby will look for paired figures and compare them.
Instead of sewing a book, you can attach geometric shapes to a thick drape and let the child find pairs for them.

If you have cardboard boxes, use them to make a whole car complex for the boy, which will include:
- washing;
- gas station;
- garage;
- riser.

Cars can be made from the same material. You will make them from wood and plywood.

DIY educational board

You won't get bored with this toy! After all, there are so many interesting things here, you can scroll through the telephone dial, learn how to lock and open a real lock. Now you don’t need to click the door chain or the latch, since it will all be on the board. An abacus will help your child learn to count, and scales will help your child learn to weigh objects.
To make such “smart” original toys with your own hands, you will need:
- door lock, latch, chain, handle;
- abacus;
- scales;
- switch;
- buttons;
- textile;
- elastic bands;
- switch;
- glue gun;
- colored cardboard;
- self-tapping screws;
- MDF sheet;
- sneakers, etc.
- Lay out the items on the prepared board. See how to position the lock so that it closes well. The same applies to the latch and door chain.
- Screw one half of the lock to one plank with self-tapping screws, and the other and the door handle to the second. In the same way, attach these boards to the MDF.
- To keep the abacus in working condition, you can rattle it with “knuckles”; attach only the frame to the board.
- Glue scales, key holder, and other items using hot gun silicone rods. Cut out the base of the phone from cardboard, glue it to the board, and secure the dial in the center.
- Cut out a small dress from fabric, sew buttons and elastic into it in the form of loops. Let your child learn to unbutton and button clothes.
You can use various items that you have at home to decorate the development board.
Original toy - cat Basik
This toy is loved by both children and adults. The cute cat is made from a material that is pleasant to the touch.

If you want to quickly create such an original toy, then use a simple pattern.

At the bottom of the back and tummy you need to make an undercut, then these parts will become more voluminous.
On the Basik pattern, the undercut locations are indicated by triangles. You just need to match the opposite sides of each shape and stitch on the wrong side.
- The muzzle consists of two identical parts, cut in a mirror image. They need to be connected by stitching in the center.
- For each paw you need to cut out 2 pieces. In total, you will need 4 parts for the hind legs and the same number for the front legs.
- Sew the paired pieces on the wrong side, leaving the top unsewn. Turn the paws inside out and fill them with filler. Sew the muzzle to the tummy.
- Here's how to sew Basik further. To assemble this original toy, place the front part on the back part, place the front and back legs between them, placing them in place. Turn the toy inside out through the hole left at the bottom.
- Stuff the animal with a small amount of stuffing and sew up the hole in the arms.

Here are the paws and toes. Don't forget to sew a tail on the toy. It is given on the pattern.

Sew a fish from a piece of colored fabric and place it in Basik’s paws.
You can dress up the cat at your discretion; clothes for Basik are also not difficult to sew.

If this is a winter option, a hat with earflaps and a scarf will do. You will sew the first one from the remnants of fur, and knit a scarf from yarn.
Here are some original toys you can create with your own hands. Choose the ones you like and start crafting. And to simplify the process of creating new things and get ideas for inspiration, watch the selected videos.